> ## Documentation Index
> Fetch the complete documentation index at: https://hc.saas-manager.biz.nuro.jp/llms.txt
> Use this file to discover all available pages before exploring further.
# Microsoft Entra ID (Azure AD)
> Integration setup steps for Azure AD.
## Supported Features
Account Deletion Account Deactivation Account Provisioning Employee Master Integration Identity Provider Integration
## Integration Setup
Global Administrator privileges are required to set up the integration.
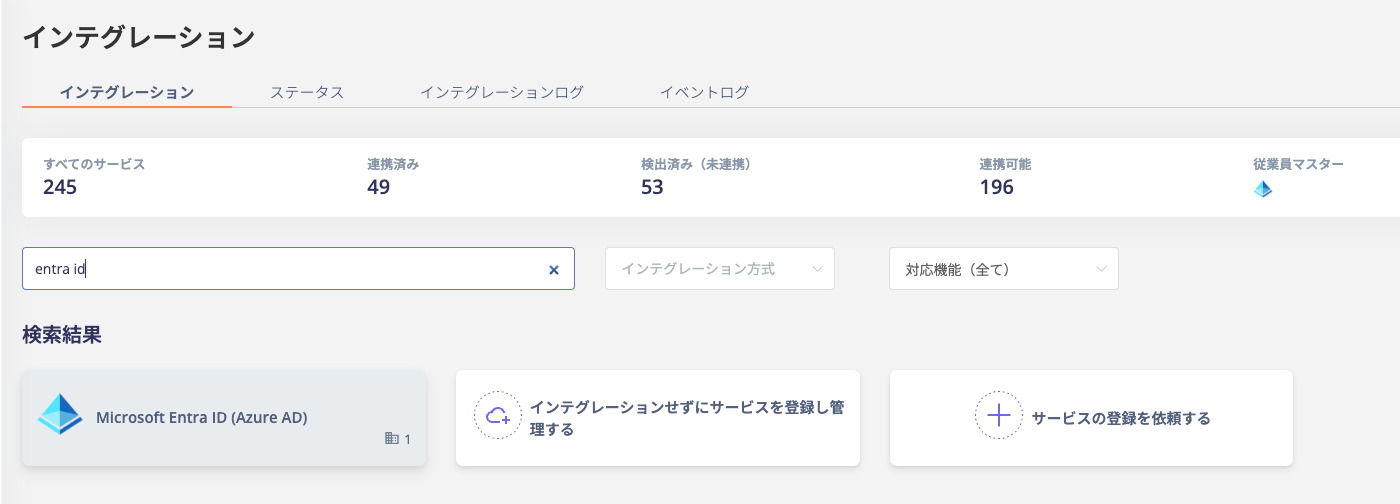
1. In the Admina Integration screen, search for **Microsoft Entra ID** and click on it.
 2. Select one of the following options from the dropdown menu and click **Integrate**.
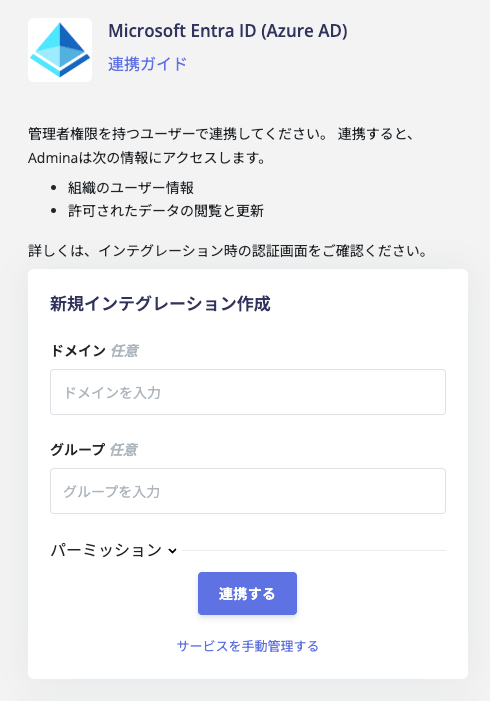 * **Read and Write (Recommended)**: Supports account deactivation and provisioning features.
* **Read Only**: Allows read-only access to accounts.
**Integrating with Specific Groups**
You can specify particular groups for integration. Obtain the object ID from Entra ID and enter it in the groups field.
To specify multiple groups, use comma-separated group IDs without spaces (e.g., `groupID1,groupID2`).
* **Read and Write (Recommended)**: Supports account deactivation and provisioning features.
* **Read Only**: Allows read-only access to accounts.
**Integrating with Specific Groups**
You can specify particular groups for integration. Obtain the object ID from Entra ID and enter it in the groups field.
To specify multiple groups, use comma-separated group IDs without spaces (e.g., `groupID1,groupID2`).
 **Integrating by Domain**
Entering a domain allows you to integrate only accounts from that domain (e.g., i.moneyforward.com accounts only). Accounts outside the specified domain will not be retrieved, making this option suitable for initial verification. To integrate all domains, leave the field **empty** and click **Integrate**.
3. You will be redirected to the Entra ID login page. Enter your Global Administrator **email address and password** and click **Login**.
**Integrating by Domain**
Entering a domain allows you to integrate only accounts from that domain (e.g., i.moneyforward.com accounts only). Accounts outside the specified domain will not be retrieved, making this option suitable for initial verification. To integrate all domains, leave the field **empty** and click **Integrate**.
3. You will be redirected to the Entra ID login page. Enter your Global Administrator **email address and password** and click **Login**.
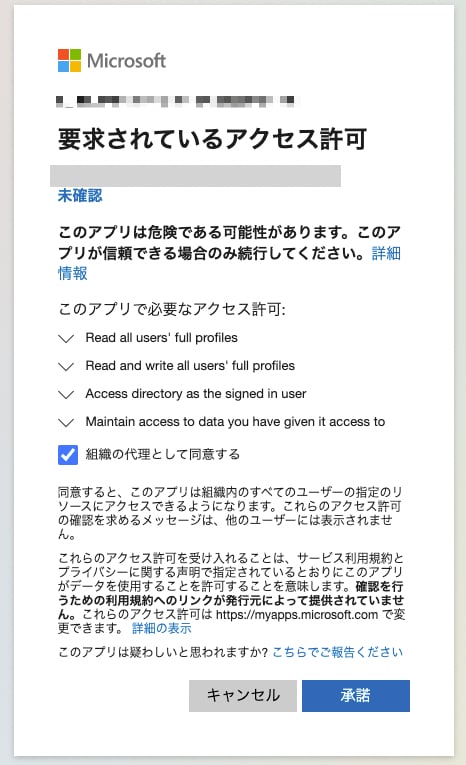
 4. After logging in to Entra ID, a permissions request will appear. Review the requested permissions and click **Accept**.
 Upon successful integration with Entra ID, registered user information will appear in the account list.
If the integration is not completed successfully.
Click **Edit** from the Status tab in the Integration screen and try again.
If the issue persists, please contact us via chat.
For an overview of the Entra ID integration, see the [integration page](http://admina.moneyforward.com/en/integrations/microsoft-entra-id).
Upon successful integration with Entra ID, registered user information will appear in the account list.
If the integration is not completed successfully.
Click **Edit** from the Status tab in the Integration screen and try again.
If the issue persists, please contact us via chat.
For an overview of the Entra ID integration, see the [integration page](http://admina.moneyforward.com/en/integrations/microsoft-entra-id).