> ## Documentation Index
> Fetch the complete documentation index at: https://hc.saas-manager.biz.nuro.jp/llms.txt
> Use this file to discover all available pages before exploring further.
# Google Cloud Platform
> Steps to integrate with Google Cloud Platform. This guide covers everything from logging in as an administrator to completing the integration with MoneyForward Admina.
## Supported Features
Account Deletion Account Provisioning
## Integration Overview
There are two integration methods for Google Cloud Platform: OAuth and API Key. Review the features below and choose the method that best fits your management needs.
| Available Actions / Integration Method | OAuth (New) | API (Old) |
| -------------------------------------- | --------------------- | --------------------- |
| **Integration unit** | All projects in bulk | Per project |
| **Administrator** | Account administrator | Project administrator |
| **Supported actions** | User sync, deletion | User sync only |
## OAuth Integration (New: Recommended)
### Prerequisites
#### Logging In to Google Cloud Platform
Go to the [Google Cloud Platform login page](https://accounts.google.com/signin/v2/identifier?service=cloudconsole\&passive=1209600\&osid=1\&continue=https%3A%2F%2Fconsole.cloud.google.com%2F%3Fhl%3Dja%26pli%3D1\&followup=https%3A%2F%2Fconsole.cloud.google.com%2F%3Fhl%3Dja%26pli%3D1\&hl=ja\&flowName=GlifWebSignIn\&flowEntry=ServiceLogin) and enter the email address and password of an administrator account.
#### Enabling the Cloud Resource Manager API
1. After logging in to Google Cloud Platform, create a project or navigate to the **project you want to integrate**.
2. Go to **APIs & Services** > **Enabled APIs & Services** and click **Enable APIs and Services**.
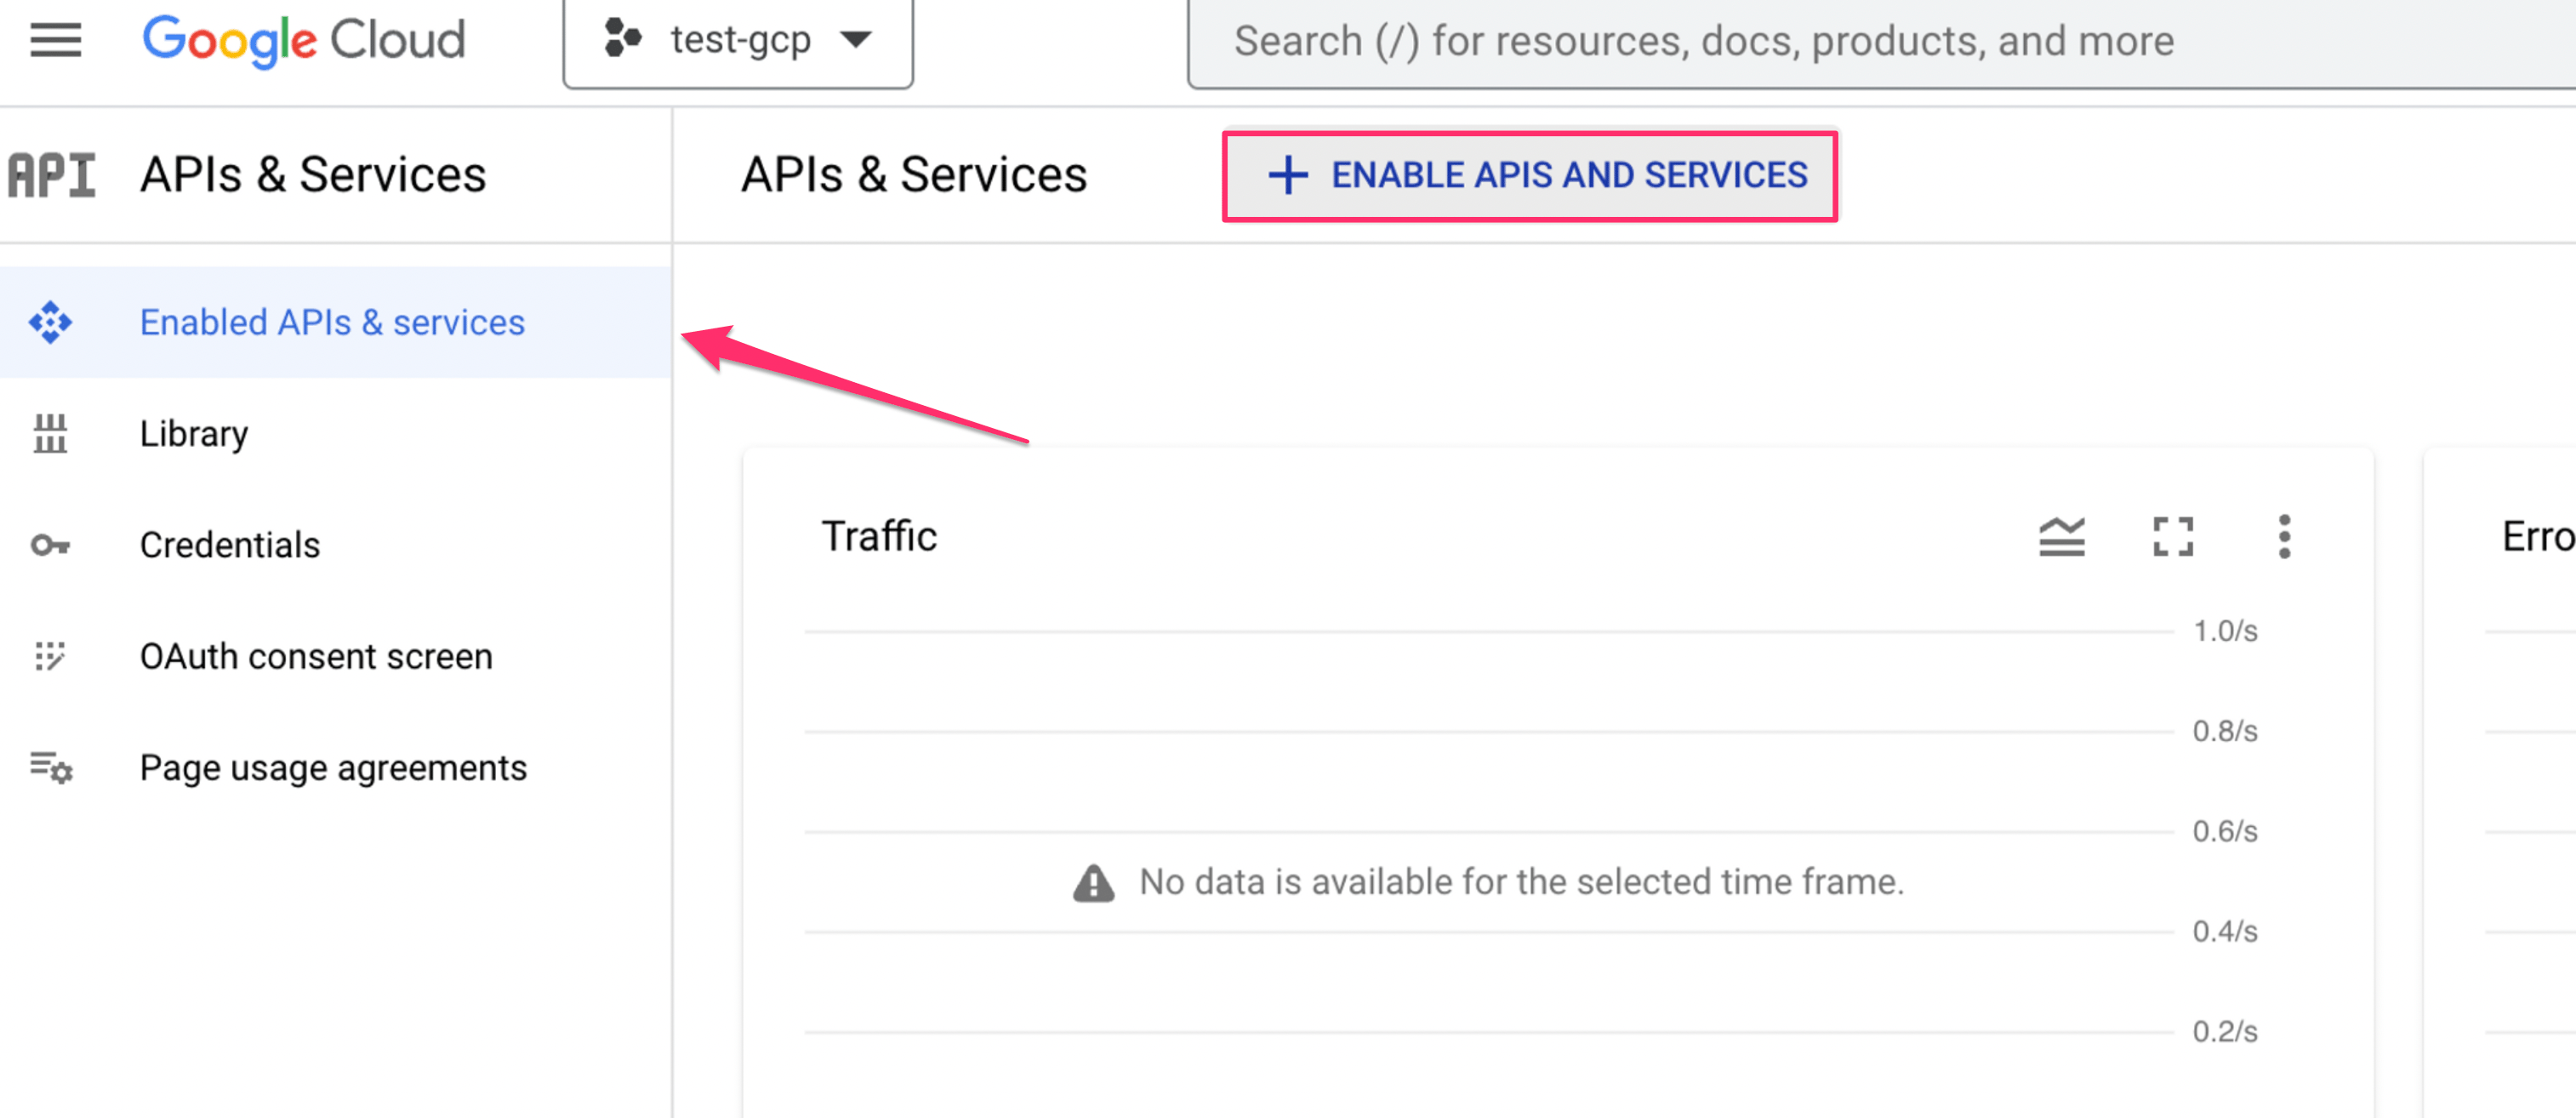 3. Search for **Cloud Resource Manager API** and click **Enable**.
 #### Creating an OAuth Application for Integration
4. After logging in to Google Cloud Platform, go to **APIs & Services > OAuth consent screen**.
5. Select `Internal` for the User Type and click **Create**.
If you see "Error 403: org\_internal" and the integration fails, create with User Type `External`.
#### Creating an OAuth Application for Integration
4. After logging in to Google Cloud Platform, go to **APIs & Services > OAuth consent screen**.
5. Select `Internal` for the User Type and click **Create**.
If you see "Error 403: org\_internal" and the integration fails, create with User Type `External`.
 6. Enter the application name (e.g., Admina), user support email, and developer contact email in the app information, then click **Save and Continue**.
7. Click **Add or Remove Scopes** and add one of the following Scope URLs. The image shows an example scope configuration for Read & Write.
* **Read & Write** (to allow user sync and deletion): `https://www.googleapis.com/auth/cloud-platform`
* **Read Only** (to allow user sync only): `https://www.googleapis.com/auth/cloud-platform.read-only`
6. Enter the application name (e.g., Admina), user support email, and developer contact email in the app information, then click **Save and Continue**.
7. Click **Add or Remove Scopes** and add one of the following Scope URLs. The image shows an example scope configuration for Read & Write.
* **Read & Write** (to allow user sync and deletion): `https://www.googleapis.com/auth/cloud-platform`
* **Read Only** (to allow user sync only): `https://www.googleapis.com/auth/cloud-platform.read-only`
 After adding the scope, click **Back to Dashboard**.
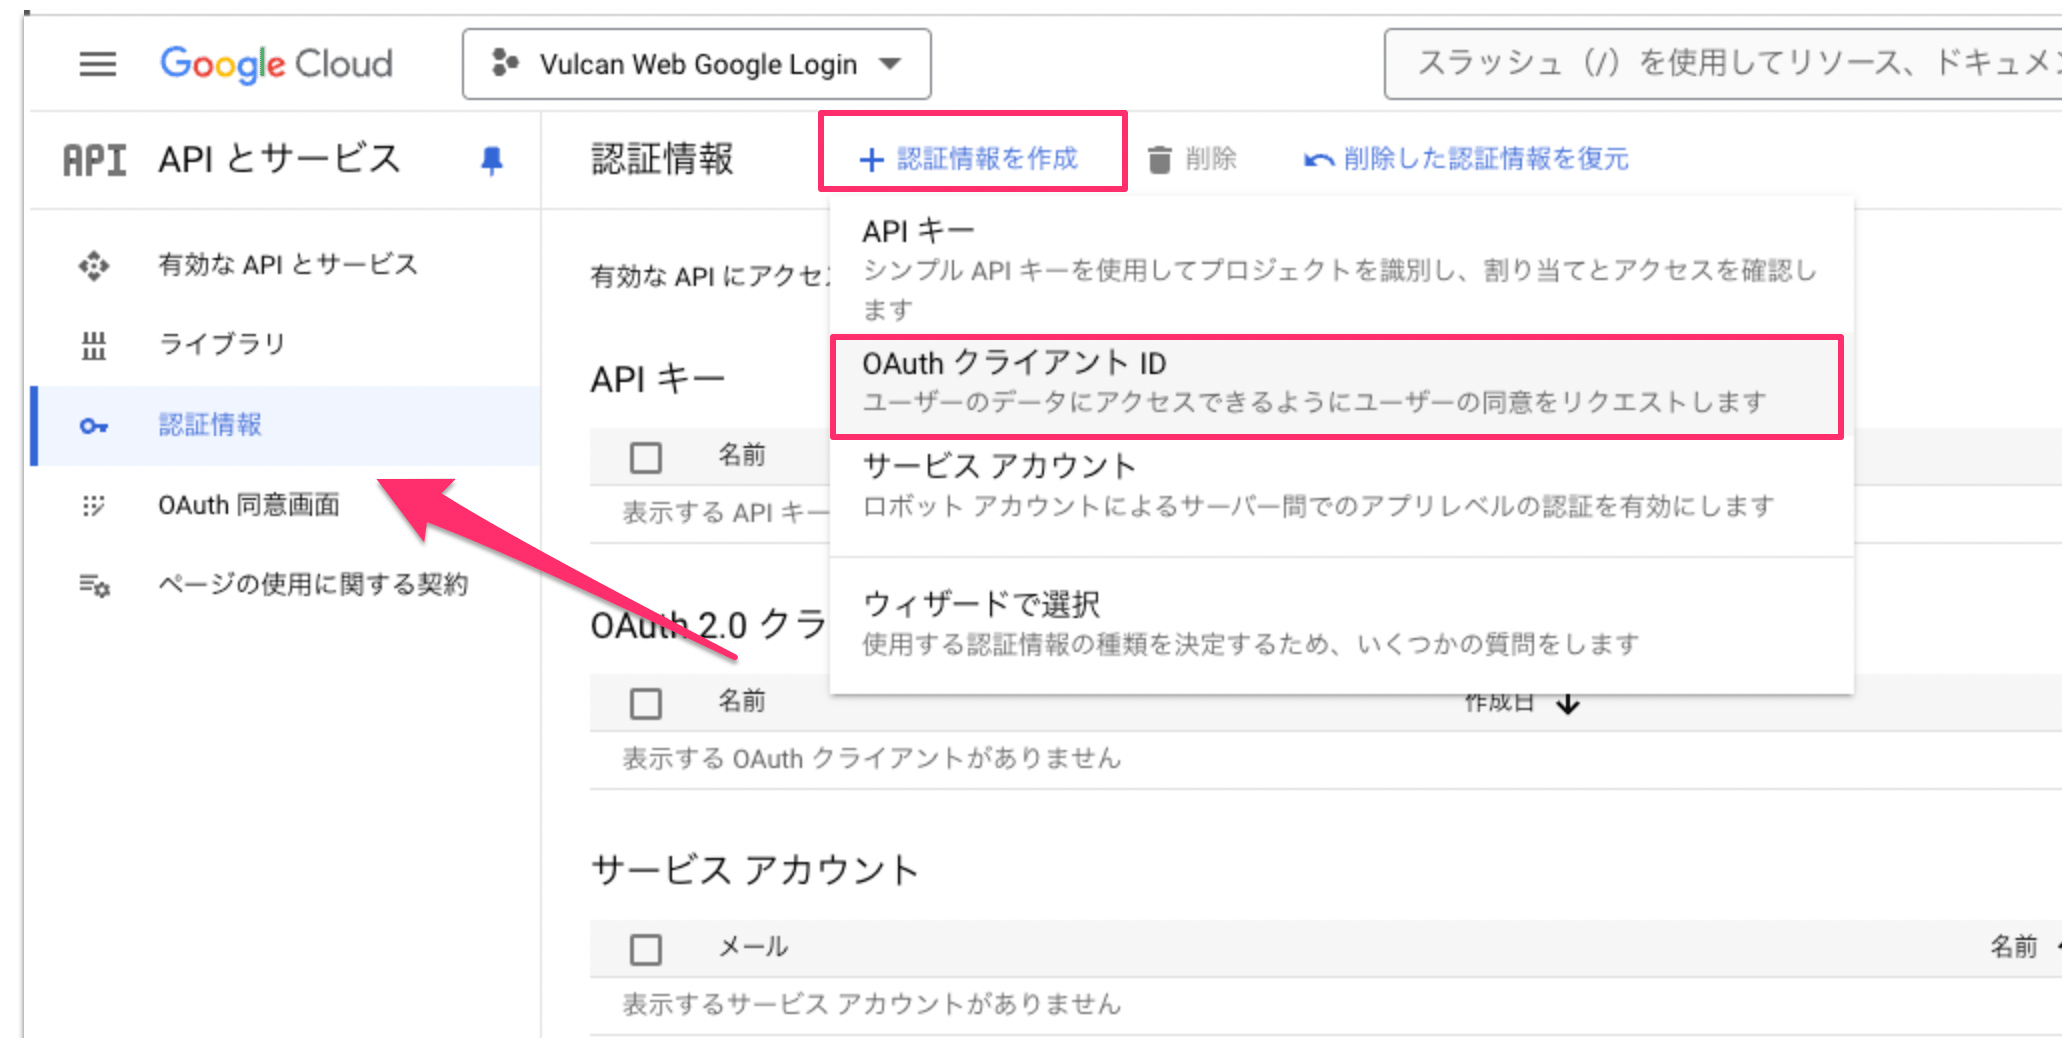
8. Click the **Credentials** menu, then click **+ Create Credentials > OAuth client ID**.
After adding the scope, click **Back to Dashboard**.
8. Click the **Credentials** menu, then click **+ Create Credentials > OAuth client ID**.
 9. Fill in the OAuth client ID creation form as follows and click **Create**.
* **Application type**: `Web application`
* **Name**: Any name (e.g., Admina)
* **Authorized redirect URIs**: `https://itmc.i.moneyforward.com/oauth/callback`
9. Fill in the OAuth client ID creation form as follows and click **Create**.
* **Application type**: `Web application`
* **Name**: Any name (e.g., Admina)
* **Authorized redirect URIs**: `https://itmc.i.moneyforward.com/oauth/callback`
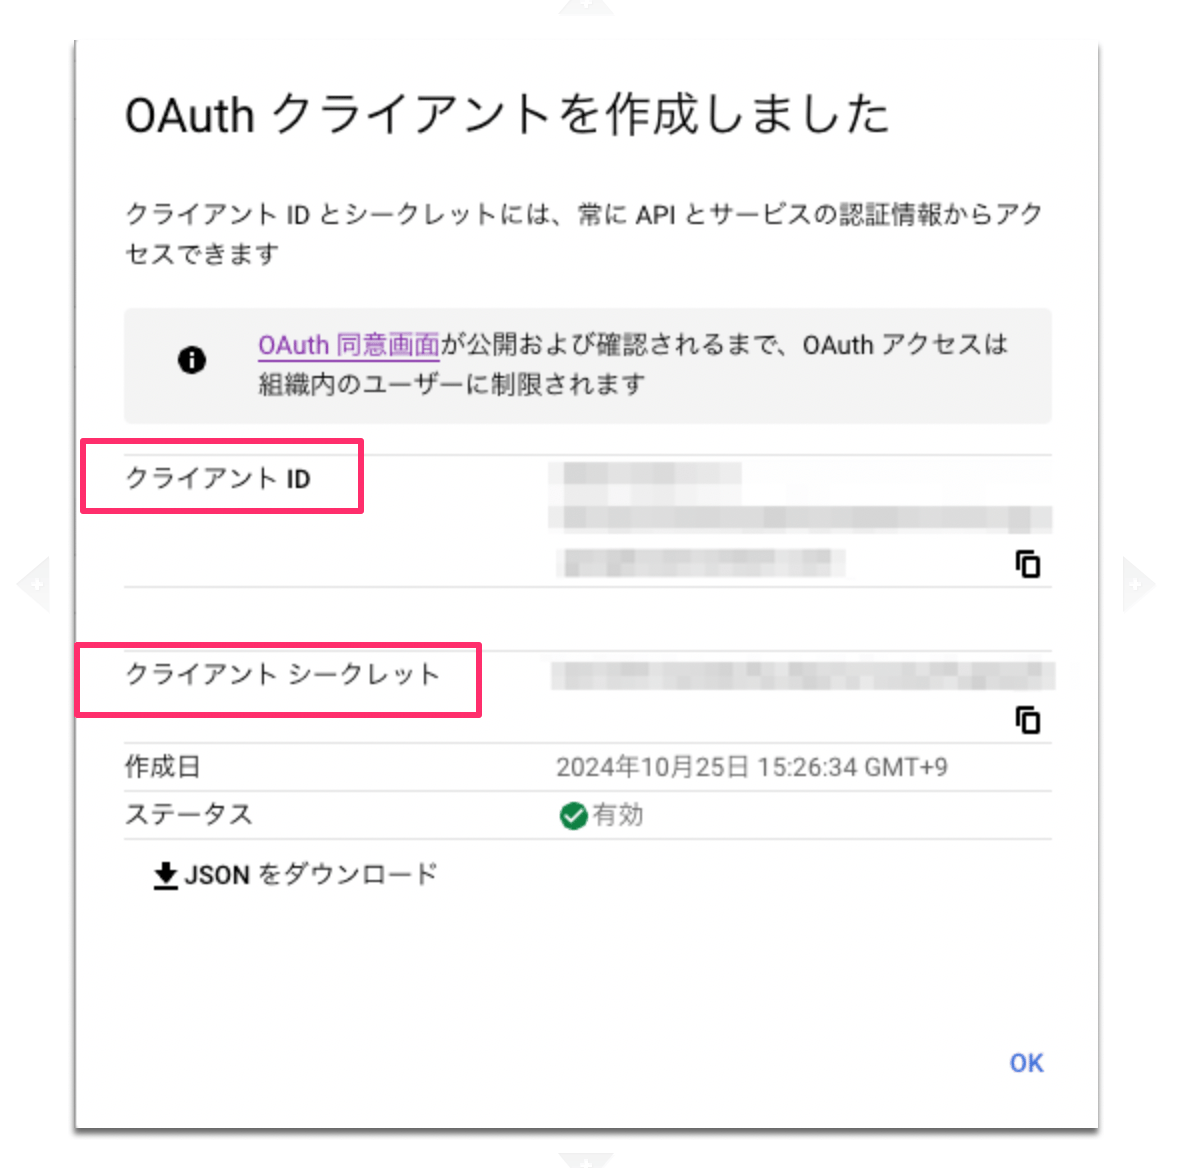
 10. Copy the displayed Client ID and Client Secret values.
 ### Integration Setup
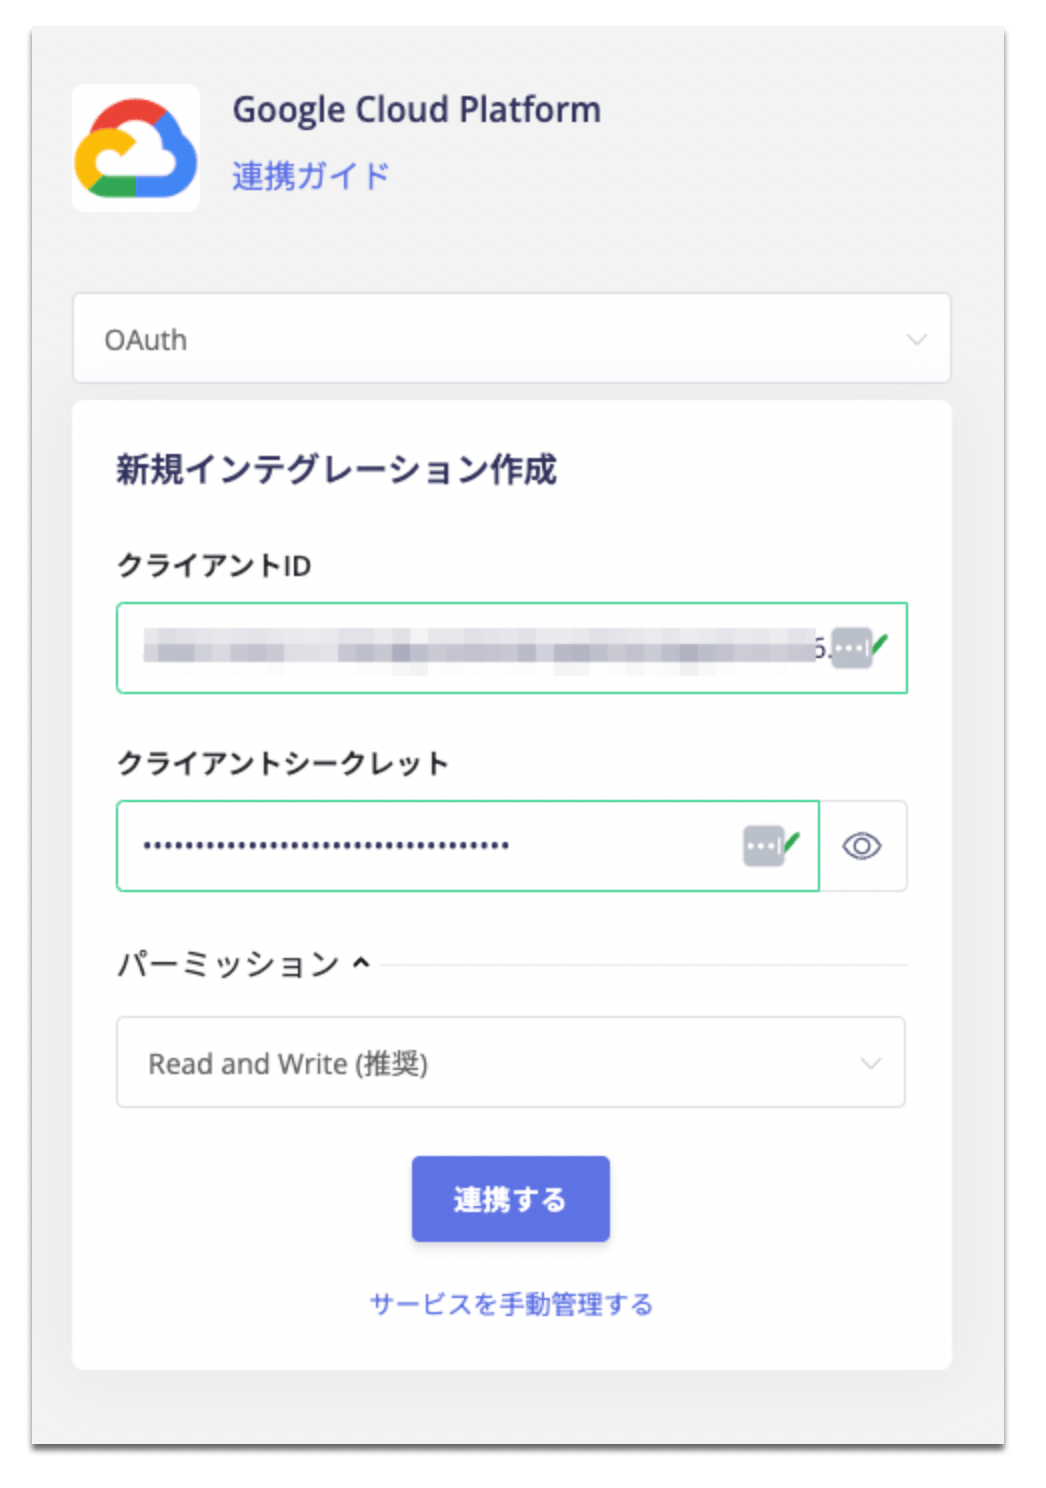
1. In the MoneyForward Admina integrations screen, search for **Google Cloud Platform**. Select the OAuth tab.
2. Enter the Client ID and Client Secret, then click **Connect**. For Permissions, select the option that matches the scope configured in step 7.
### Integration Setup
1. In the MoneyForward Admina integrations screen, search for **Google Cloud Platform**. Select the OAuth tab.
2. Enter the Client ID and Client Secret, then click **Connect**. For Permissions, select the option that matches the scope configured in step 7.
 When the integration succeeds, registered user information will appear in the account list.
If the process does not complete successfully, click **Edit** from the Status tab on the integrations screen and try connecting again.
If the issue persists, please contact us via chat.
For an overview of the Google Cloud Platform integration, visit the [integration page](http://admina.moneyforward.com/en/integrations/google-cloud-platform).
## API Key Integration (Old)
### Prerequisites
#### Logging In to Google Cloud Platform
Go to the [Google Cloud Platform login page](https://accounts.google.com/signin/v2/identifier?service=cloudconsole\&passive=1209600\&osid=1\&continue=https%3A%2F%2Fconsole.cloud.google.com%2F%3Fhl%3Dja%26pli%3D1\&followup=https%3A%2F%2Fconsole.cloud.google.com%2F%3Fhl%3Dja%26pli%3D1\&hl=ja\&flowName=GlifWebSignIn\&flowEntry=ServiceLogin) and enter the email address and password of an administrator account.
#### Enabling the Cloud Resource Manager API
1. After logging in to Google Cloud Platform, navigate to the **project you want to integrate**.
Integration is performed on a per-project basis. Select the project whose users you want to retrieve, then complete the integration. You can integrate multiple projects by repeating this process.
2. Go to **APIs & Services** > **Enabled APIs & Services** and click **Enable APIs and Services**.
3. Search for **Cloud Resource Manager API** and click **Enable**.
#### Creating a Service Account for Integration
4. Go to **APIs & Services > Credentials**, click **\[CREATE CREDENTIALS]**, and select **\[Service account]**.
When the integration succeeds, registered user information will appear in the account list.
If the process does not complete successfully, click **Edit** from the Status tab on the integrations screen and try connecting again.
If the issue persists, please contact us via chat.
For an overview of the Google Cloud Platform integration, visit the [integration page](http://admina.moneyforward.com/en/integrations/google-cloud-platform).
## API Key Integration (Old)
### Prerequisites
#### Logging In to Google Cloud Platform
Go to the [Google Cloud Platform login page](https://accounts.google.com/signin/v2/identifier?service=cloudconsole\&passive=1209600\&osid=1\&continue=https%3A%2F%2Fconsole.cloud.google.com%2F%3Fhl%3Dja%26pli%3D1\&followup=https%3A%2F%2Fconsole.cloud.google.com%2F%3Fhl%3Dja%26pli%3D1\&hl=ja\&flowName=GlifWebSignIn\&flowEntry=ServiceLogin) and enter the email address and password of an administrator account.
#### Enabling the Cloud Resource Manager API
1. After logging in to Google Cloud Platform, navigate to the **project you want to integrate**.
Integration is performed on a per-project basis. Select the project whose users you want to retrieve, then complete the integration. You can integrate multiple projects by repeating this process.
2. Go to **APIs & Services** > **Enabled APIs & Services** and click **Enable APIs and Services**.
3. Search for **Cloud Resource Manager API** and click **Enable**.
#### Creating a Service Account for Integration
4. Go to **APIs & Services > Credentials**, click **\[CREATE CREDENTIALS]**, and select **\[Service account]**.
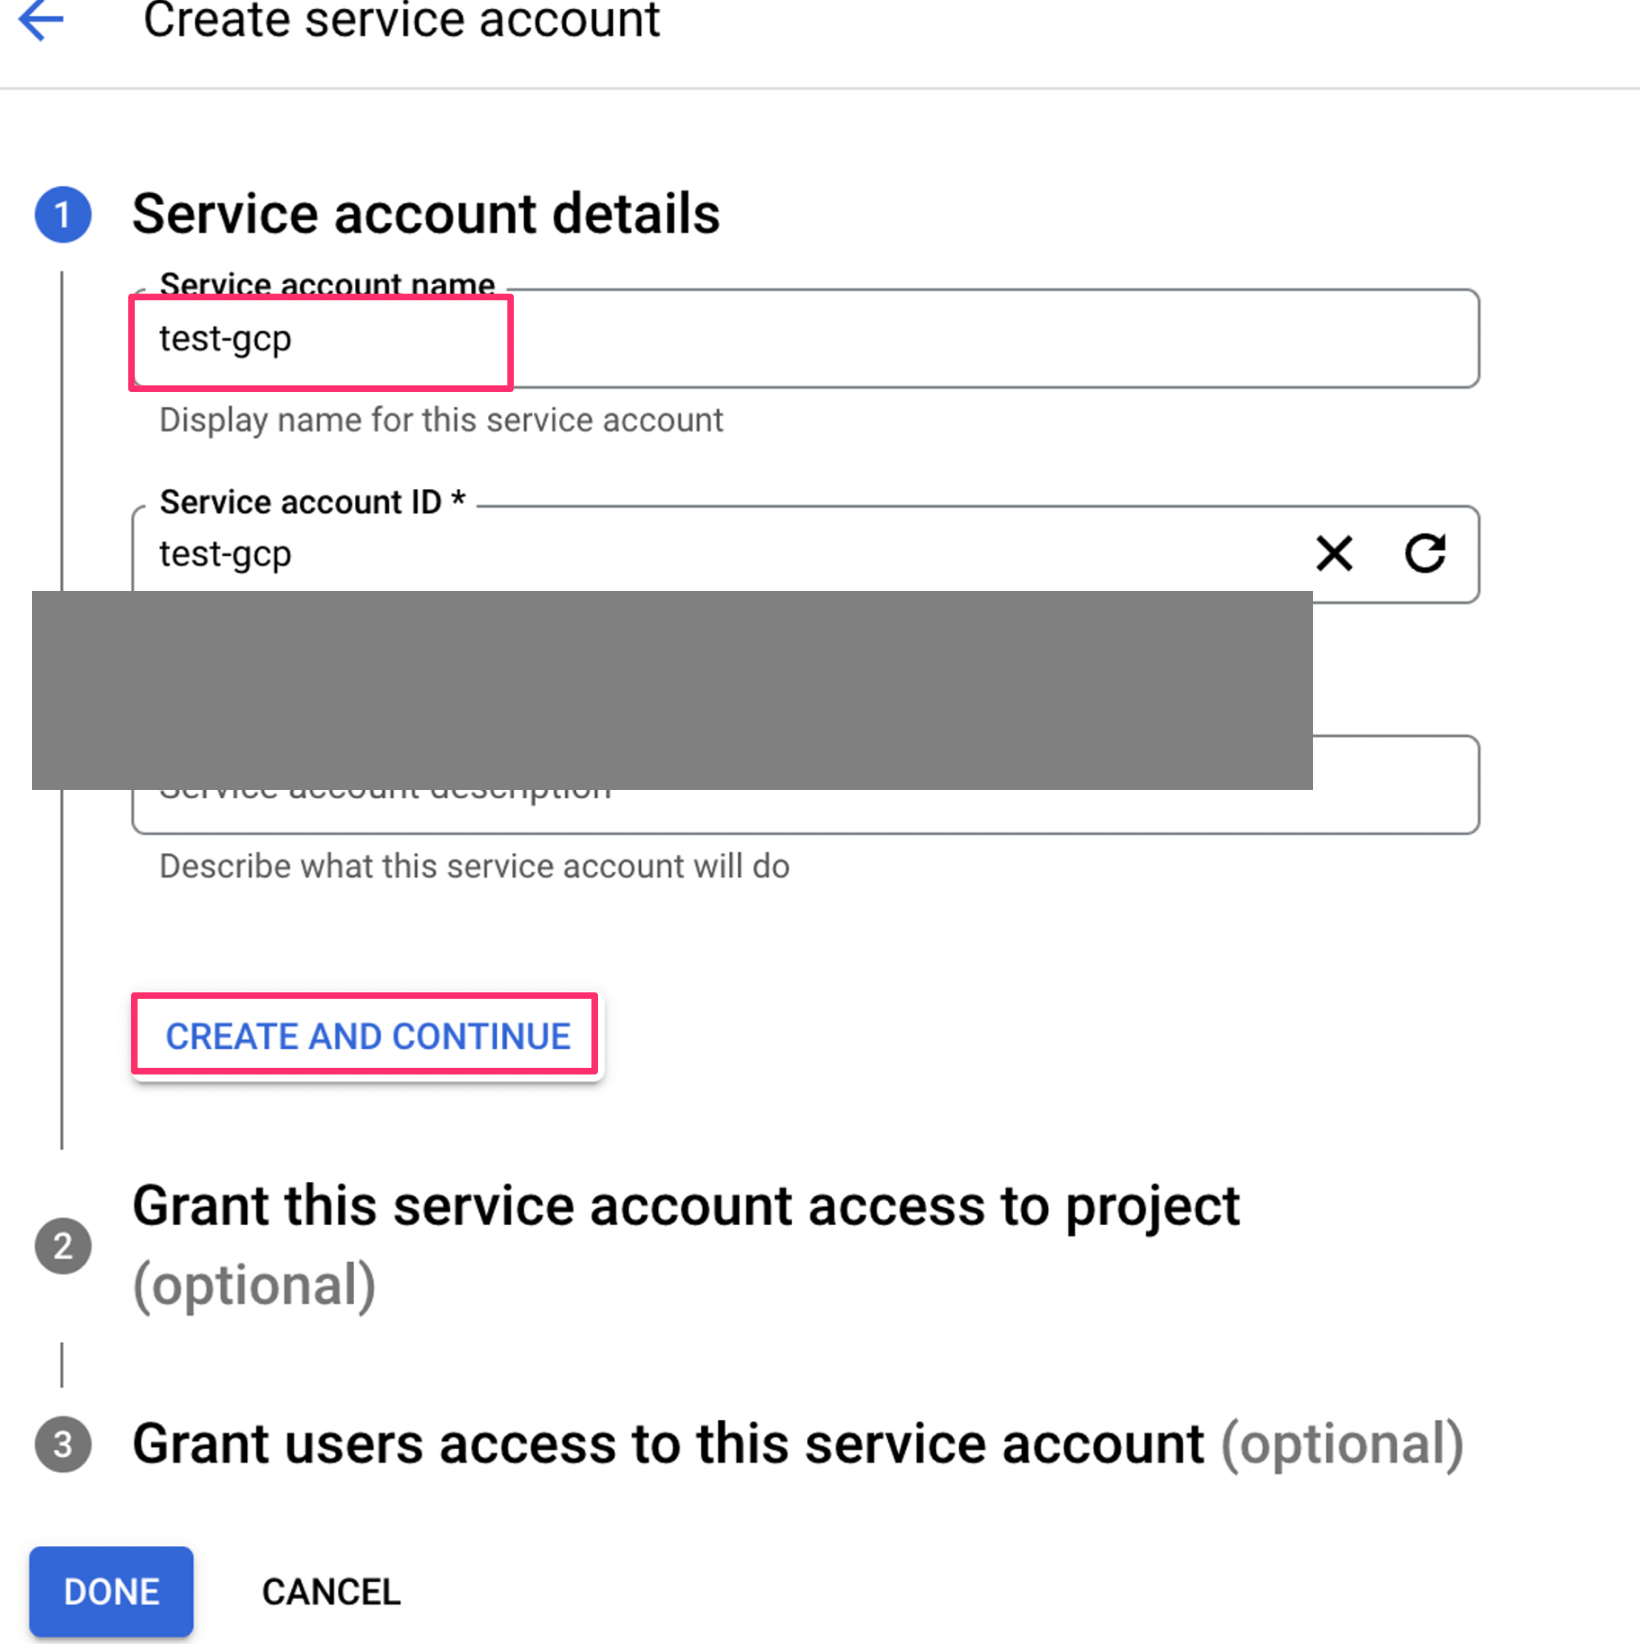
 5. Enter any name in the Service Account Name field and click **\[CREATE AND CONTINUE]**.
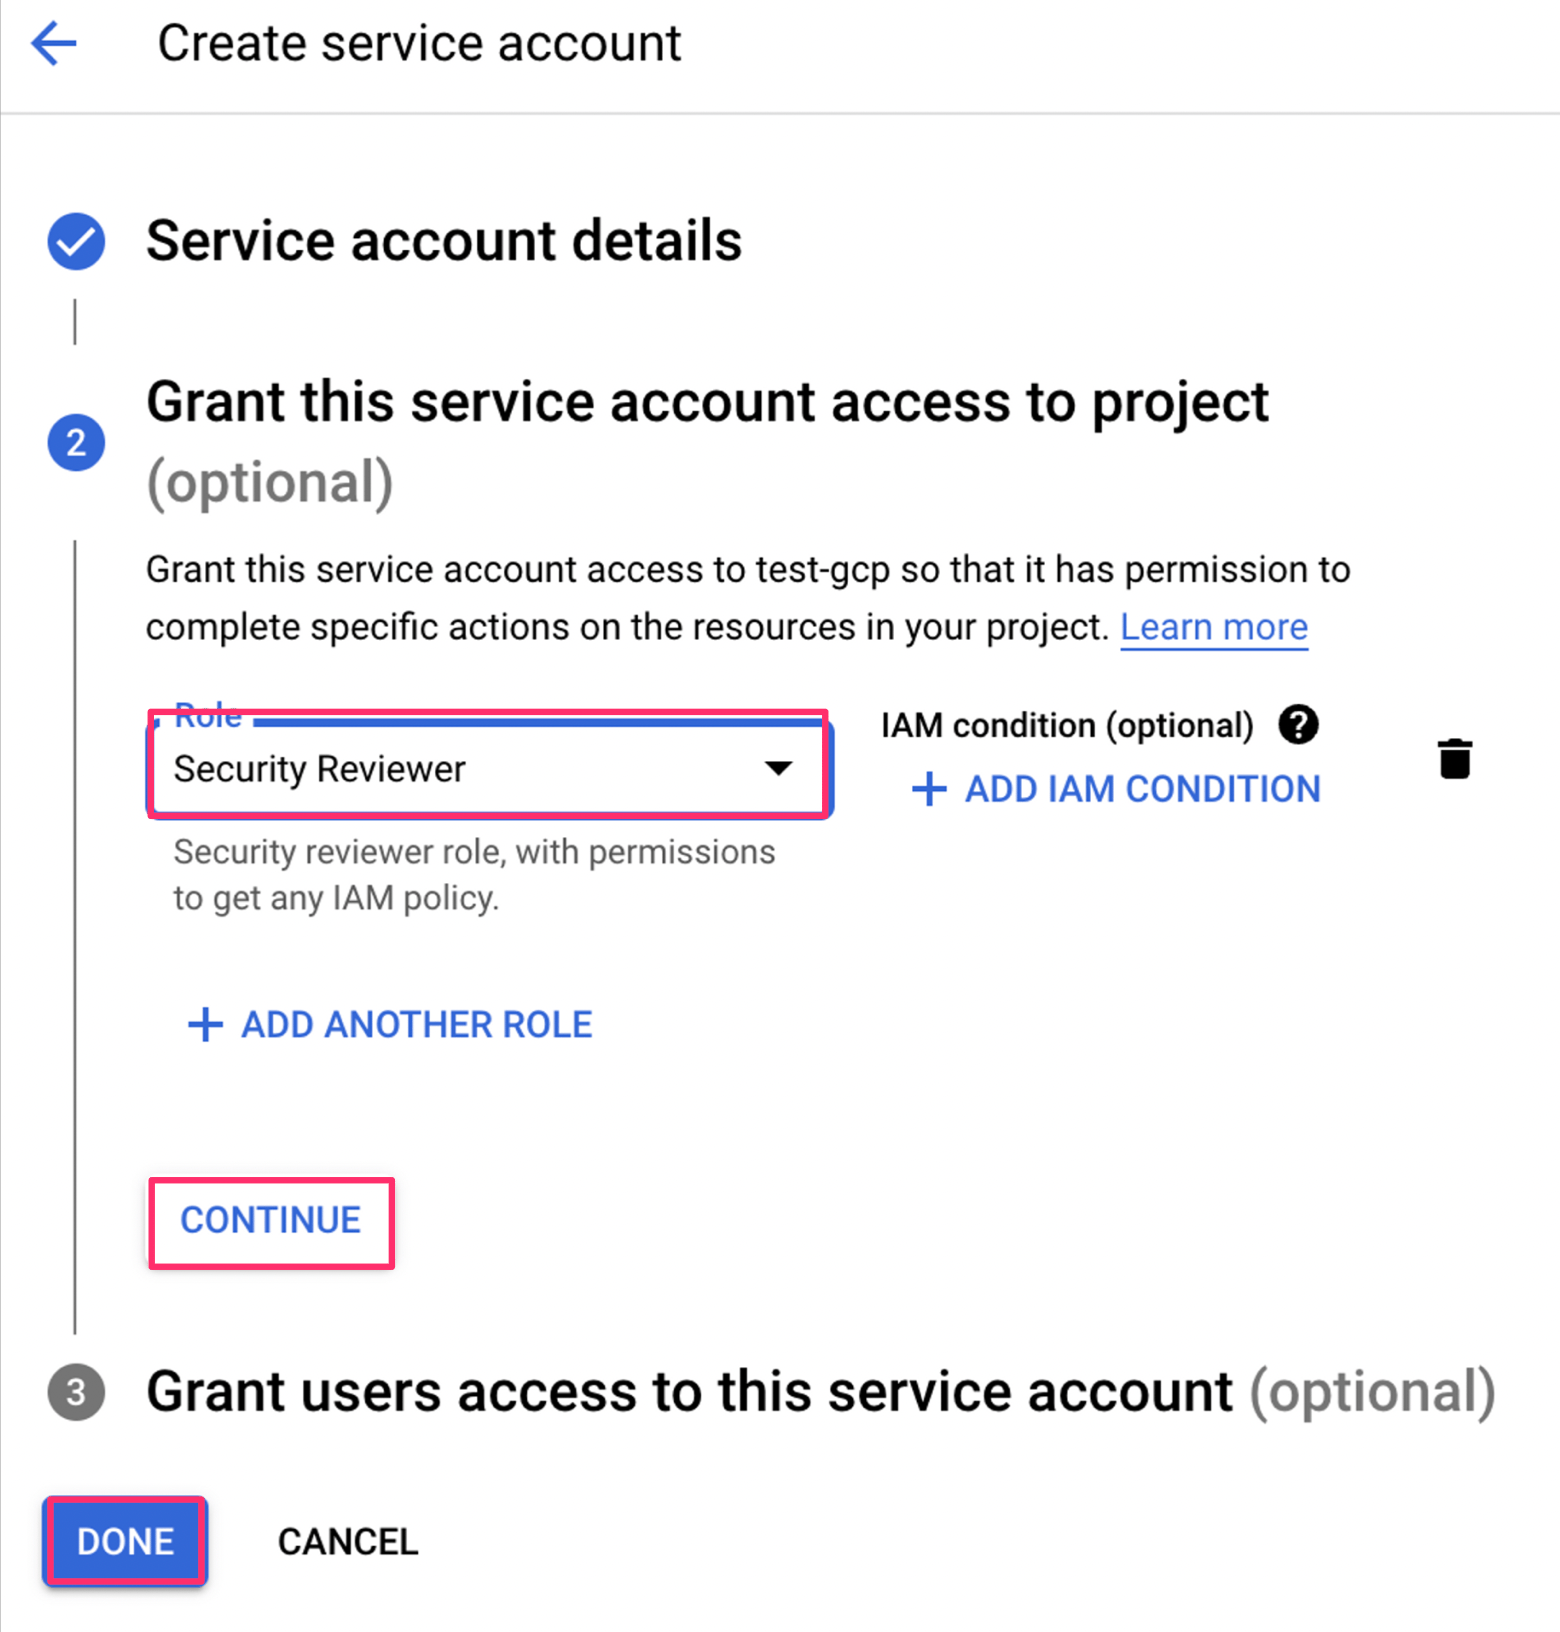
 6. Configure the role. Select **Security Reviewer** and click **Continue**. Finally, click **Done**.
 #### Creating a Private Key
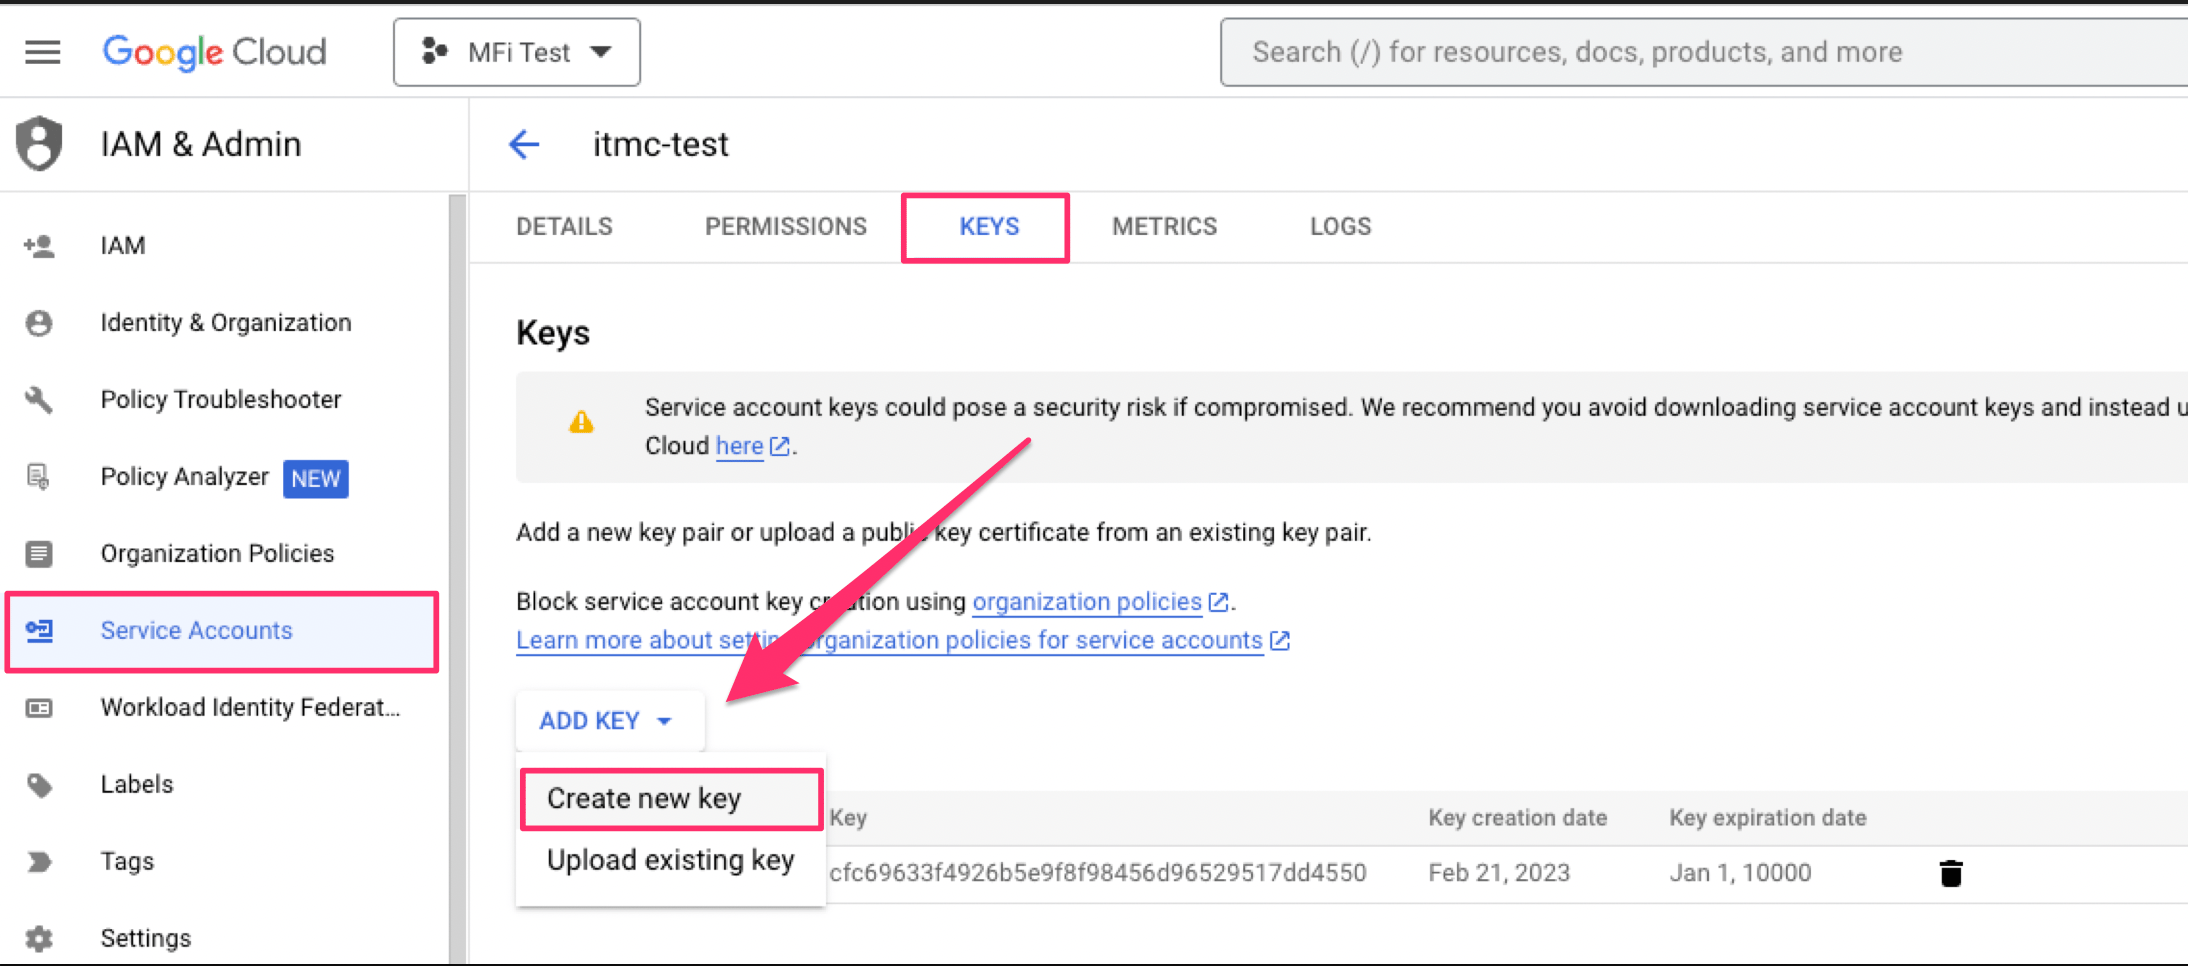
7. From Service Accounts, click the service account name you created, then go to the **\[KEYS]** tab > **ADD KEY** > **Create new key**.
#### Creating a Private Key
7. From Service Accounts, click the service account name you created, then go to the **\[KEYS]** tab > **ADD KEY** > **Create new key**.
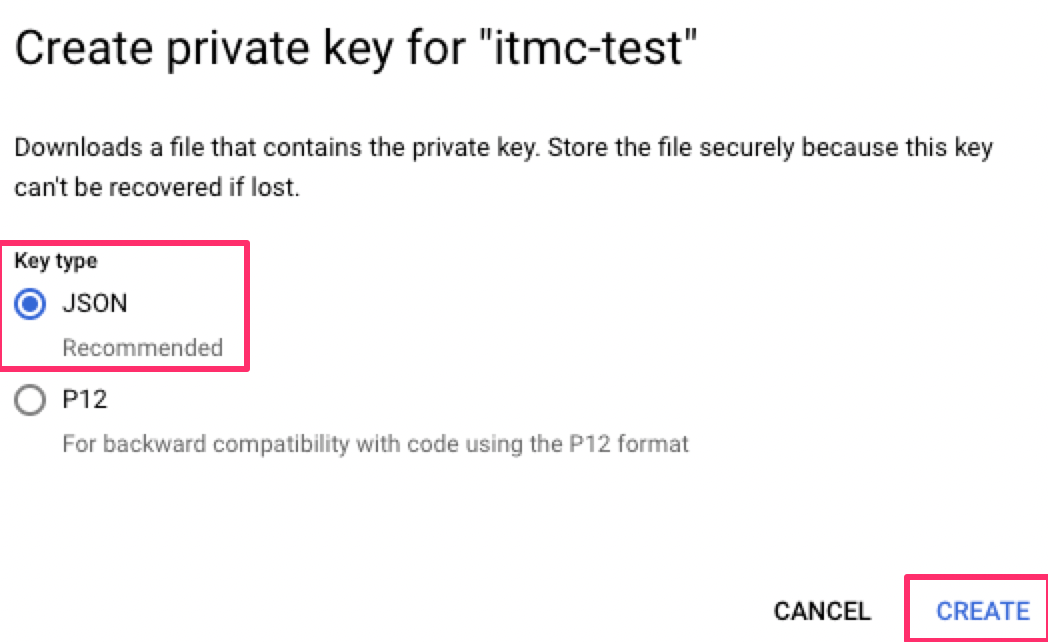
 8. Select **JSON** as the Key type and click **CREATE**.
 9. A JSON file will be downloaded — save it. Open it with a text editor to review the contents. **All parameters required for the integration are included in this JSON file.**
Prerequisites are now complete.
### Integration Setup
1. In the MoneyForward Admina integrations screen, search for **Google Cloud Platform**. Switch to the **API** tab.
9. A JSON file will be downloaded — save it. Open it with a text editor to review the contents. **All parameters required for the integration are included in this JSON file.**
Prerequisites are now complete.
### Integration Setup
1. In the MoneyForward Admina integrations screen, search for **Google Cloud Platform**. Switch to the **API** tab.
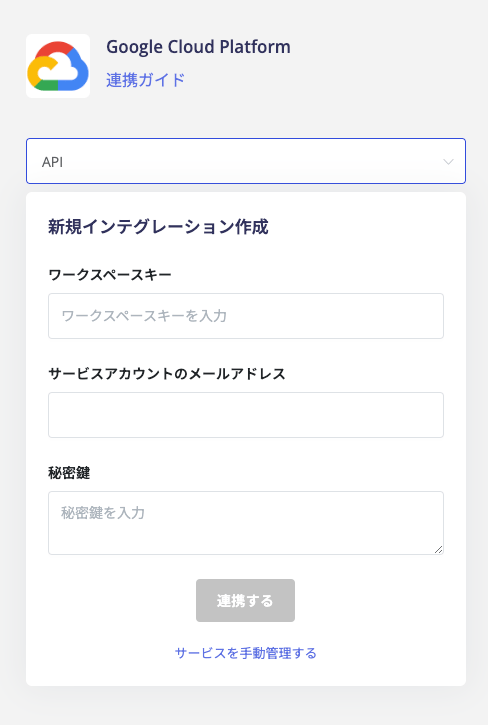 2. Enter the following values from the downloaded JSON file and click **Connect**.
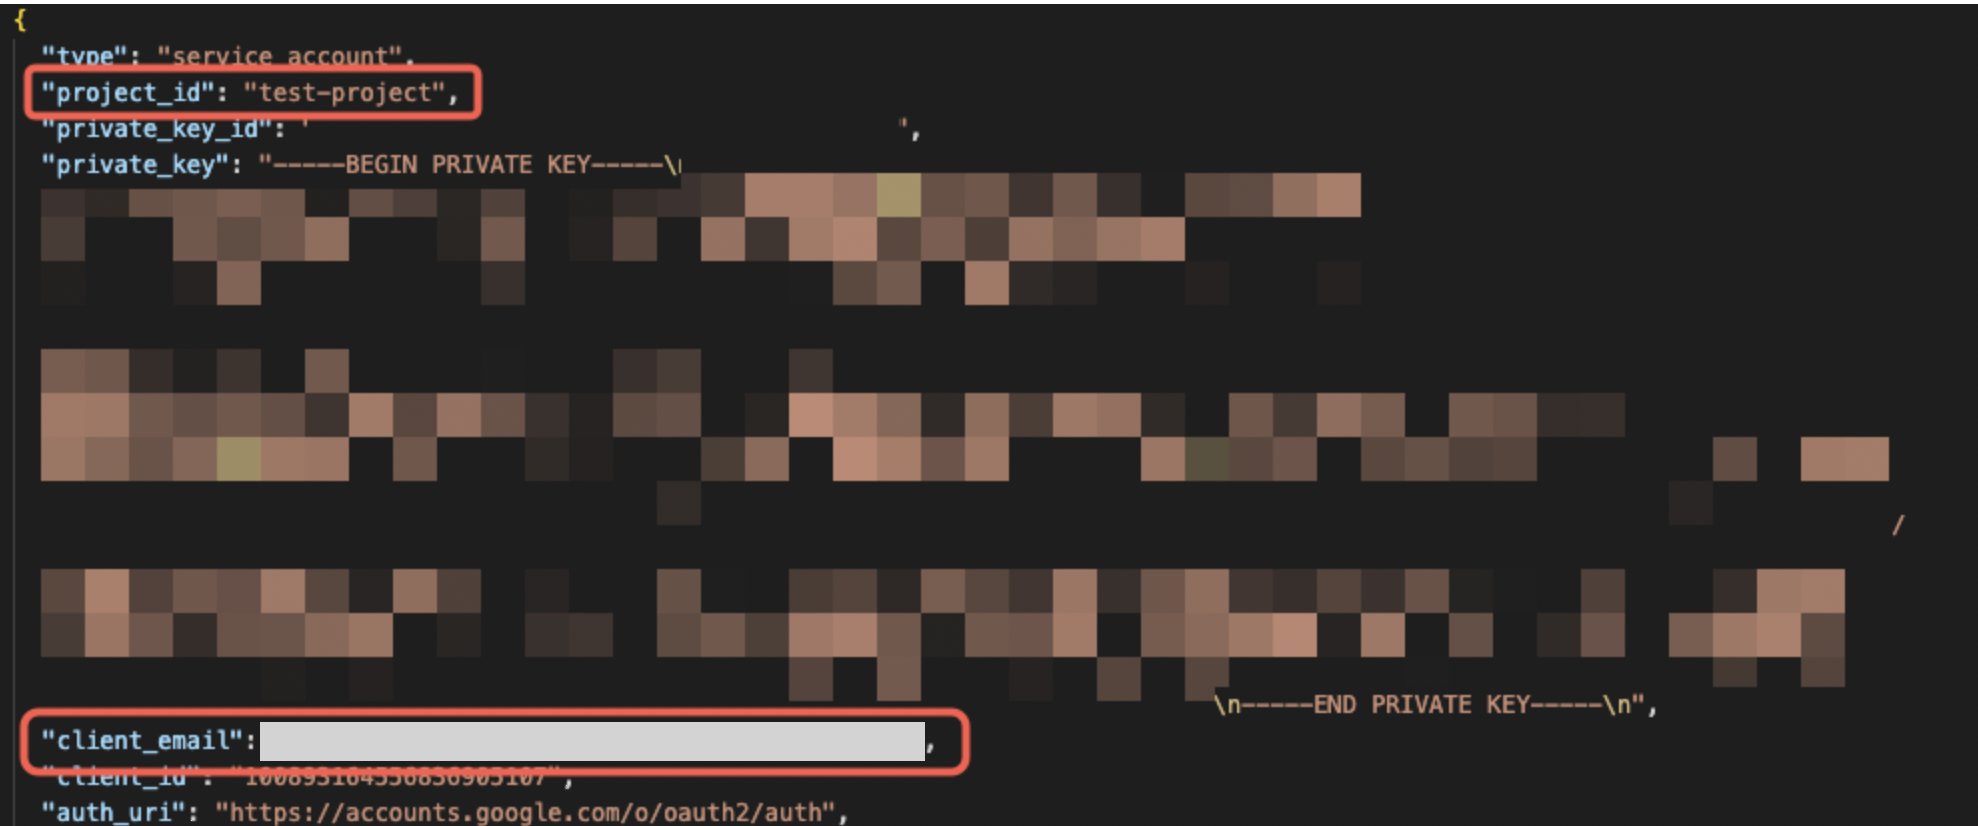 * **Workspace Key:** Enter the `project_id`
* **Service Account Email:** Enter the `client_email`
* **Private Key:** Enter the `private_key`.
Enter from **-----BEGIN PRIVATE KEY-----** to **-----END PRIVATE KEY-----**. (The leading `"` and trailing `\n",` are not needed.)
If an error appears, refer to the following help article.
["This app isn't verified" error from Google](/en/it-management/faq/dqpoevdgwg-google-error)
"This app isn't verified by Google" error
When the integration succeeds, registered user information will appear in the account list.
If the process does not complete successfully, click **Edit** from the Status tab on the integrations screen and try connecting again.
If the issue persists, please contact us via chat.
For an overview of the Google Cloud Platform integration, visit the [integration page](http://admina.moneyforward.com/en/integrations/google-cloud-platform).
* **Workspace Key:** Enter the `project_id`
* **Service Account Email:** Enter the `client_email`
* **Private Key:** Enter the `private_key`.
Enter from **-----BEGIN PRIVATE KEY-----** to **-----END PRIVATE KEY-----**. (The leading `"` and trailing `\n",` are not needed.)
If an error appears, refer to the following help article.
["This app isn't verified" error from Google](/en/it-management/faq/dqpoevdgwg-google-error)
"This app isn't verified by Google" error
When the integration succeeds, registered user information will appear in the account list.
If the process does not complete successfully, click **Edit** from the Status tab on the integrations screen and try connecting again.
If the issue persists, please contact us via chat.
For an overview of the Google Cloud Platform integration, visit the [integration page](http://admina.moneyforward.com/en/integrations/google-cloud-platform).