> ## Documentation Index
> Fetch the complete documentation index at: https://hc.saas-manager.biz.nuro.jp/llms.txt
> Use this file to discover all available pages before exploring further.
# 1. Add, Edit, and Delete People
> Steps to add, edit, and delete People in the Directory. Includes bulk operations and CSV import/export.
#### Add People
You can add People to the Directory individually or via [CSV import](#csv-import).
#### Create a new person
Follow these steps to add a user individually.
1. Click **Add new person** in the upper-right corner of the Directory screen.
 2. Enter the user information in the form that appears, then click **Apply**.
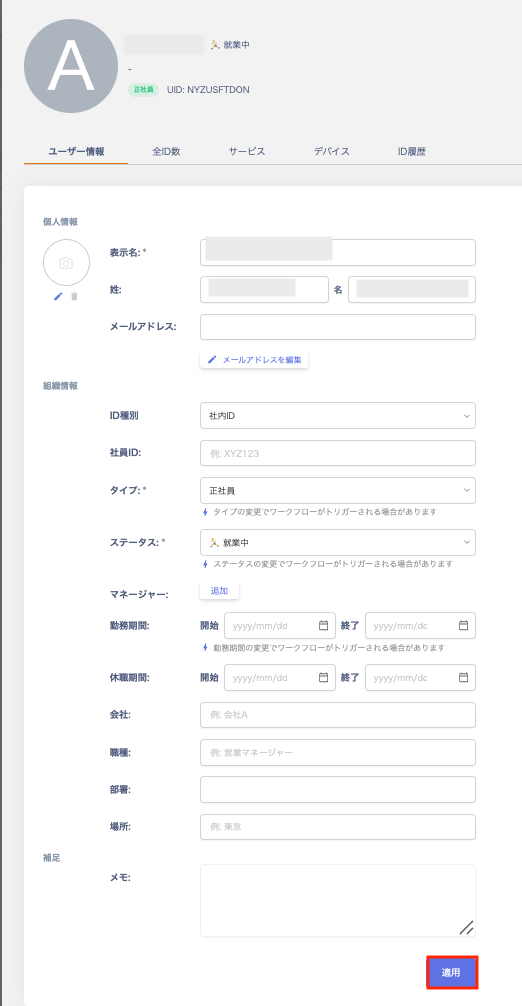 3. The registered user appears in the Directory list.
#### Edit People
1. Go to Directory, select a person, and edit the fields on the **User Information** screen.
1. To edit an email address, go to User Information > Email address and click **Edit email address**. Edit the address on the **Edit email address** screen. To swap the primary and secondary addresses, use the up/down buttons on the left side. After editing, click **Save**.
3. The registered user appears in the Directory list.
#### Edit People
1. Go to Directory, select a person, and edit the fields on the **User Information** screen.
1. To edit an email address, go to User Information > Email address and click **Edit email address**. Edit the address on the **Edit email address** screen. To swap the primary and secondary addresses, use the up/down buttons on the left side. After editing, click **Save**.
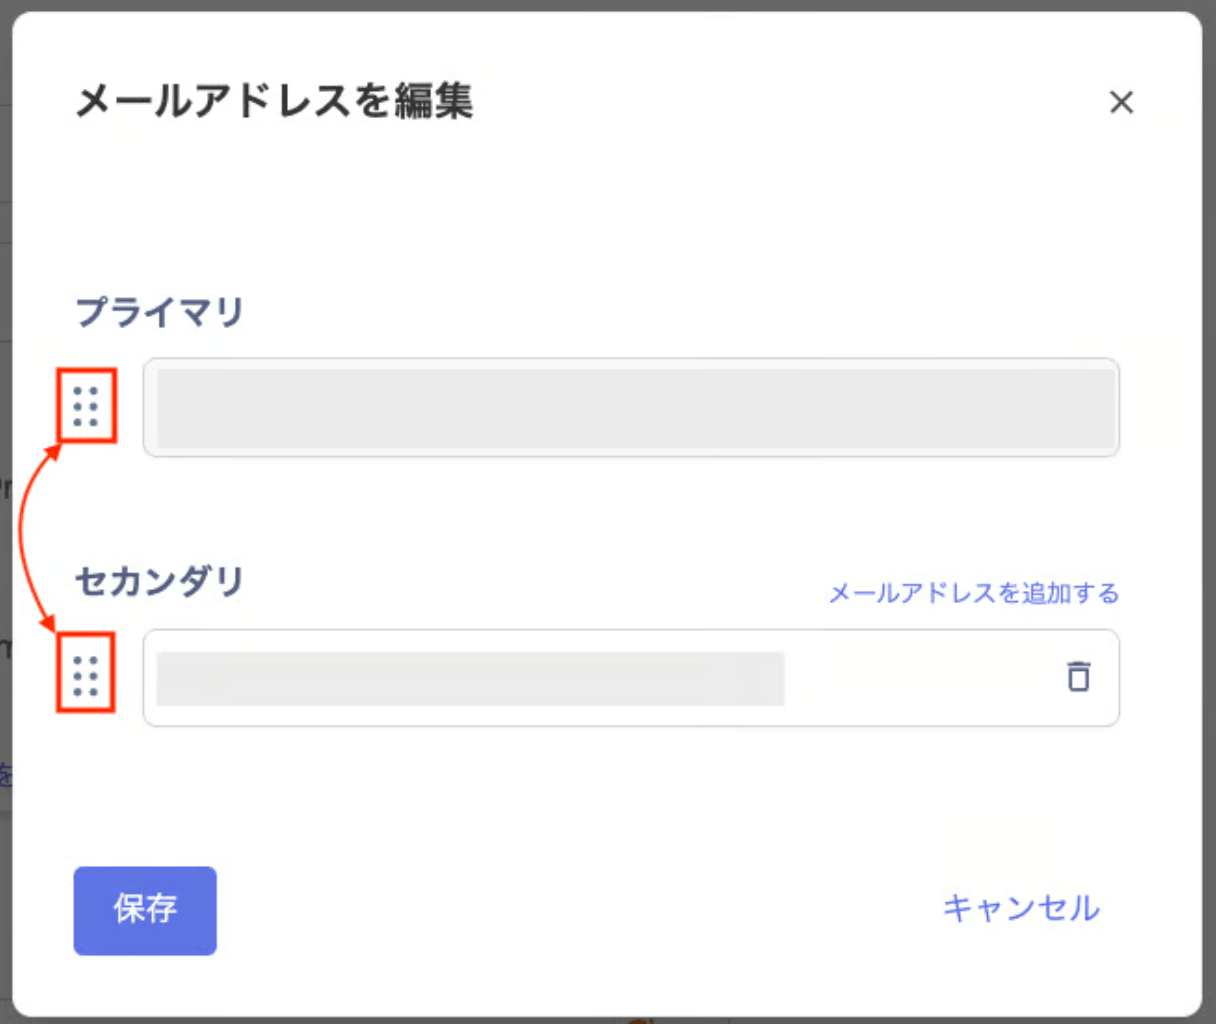 2. Click **Apply** after making your edits.
#### Delete People
#### Archive
1. To hide unnecessary People, click ︙ (three-dot menu) in the Directory list and select **Archive**. You can archive People with 0 linked services.
2. Click **Apply** after making your edits.
#### Delete People
#### Archive
1. To hide unnecessary People, click ︙ (three-dot menu) in the Directory list and select **Archive**. You can archive People with 0 linked services.
 2. A confirmation screen appears. Click **Archive**.
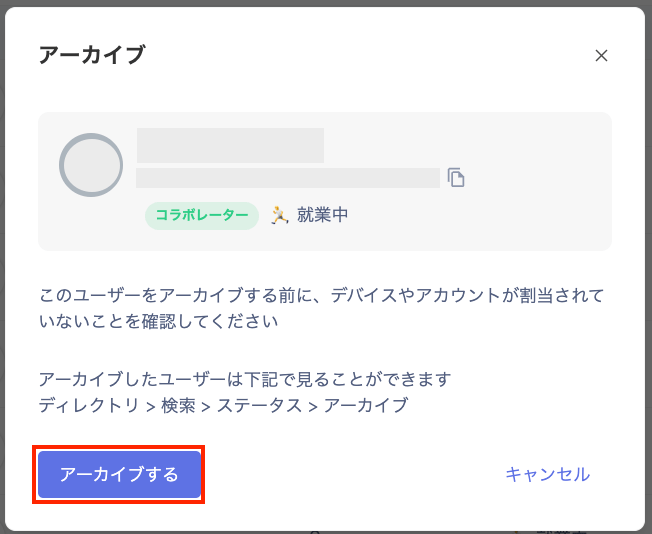 3. Click **Confirm** to complete the archive.
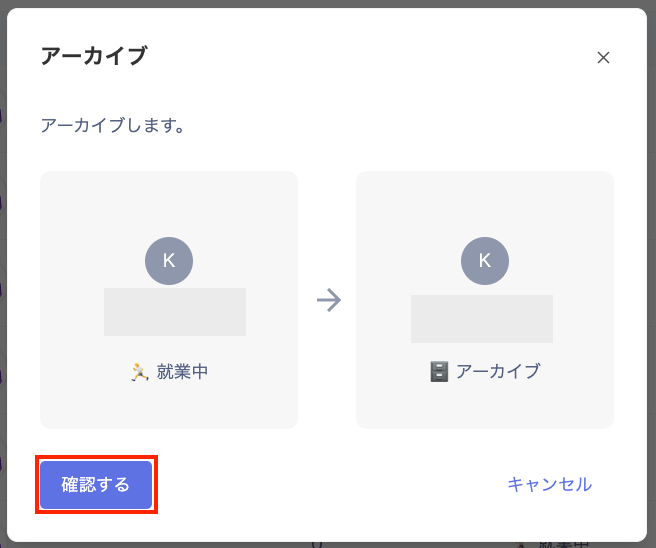 You can view archived data under Status > Archived. To unarchive, click **Unarchive**.
 #### Delete
This permanently removes People from the Directory.
Note that deleted user information no longer appears and cannot be recovered.
1. Click ︙ (three-dot menu) in the Directory list and select **Delete user**.
#### Delete
This permanently removes People from the Directory.
Note that deleted user information no longer appears and cannot be recovered.
1. Click ︙ (three-dot menu) in the Directory list and select **Delete user**.
 2. A dialog appears. Click **Delete user**.
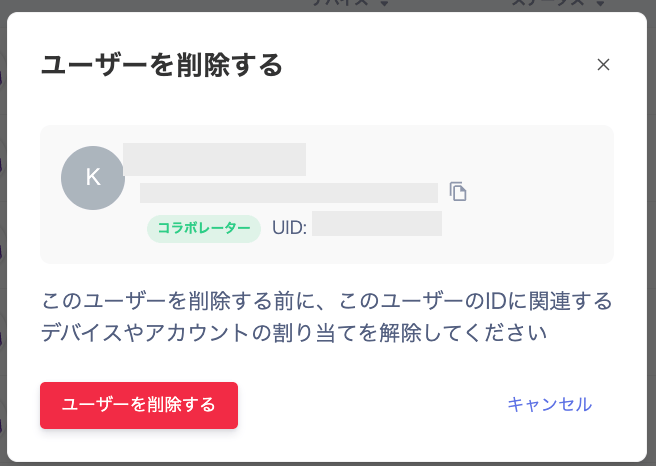 3. When the deletion succeeds, a message appears in the upper-right: "ID has been deleted successfully."
 #### Bulk operations
#### Bulk delete, bulk archive, and bulk edit
Click the checkboxes in the upper-left of the Directory. You can select up to 50 items at a time. When you select two or more items, the action menu appears in the upper-right.
#### Bulk operations
#### Bulk delete, bulk archive, and bulk edit
Click the checkboxes in the upper-left of the Directory. You can select up to 50 items at a time. When you select two or more items, the action menu appears in the upper-right.
 | | |
| ------------ | --------------------------------------------------------------------------------------------------------------------------------------------------------------------------------------------------------------------------------------------------------------------------------------------------------------- |
| Bulk delete | Select **Delete** in the upper-right to delete the selected People.
| | |
| ------------ | --------------------------------------------------------------------------------------------------------------------------------------------------------------------------------------------------------------------------------------------------------------------------------------------------------------- |
| Bulk delete | Select **Delete** in the upper-right to delete the selected People.
On the deletion confirmation screen that appears, verify the selected IDs and click **Confirm** to execute the deletion. |
| Bulk archive | Select **Archive** in the upper-right to archive the selected People.
On the confirmation screen that appears, verify the selected IDs and click **Confirm** to execute the archive. |
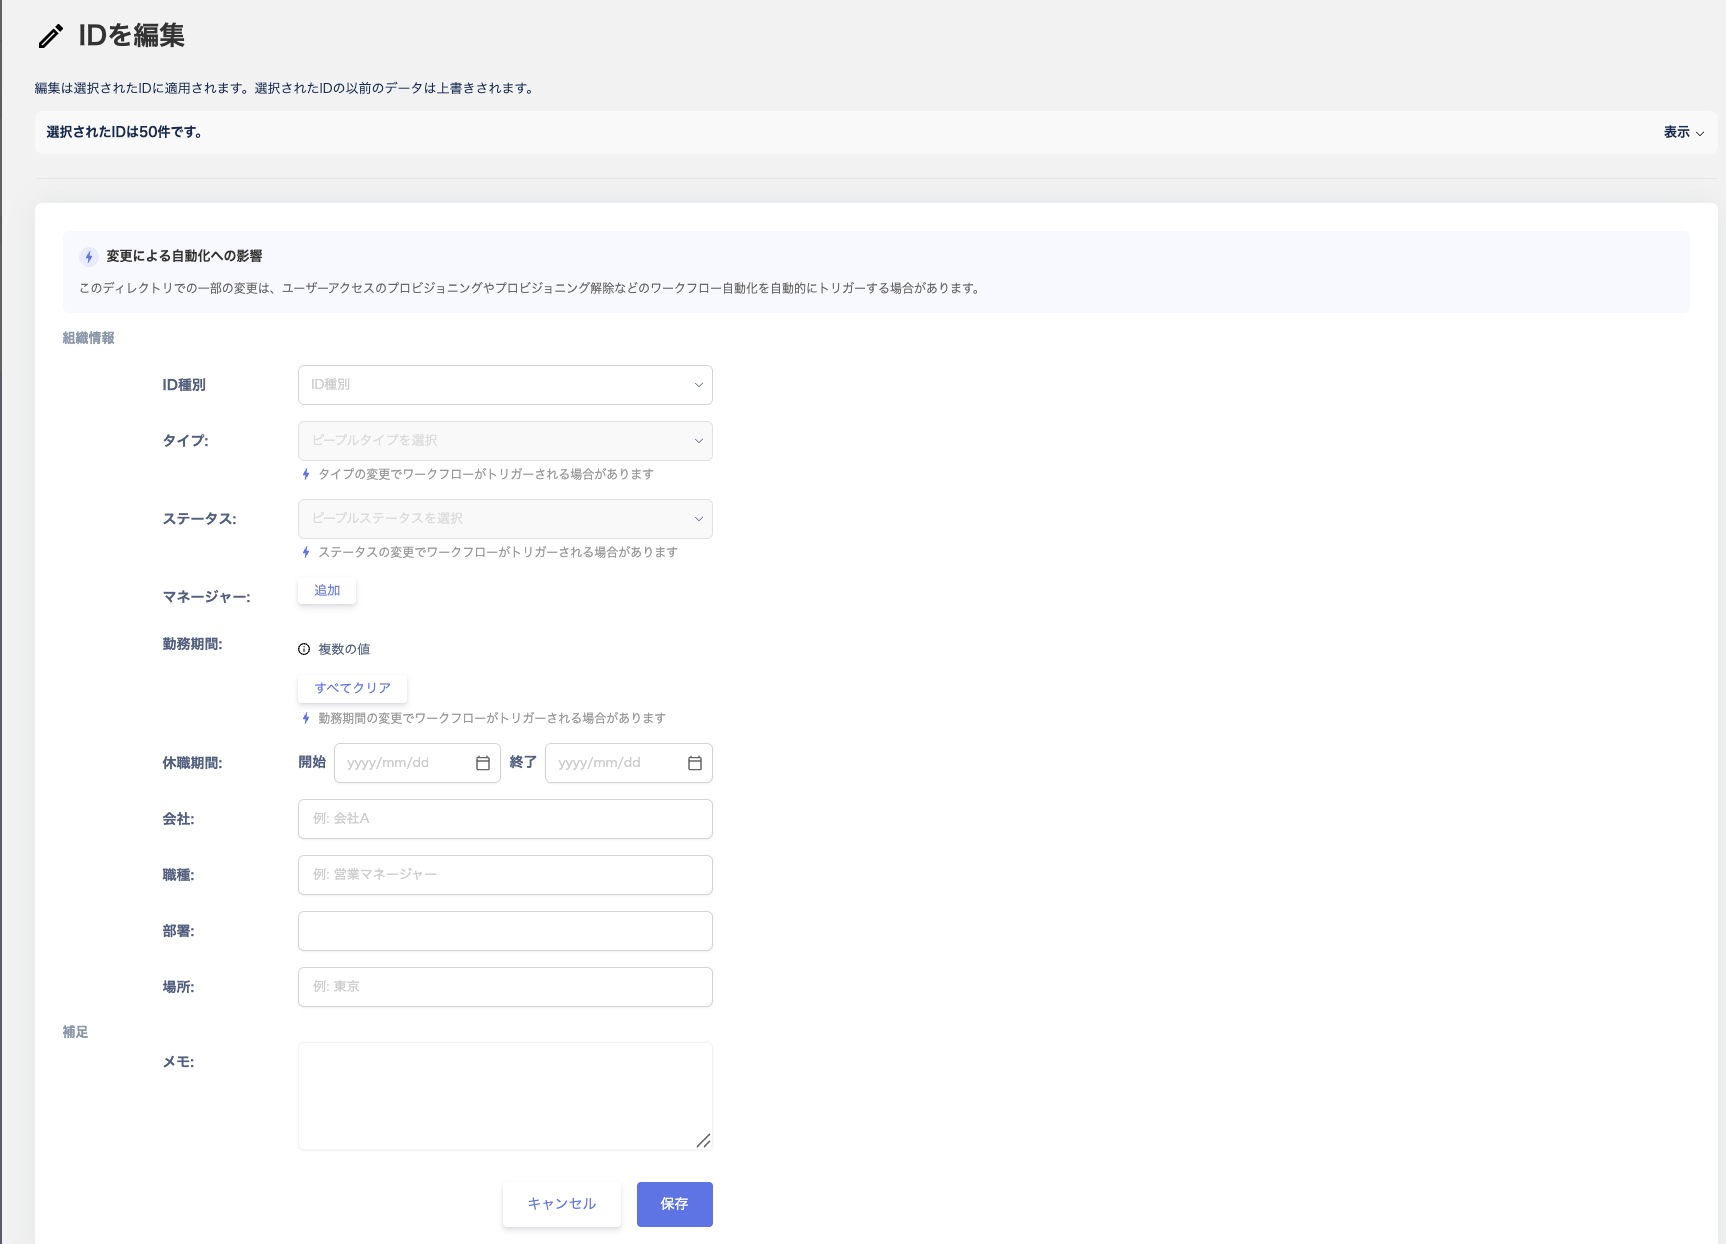
| Bulk edit | Select **Edit** in the upper-right to edit the selected People.
On the **Edit ID** screen, make your edits and click **Save**. A confirmation screen appears — click **Next** then **Save** to apply the bulk edits.
Note: IDs that appear grayed out on the Edit ID screen cannot be edited in bulk. |
The following is the **Edit ID** screen.
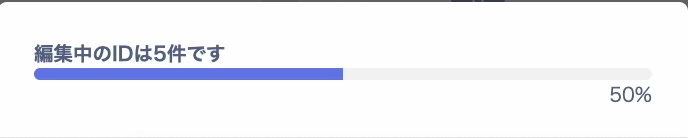
 While a bulk operation is processing, the number of IDs being edited appears in the lower-left. A progress percentage also appears there.
CSV import
Follow these steps to register People in bulk from a CSV file.
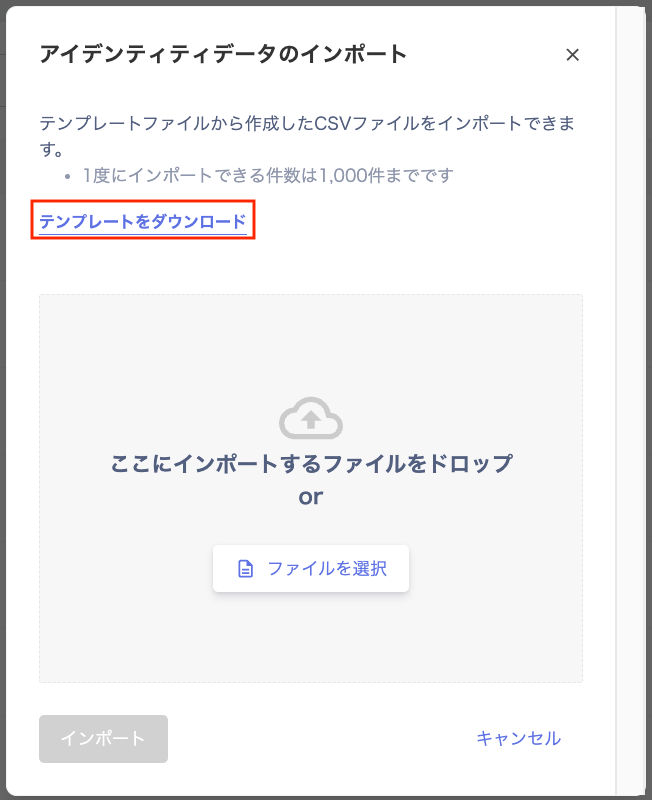
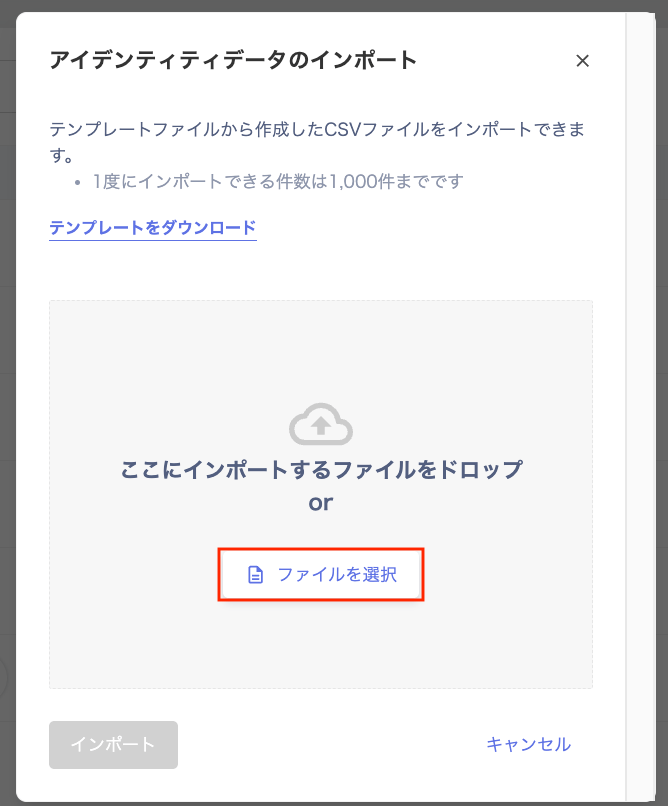
1. Click **Import** in the Directory.
 2. On the **Import identity data** screen, click **Download template**. Alternatively, export a CSV file via **Export**.
 3. Edit the downloaded template and save it as a CSV file. For details on each field and important notes, see [\[Directory\] How to create a CSV for device inventory import](/en/it-management/directory/1xtq0cxipa-directory-csv-import).
4. Click **Select file** to choose the file to import, then run the import.
3. Edit the downloaded template and save it as a CSV file. For details on each field and important notes, see [\[Directory\] How to create a CSV for device inventory import](/en/it-management/directory/1xtq0cxipa-directory-csv-import).
4. Click **Select file** to choose the file to import, then run the import.
 #### CSV export
Click **Export** in the Directory to export a CSV file.
#### CSV export
Click **Export** in the Directory to export a CSV file.
 #### FAQ
#### Q. What should I check if CSV import or export does not work correctly?
A. See [\[CSV Import\] Recommended environment and troubleshooting](/en/it-management/device/dwrsgbckjp-device-csv).
#### Q. What should I check if I cannot swap the primary and secondary email addresses?
A. If swapping email addresses fails, go to Directory, select the person, and check the **All IDs** tab.
If the IDs are merged, unmerge (split) them first. Then check whether you can swap the primary and secondary addresses on the **User Information** screen.
For details on unmerging, see [Account separation (unmerge)](/en/it-management/saas-management/d97dy5z2l7-merge). (After swapping, re-merge the accounts if needed.)
#### FAQ
#### Q. What should I check if CSV import or export does not work correctly?
A. See [\[CSV Import\] Recommended environment and troubleshooting](/en/it-management/device/dwrsgbckjp-device-csv).
#### Q. What should I check if I cannot swap the primary and secondary email addresses?
A. If swapping email addresses fails, go to Directory, select the person, and check the **All IDs** tab.
If the IDs are merged, unmerge (split) them first. Then check whether you can swap the primary and secondary addresses on the **User Information** screen.
For details on unmerging, see [Account separation (unmerge)](/en/it-management/saas-management/d97dy5z2l7-merge). (After swapping, re-merge the accounts if needed.)