> ## Documentation Index
> Fetch the complete documentation index at: https://hc.saas-manager.biz.nuro.jp/llms.txt
> Use this file to discover all available pages before exploring further.
# 2-3. Deploying and Configuring the Chrome Extension via Mac Configuration Profiles and MDM
> How to deploy and configure the Chrome extension on Mac using managed configuration profiles (plist).
This page explains how to configure the Chrome extension on Mac using managed configuration profiles distributed via MDM (plist). For instructions on how to distribute configuration profiles, refer to your MDM product's documentation.
For details on what this extension can do and its specifications, see [Deploy the browser extension to collect SaaS activity](/en/it-management/shadow-it/7q1wryx3dk-extension).
If you use Google Workspace, distribution is easier. See [Deploying the Chrome Extension via Google Workspace Admin Console](/en/it-management/shadow-it/bbb2v722bm-extension-bdv).
## Prerequisites and Configuration
### Retrieving Extension Policy Information
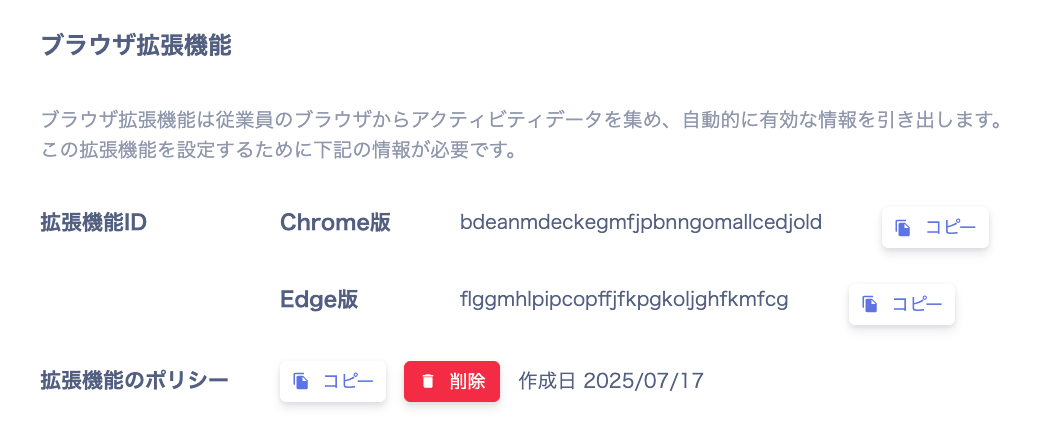
Retrieve the extension ID and policy contents.
In advance, go to Settings > Browser Extension > Browser Extension and copy the values for **Extension ID** and **Extension Policy**, then save them.
 ### Forced Installation of the Chrome Extension
The following uses JAMF Pro as an example.
Use a configuration profile in your MDM to distribute the forced installation parameter for the Chrome extension. Your environment may already distribute a password manager or similar via a configuration profile. In that case, add the entry to the existing profile rather than creating a duplicate.
```xml theme={null}
[Preference Domain]
com.google.Chrome
[Property List]
ExtensionInstallForcelist
bdeanmdeckegmfjpbnngomallcedjold
```
[https://chromeenterprise.google/policies/#ExtensionInstallForcelist](https://chromeenterprise.google/policies/#ExtensionInstallForcelist)
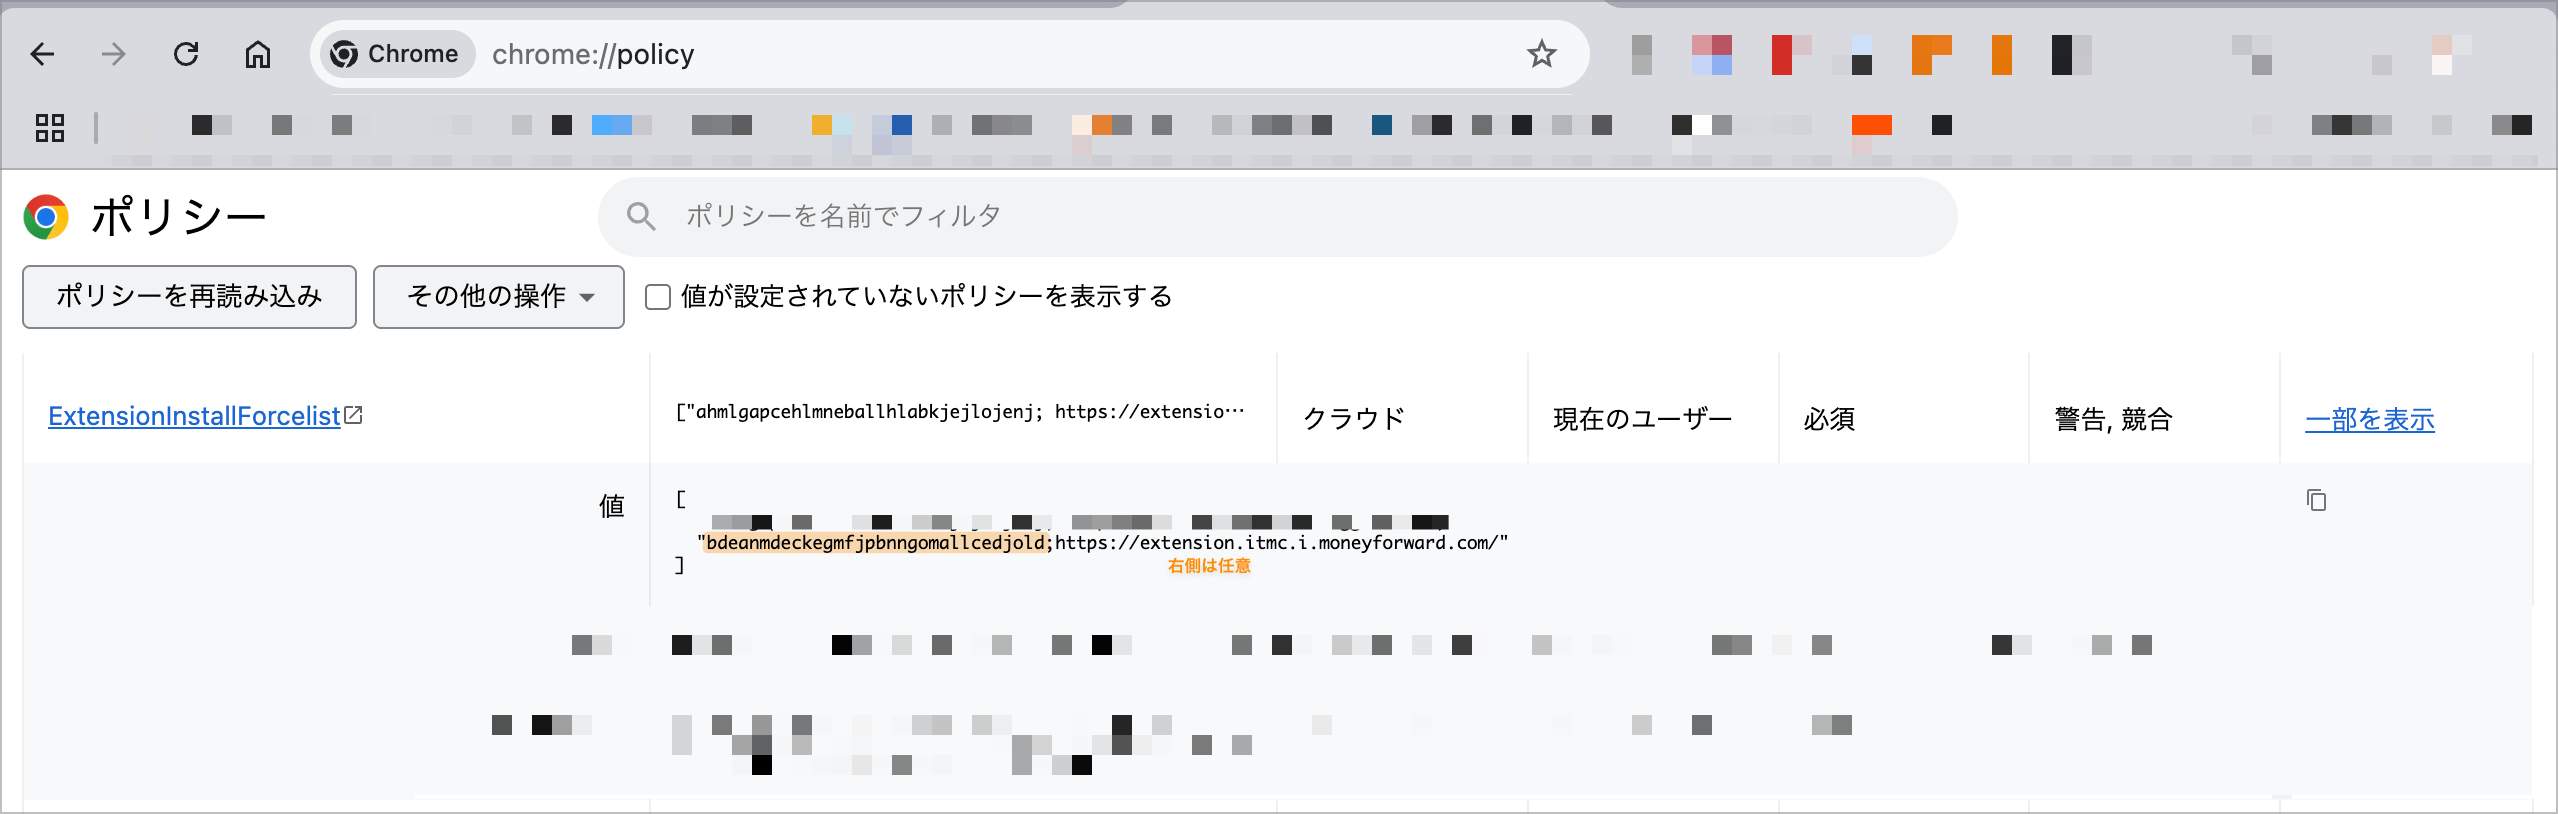
When successful, the ID appears under "ExtensionInstallForcelist" on the `chrome://policy` page.
The extension will be installed automatically. Once installed, you can open the following URL:
`chrome-extension://bdeanmdeckegmfjpbnngomallcedjold/options.html`
### Forced Installation of the Chrome Extension
The following uses JAMF Pro as an example.
Use a configuration profile in your MDM to distribute the forced installation parameter for the Chrome extension. Your environment may already distribute a password manager or similar via a configuration profile. In that case, add the entry to the existing profile rather than creating a duplicate.
```xml theme={null}
[Preference Domain]
com.google.Chrome
[Property List]
ExtensionInstallForcelist
bdeanmdeckegmfjpbnngomallcedjold
```
[https://chromeenterprise.google/policies/#ExtensionInstallForcelist](https://chromeenterprise.google/policies/#ExtensionInstallForcelist)
When successful, the ID appears under "ExtensionInstallForcelist" on the `chrome://policy` page.
The extension will be installed automatically. Once installed, you can open the following URL:
`chrome-extension://bdeanmdeckegmfjpbnngomallcedjold/options.html`
 ### Policy Configuration for the Extension
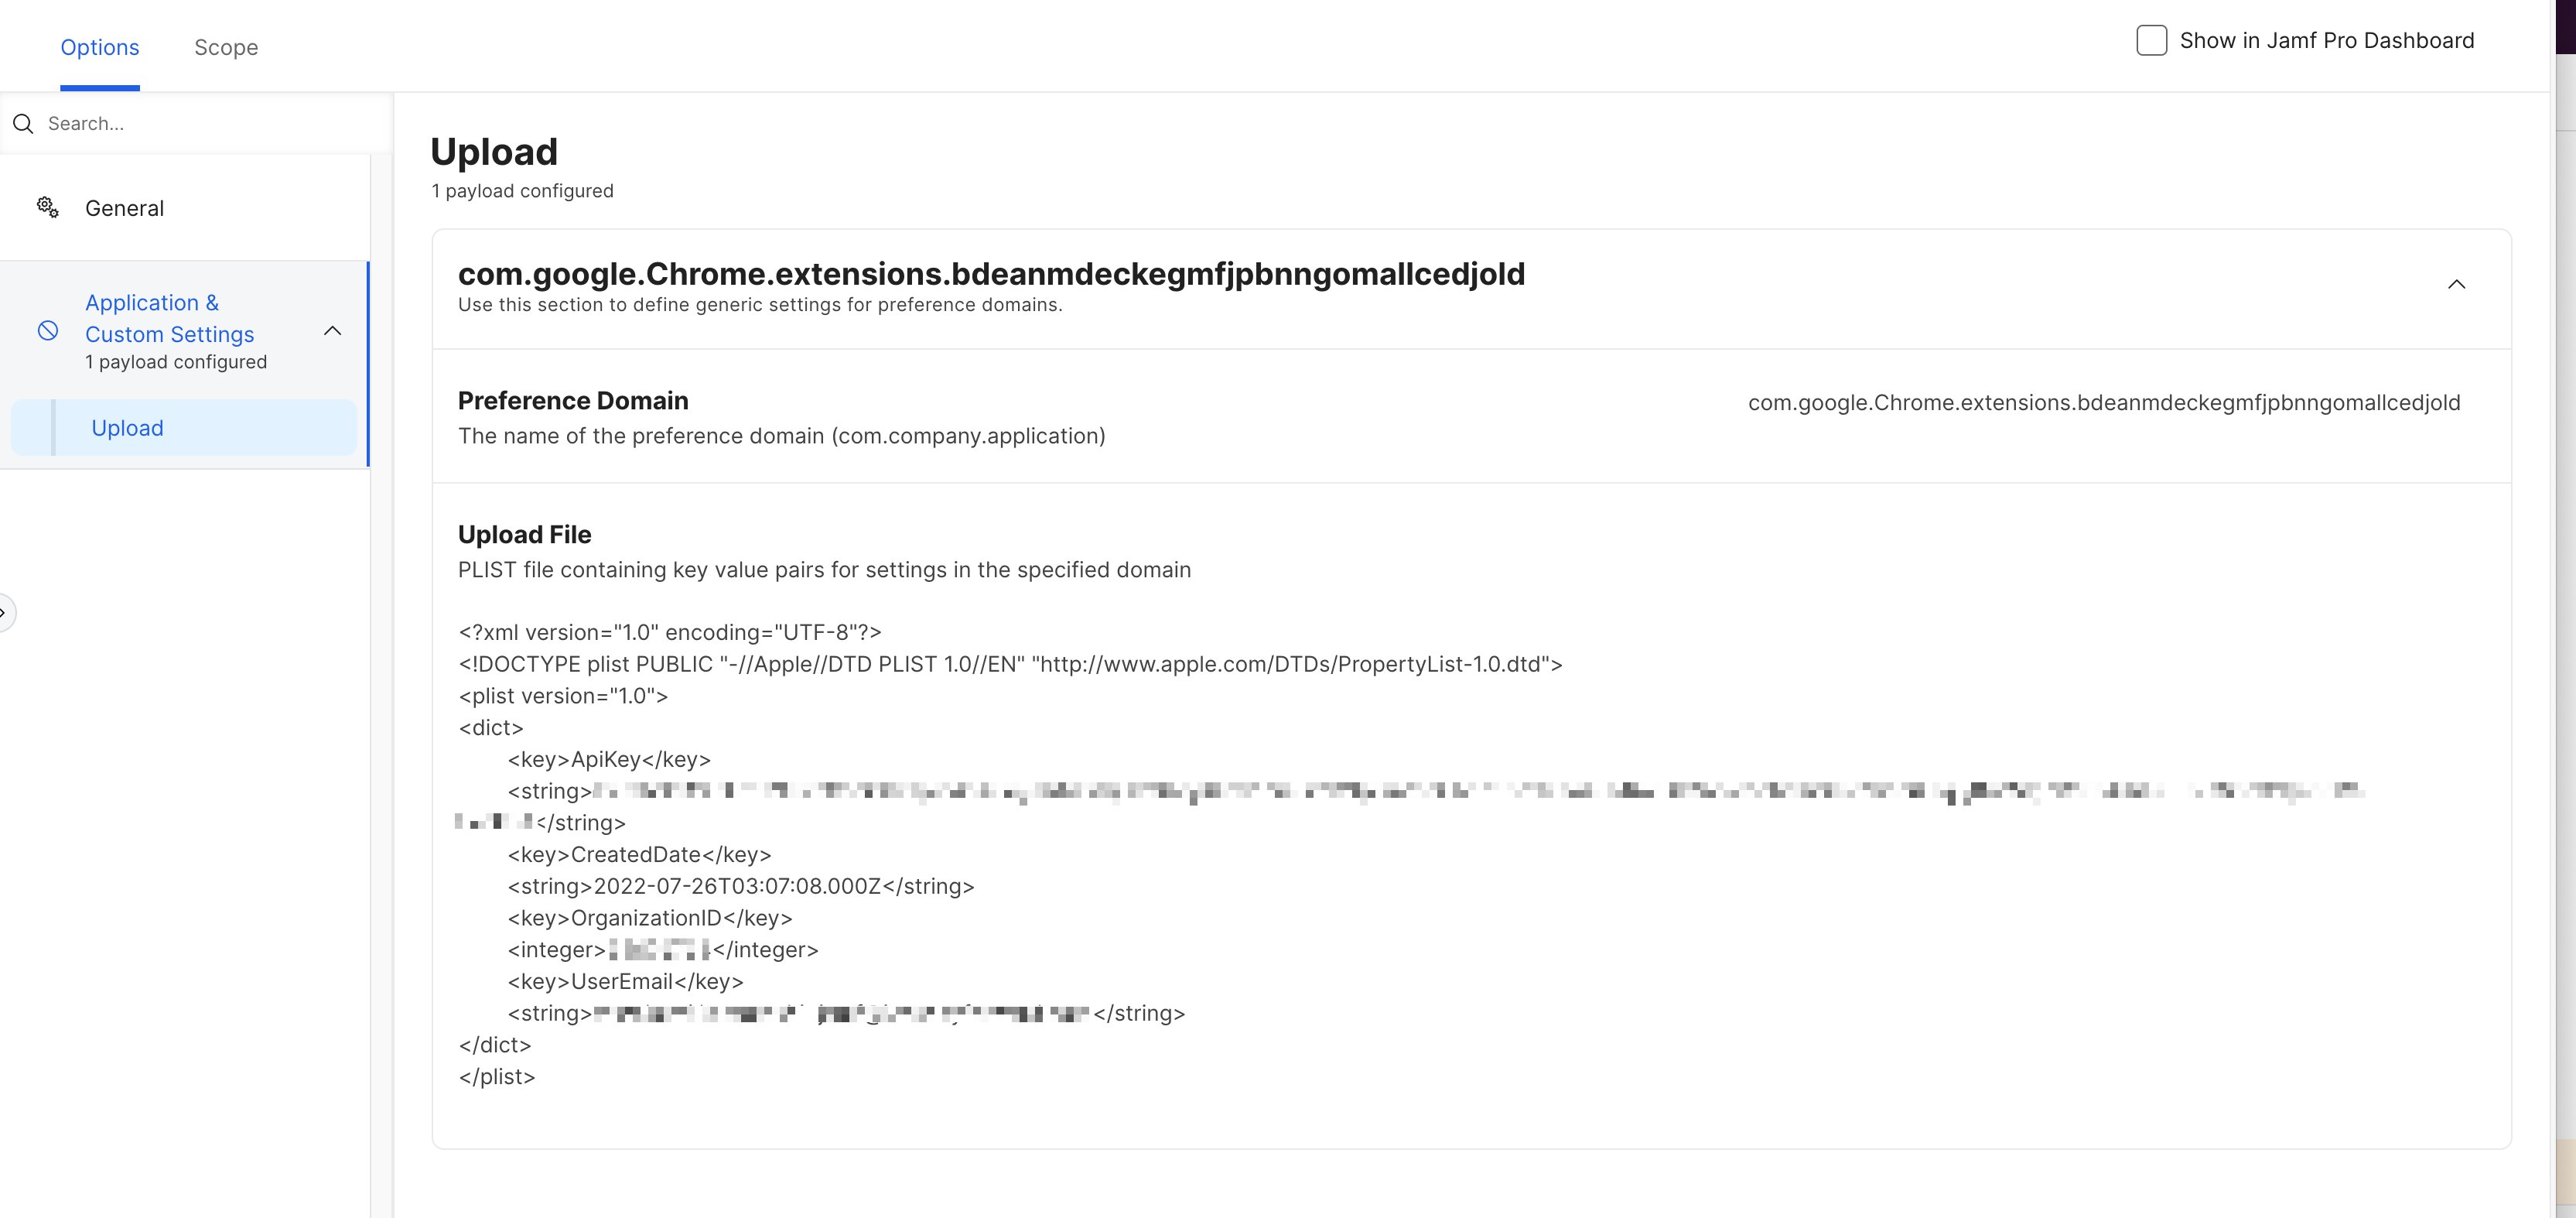
After distributing the extension, distribute the extension configuration via a configuration profile.
Fill in `ApiKey`, `CreatedDate`, and `OrganizationID` as constants using the extension policy information retrieved earlier. Set the values for each KEY inside ``.
`UserEmail` is optional but recommended. Distributing a unique value per device or per user allows the server to receive data with identity information rather than anonymized data.
Set a dynamic value for UserEmail.
* JAMF: Use the [Payload variable](https://learn.jamf.com/ja-JP/bundle/jamf-pro-documentation-current/page/Computer_Configuration_Profiles.html) `$EMAIL`.
* Kandji: Use the [Global variable](https://support.kandji.io/kb/ja/global-variables-1) `$EMAIL`.
Then distribute the profile.
### Policy Configuration for the Extension
After distributing the extension, distribute the extension configuration via a configuration profile.
Fill in `ApiKey`, `CreatedDate`, and `OrganizationID` as constants using the extension policy information retrieved earlier. Set the values for each KEY inside ``.
`UserEmail` is optional but recommended. Distributing a unique value per device or per user allows the server to receive data with identity information rather than anonymized data.
Set a dynamic value for UserEmail.
* JAMF: Use the [Payload variable](https://learn.jamf.com/ja-JP/bundle/jamf-pro-documentation-current/page/Computer_Configuration_Profiles.html) `$EMAIL`.
* Kandji: Use the [Global variable](https://support.kandji.io/kb/ja/global-variables-1) `$EMAIL`.
Then distribute the profile.
 ```xml theme={null}
[Preference Domain]
com.google.Chrome.extensions.bdeanmdeckegmfjpbnngomallcedjold
[Property List]
ApiKey
HERE_IS_YOUR_API_KEY
CreatedDate
2022-07-26T03:07:08.000Z
OrganizationID
99999999
UserEmail
$EMAIL
```
When the distribution succeeds, verify it using the following methods:
**OS-level verification**
```bash theme={null}
defaults read /Library/Managed\ Preferences/com.google.Chrome.extensions.bdeanmdeckegmfjpbnngomallcedjold
```
```xml theme={null}
[Preference Domain]
com.google.Chrome.extensions.bdeanmdeckegmfjpbnngomallcedjold
[Property List]
ApiKey
HERE_IS_YOUR_API_KEY
CreatedDate
2022-07-26T03:07:08.000Z
OrganizationID
99999999
UserEmail
$EMAIL
```
When the distribution succeeds, verify it using the following methods:
**OS-level verification**
```bash theme={null}
defaults read /Library/Managed\ Preferences/com.google.Chrome.extensions.bdeanmdeckegmfjpbnngomallcedjold
```
 **Chrome-level verification**
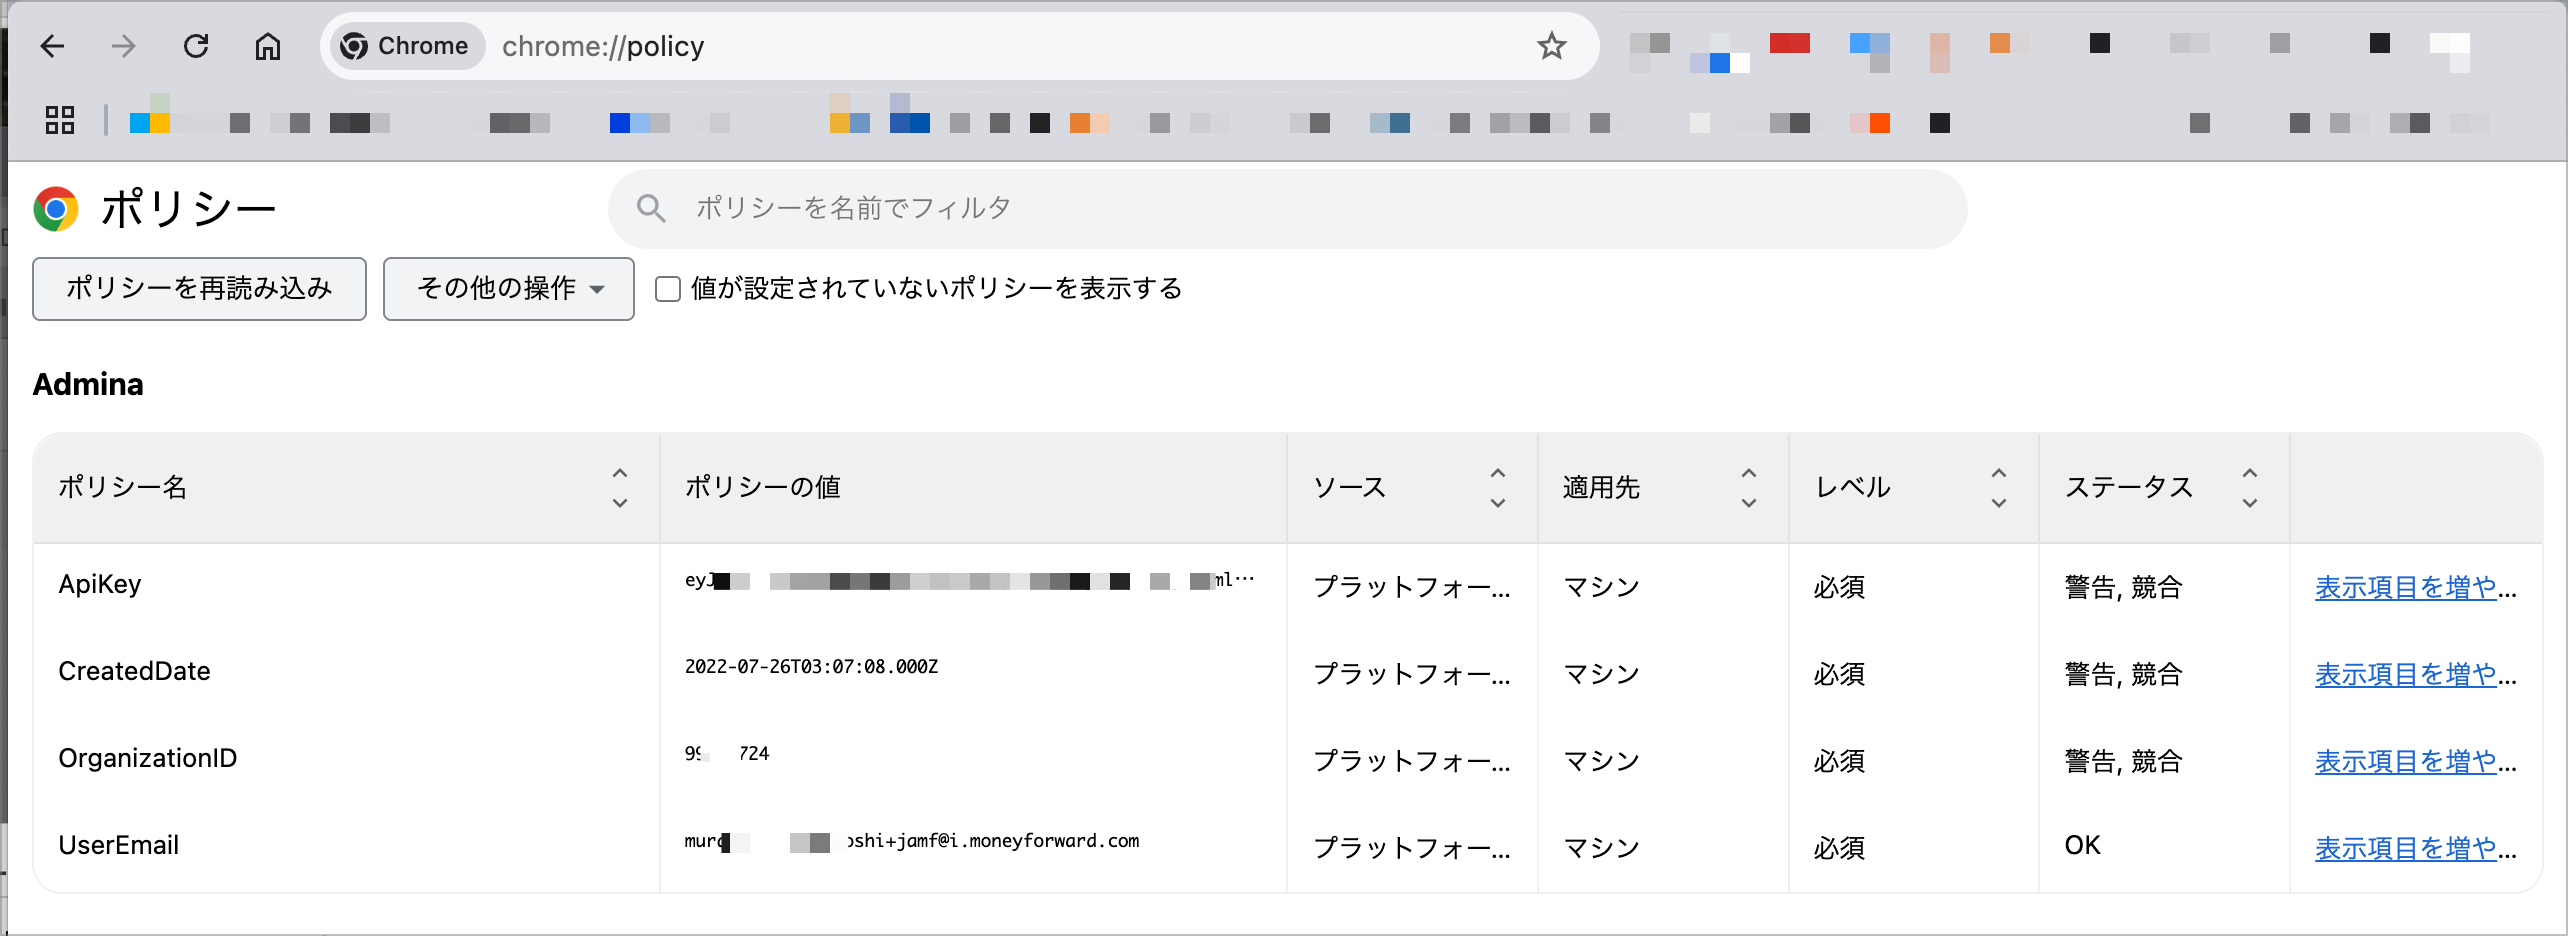
The "Admina" entry appears on the `chrome://policy` page. (The extension must be installed first.)
If it does not appear, click "Reload policies" once.
**Chrome-level verification**
The "Admina" entry appears on the `chrome://policy` page. (The extension must be installed first.)
If it does not appear, click "Reload policies" once.
 **Extension-level verification**
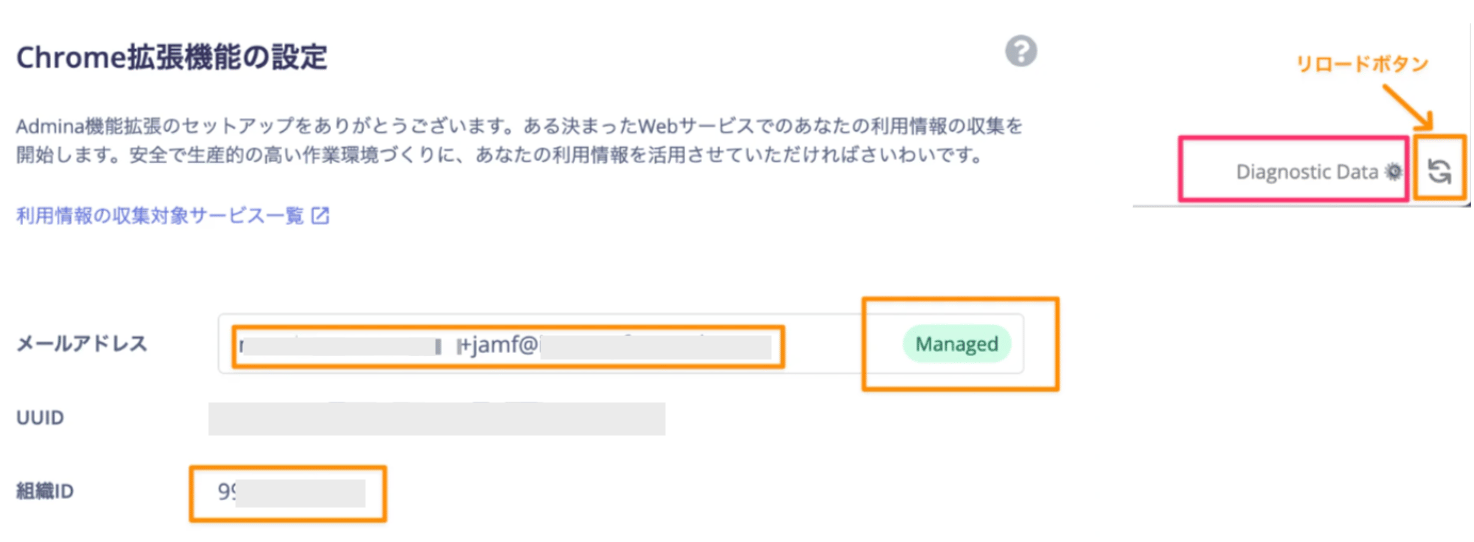
Open `chrome-extension://bdeanmdeckegmfjpbnngomallcedjold/options.html`.
If your email address and organization ID appear on screen, the setup is complete.
If they do not appear, click the reload button at the bottom right. If that does not resolve the issue, click "Diagnostic Data", copy the output, and send it to support.
**Extension-level verification**
Open `chrome-extension://bdeanmdeckegmfjpbnngomallcedjold/options.html`.
If your email address and organization ID appear on screen, the setup is complete.
If they do not appear, click the reload button at the bottom right. If that does not resolve the issue, click "Diagnostic Data", copy the output, and send it to support.
 ## Verifying Operation
The first data transmission begins approximately 30 minutes after setup.
Refer to the [activity verification guide](/en/it-management/shadow-it/7q1wryx3dk-extension) and confirm that the extension is working correctly.
## Email Setting Priority
There are three ways to set the Email value. The priority order is as follows:
| Priority | Source |
| -------- | ---------------------------------------------------------------------------------------------------------------------------------------------------------------------------------------------------------------------- |
| No.1 | A manually updated email address has the highest priority. An email address set manually in the [Extension settings view](chrome-extension://bdeanmdeckegmfjpbnngomallcedjold/options.html) always takes top priority. |
| No.2 | An email address set via plist is the second priority. Restart the browser or PC after configuring the plist to ensure the value loads reliably. |
| No.3 | The email address used to sign in to the browser is the third priority. If this value loads first, it may take several hours before the No.2 value takes effect. |
## How to Remove the Configuration
The following describes how to remove the plist settings configured above.
* Updating Chrome's ExtensionInstallForcelist
Remove only this service's extension ID from the ExtensionInstallForcelist. Removing it from the Forcelist triggers automatic uninstallation (unless the extension was installed manually).
* Deleting the extension's configuration profile
Delete the configuration profile for the extension.
## FAQ
### Q. Can I use a configuration profile without MDM?
A. This is not currently supported. Due to Chrome extension security restrictions, a manually created plist is loaded at the browser level but cannot be read by the extension.
### Q. Do I need to set a different EMAIL for each user?
A. Setting a unique email per user is recommended. The extension sends the email address to the server as the "operator" identifier.
Any value in email format is technically acceptable. For example, you can use the PC name as the local part (e.g., `HOSTNAME@example.com`).
The value appears on the web interface as the sent email address. However, because it may not link to actual users, data such as last-used dates may be harder to use. (It is still sufficient for Shadow IT purposes.)
### Q. Why does the server receive a UUID (random string) instead of an email?
A. The EMAIL setting may be missing. When no EMAIL is configured and the browser is not signed in (or Chrome Sync is disabled), the extension cannot identify the email address and sends a UUID instead.
### Q. Can a UUID be traced back to a specific person?
A. This is challenging. All employees would need to check their extension settings page individually. Consider distributing the EMAIL setting to avoid this situation.
## Verifying Operation
The first data transmission begins approximately 30 minutes after setup.
Refer to the [activity verification guide](/en/it-management/shadow-it/7q1wryx3dk-extension) and confirm that the extension is working correctly.
## Email Setting Priority
There are three ways to set the Email value. The priority order is as follows:
| Priority | Source |
| -------- | ---------------------------------------------------------------------------------------------------------------------------------------------------------------------------------------------------------------------- |
| No.1 | A manually updated email address has the highest priority. An email address set manually in the [Extension settings view](chrome-extension://bdeanmdeckegmfjpbnngomallcedjold/options.html) always takes top priority. |
| No.2 | An email address set via plist is the second priority. Restart the browser or PC after configuring the plist to ensure the value loads reliably. |
| No.3 | The email address used to sign in to the browser is the third priority. If this value loads first, it may take several hours before the No.2 value takes effect. |
## How to Remove the Configuration
The following describes how to remove the plist settings configured above.
* Updating Chrome's ExtensionInstallForcelist
Remove only this service's extension ID from the ExtensionInstallForcelist. Removing it from the Forcelist triggers automatic uninstallation (unless the extension was installed manually).
* Deleting the extension's configuration profile
Delete the configuration profile for the extension.
## FAQ
### Q. Can I use a configuration profile without MDM?
A. This is not currently supported. Due to Chrome extension security restrictions, a manually created plist is loaded at the browser level but cannot be read by the extension.
### Q. Do I need to set a different EMAIL for each user?
A. Setting a unique email per user is recommended. The extension sends the email address to the server as the "operator" identifier.
Any value in email format is technically acceptable. For example, you can use the PC name as the local part (e.g., `HOSTNAME@example.com`).
The value appears on the web interface as the sent email address. However, because it may not link to actual users, data such as last-used dates may be harder to use. (It is still sufficient for Shadow IT purposes.)
### Q. Why does the server receive a UUID (random string) instead of an email?
A. The EMAIL setting may be missing. When no EMAIL is configured and the browser is not signed in (or Chrome Sync is disabled), the extension cannot identify the email address and sends a UUID instead.
### Q. Can a UUID be traced back to a specific person?
A. This is challenging. All employees would need to check their extension settings page individually. Consider distributing the EMAIL setting to avoid this situation.