> ## Documentation Index
> Fetch the complete documentation index at: https://hc.saas-manager.biz.nuro.jp/llms.txt
> Use this file to discover all available pages before exploring further.
# 3-6. Setting Up Webhook Workflows
> Step-by-step instructions for setting up Webhook workflow automation.
This page explains the setup steps for the "Webhook Sync Template". This template lets you receive Webhooks from external systems (HRIS, IdP, custom tools, etc.). It uses these Webhooks to automate identity management.
## Prerequisites
Before setting up Webhook-based automation, confirm the following:
| Category | Item | Details / Requirements |
| ----------------------- | ---------------------- | -------------------------------------------------------------------------------------------------------------------------------------------------------------------------------------------------------------------------- |
| **Sending System** | Outbound Webhook | The HRIS, IdP, or custom system must be able to send data to external endpoints via Webhook. |
| | Data Format | Remove all newlines and spaces from the JSON body to create a compact string before generating the signature. If the sender signs with indentation, it will differ from the verification data and cause a signature error. |
| | HTTP Headers | Must be able to send `X-Timestamp` and `X-Webhook-Signature` (for authentication). |
| **Service Integration** | Onboarding/Offboarding | Each SaaS subject to automatic provisioning/deprovisioning must be connected. |
| **Notifications** | Slack | Slack integration must be completed. |
| | Email | The email address of the notification recipient must be identified. |
## Template Overview and How to Choose
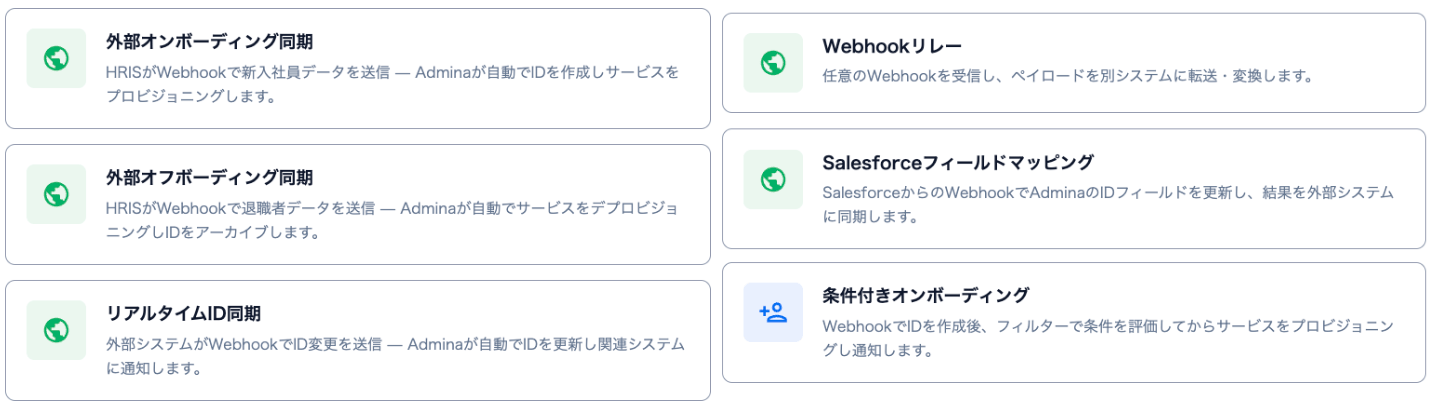
We offer six pre-built Webhook sync templates to match your needs.
| Template Name | Main Action | Example Use Case |
| ----------------------------- | -------------------------------------------------------------------------------------------------------------------------------------------------------------------------------------------------------------------------------------------------------- | ---------------------------------------------------------------------------------------------------------------------------------------------------------------------------------------------------------------------------------------------------------------------------------------- |
| **External Onboarding Sync** | Automatically creates an identity and provisions SaaS accounts by sending new hire data from your HRIS via **Webhook**. | Automate identity creation and SaaS access provisioning the moment a new employee record is created in your HRIS. |
| **External Offboarding Sync** | Automatically deletes SaaS accounts and archives identities by sending departure data from your HRIS via **Webhook**. | Automate deactivation of all SaaS accounts and archiving of the identity the moment someone is marked as departed in your HRIS. |
| **Real-Time Identity Sync** | Automatically updates identity information and notifies connected systems by sending change data (department, job title, etc.) from an external system via **Webhook**. | When treating an external system as the source of truth, instantly reflect attribute changes (department, job title, etc.). You can also send notifications via Slack or email. |
| **Salesforce Field Mapping** | Receives data from Salesforce via Webhook to update identity information, then syncs the updated result back to the external system via Webhook. | - Automatically reflect Salesforce data changes in this service
- Sync CRM/ERP data bidirectionally with identity fields
- Instantly reflect field changes from an external SaaS and notify another system of the result |
| **Conditional Onboarding** | Receives new hire data from an external system (such as an HRIS) via Webhook and creates an identity. After evaluating filter conditions (department, job title, etc.), it provisions services and sends notifications only when the conditions are met. | - Provision different services depending on a new employee's department or job title
- Automatically register onboarding data from your HRIS and grant appropriate tool access based on conditions
Example: Provision GitHub/JIRA for engineers and Salesforce for sales staff |
| **Webhook Relay** | A simple relay that receives any Webhook and forwards the payload, as-is or transformed, to another system as an HTTP request. | - Relay or transform an existing Webhook to another system
- Notify system B of an event from system A (used as a relay point)
- Route Webhooks or transform payloads |
 ## Setup Steps
1. Go to **Automation** > click **\[Create Automation]**.
2. Select a Webhook template from the dialog.
1. Real-Time Identity Sync: Click **\[Use Real-Time Sync]**.
2. External Onboarding Sync: Click **\[Use Webhook Trigger]**.
3. External Offboarding Sync: Click **\[Use Webhook Offboarding]**.
4. Salesforce Field Mapping: Click **\[Use Salesforce Field Mapping]**.
5. Conditional Onboarding: Click **\[Use Conditional Onboarding]**.
6. Webhook Relay: Click **\[Use Webhook Relay]**.
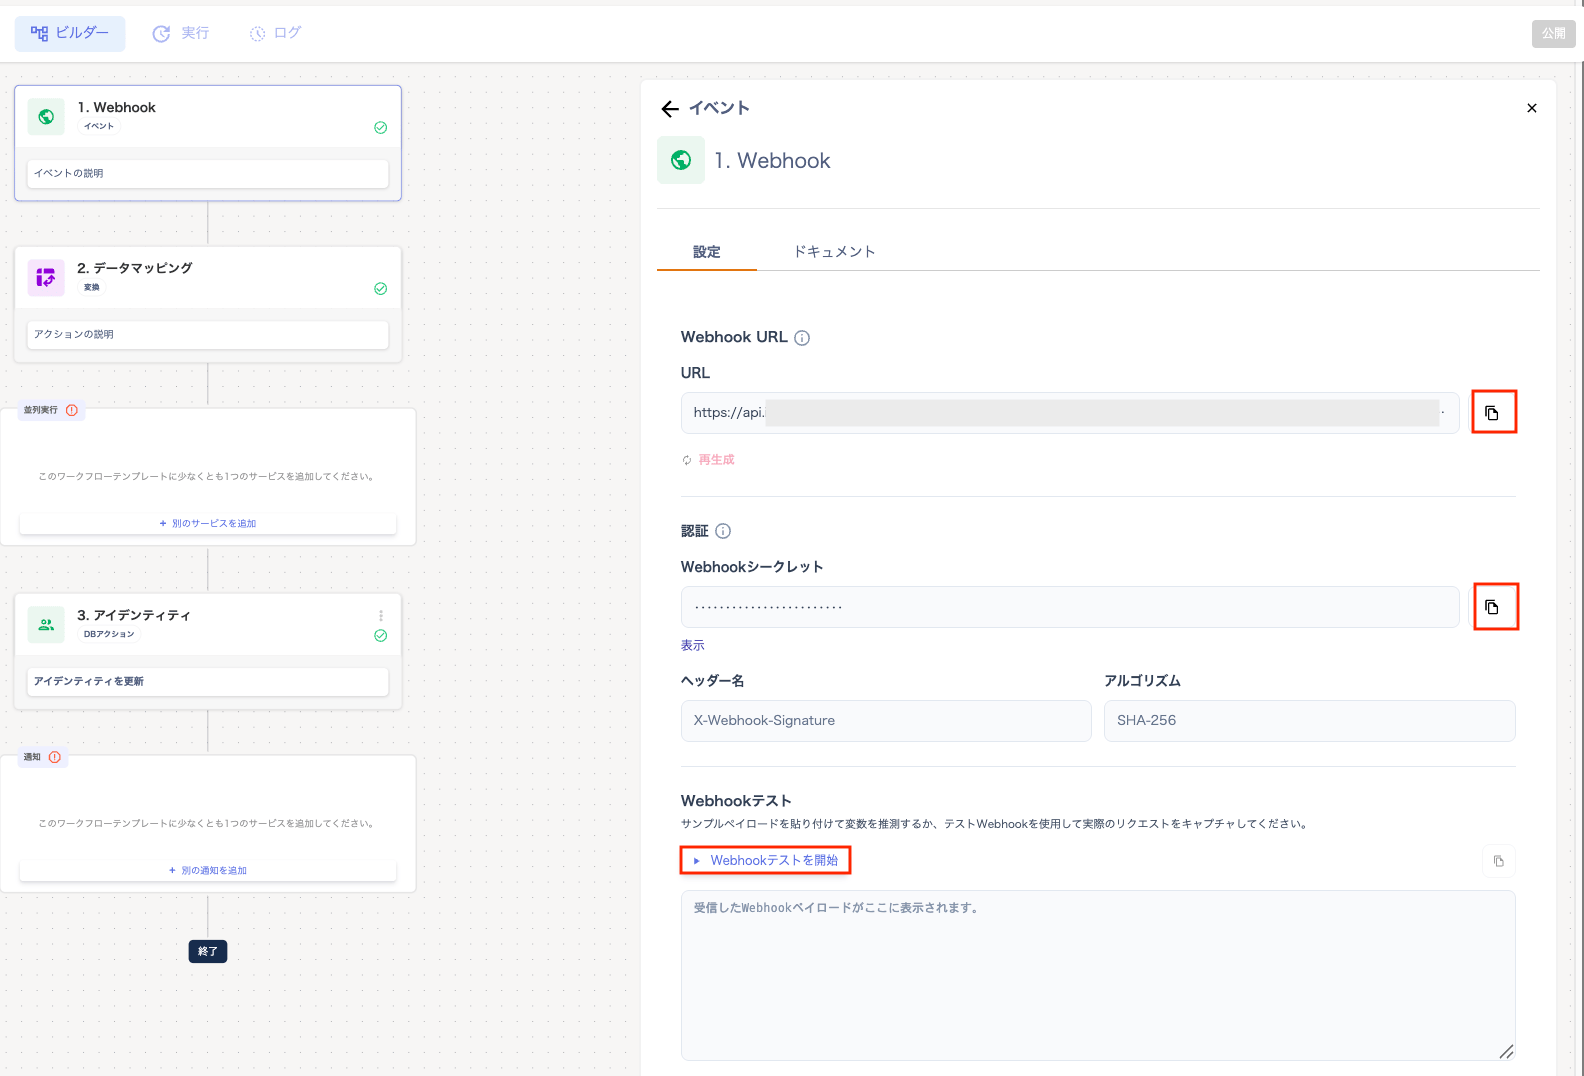
3. In the "Builder" screen, configure **"1. Webhook"** under the "Settings" tab. You can also refer to the "Documentation" tab for details.
Copy and save the URL from "Webhook URL" and the secret from "Webhook Secret". Then configure the copied URL and secret in your sending system and publish.
| Item | Description |
| ------------------ | ----------------------------------------------------------------------------------------------------------------------------------------------------------------------------------------------------------------------------------------------------------------------------------------------------------------------------------------------------------------------- |
| **Webhook Test** | Click **\[Start Webhook Test]** under "Webhook Test" to enter a waiting state. "Waiting for an incoming webhook request…" appears in the sidebar. Send a test payload (JSON) once as a **POST** from your sending system. |
| **Test Reception** | The received data is displayed in the panel and can be used for two purposes: **Signature Validation**: The reception time and an **OK / Error** badge are displayed so you can verify authentication. **Automatic Variable Inference**: Payload keys are automatically extracted. You can reference and map them as `{{trigger.}}` variables in subsequent nodes. |
**Webhook Secret**: It is only displayed once when generated. If you regenerate it, you must also update the secret in your sending system's configuration.
**Note during test execution**: Do not close the sidebar. Closing it interrupts the listening session, and you must restart by clicking **\[Start Webhook Test]** again.
## Setup Steps
1. Go to **Automation** > click **\[Create Automation]**.
2. Select a Webhook template from the dialog.
1. Real-Time Identity Sync: Click **\[Use Real-Time Sync]**.
2. External Onboarding Sync: Click **\[Use Webhook Trigger]**.
3. External Offboarding Sync: Click **\[Use Webhook Offboarding]**.
4. Salesforce Field Mapping: Click **\[Use Salesforce Field Mapping]**.
5. Conditional Onboarding: Click **\[Use Conditional Onboarding]**.
6. Webhook Relay: Click **\[Use Webhook Relay]**.
3. In the "Builder" screen, configure **"1. Webhook"** under the "Settings" tab. You can also refer to the "Documentation" tab for details.
Copy and save the URL from "Webhook URL" and the secret from "Webhook Secret". Then configure the copied URL and secret in your sending system and publish.
| Item | Description |
| ------------------ | ----------------------------------------------------------------------------------------------------------------------------------------------------------------------------------------------------------------------------------------------------------------------------------------------------------------------------------------------------------------------- |
| **Webhook Test** | Click **\[Start Webhook Test]** under "Webhook Test" to enter a waiting state. "Waiting for an incoming webhook request…" appears in the sidebar. Send a test payload (JSON) once as a **POST** from your sending system. |
| **Test Reception** | The received data is displayed in the panel and can be used for two purposes: **Signature Validation**: The reception time and an **OK / Error** badge are displayed so you can verify authentication. **Automatic Variable Inference**: Payload keys are automatically extracted. You can reference and map them as `{{trigger.}}` variables in subsequent nodes. |
**Webhook Secret**: It is only displayed once when generated. If you regenerate it, you must also update the secret in your sending system's configuration.
**Note during test execution**: Do not close the sidebar. Closing it interrupts the listening session, and you must restart by clicking **\[Start Webhook Test]** again.
 4. After "1. Webhook", the screens displayed differ per selected template. Refer to the linked instructions for details.
1. Real-Time Identity Sync: ["Data Mapping"](#data-mapping) > ["Identity"](#identity) > ["HTTP Request"](#http-request)
2. External Onboarding Sync: ["Data Mapping"](#data-mapping) > ["Identity"](#identity) > [Service Selection (Parallel Execution)](#parallel-execution) > [Notification](#notification)
3. External Offboarding Sync: ["Data Mapping"](#data-mapping) > [Service Selection (Parallel Execution)](#parallel-execution) > ["Identity"](#identity) > [Notification](#notification)
4. Salesforce Field Mapping: ["Identity"](#identity)
5. Conditional Onboarding: ["Identity"](#identity) > [Service Selection (Parallel Execution)](#parallel-execution) > [Notification](#notification)
6. Webhook Relay: ["HTTP Request"](#http-request)
5. Once all checks in the "Builder" turn green, click **\[Publish]** or **\[Dry Run]**.
4. After "1. Webhook", the screens displayed differ per selected template. Refer to the linked instructions for details.
1. Real-Time Identity Sync: ["Data Mapping"](#data-mapping) > ["Identity"](#identity) > ["HTTP Request"](#http-request)
2. External Onboarding Sync: ["Data Mapping"](#data-mapping) > ["Identity"](#identity) > [Service Selection (Parallel Execution)](#parallel-execution) > [Notification](#notification)
3. External Offboarding Sync: ["Data Mapping"](#data-mapping) > [Service Selection (Parallel Execution)](#parallel-execution) > ["Identity"](#identity) > [Notification](#notification)
4. Salesforce Field Mapping: ["Identity"](#identity)
5. Conditional Onboarding: ["Identity"](#identity) > [Service Selection (Parallel Execution)](#parallel-execution) > [Notification](#notification)
6. Webhook Relay: ["HTTP Request"](#http-request)
5. Once all checks in the "Builder" turn green, click **\[Publish]** or **\[Dry Run]**.
 6. The "Confirm Workflow Automation Settings" screen appears. Enter an automation name and click **\[Publish]**.
Note: You cannot reuse a name that is already registered for the automation name.
6. The "Confirm Workflow Automation Settings" screen appears. Enter an automation name and click **\[Publish]**.
Note: You cannot reuse a name that is already registered for the automation name.
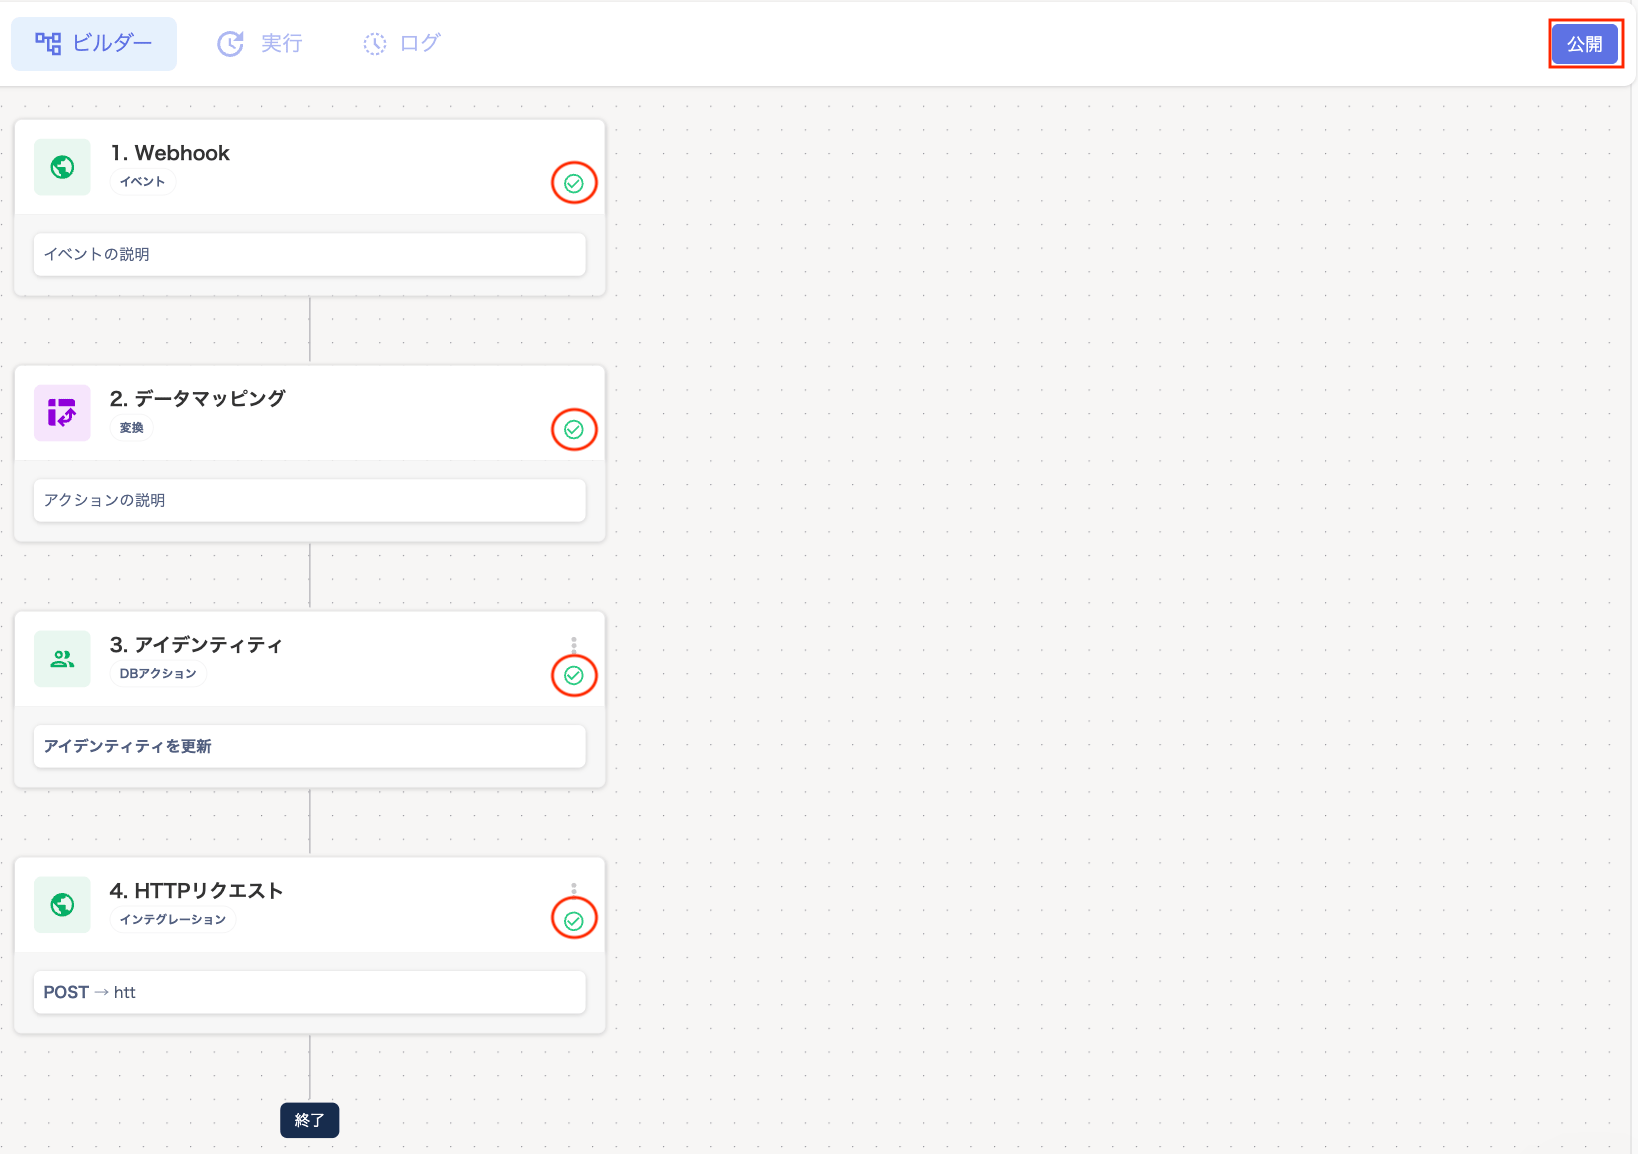 7. When "Workflow has been published" is displayed, click **\[OK]**.

Data Mapping
Select "Data Mapping" in the "Builder" screen to see a list of standard identity fields and your custom identity fields.
Click **\[Auto-fill from Sample Payload]** to automatically infer each field based on the keys received during the test. Matching priority is exact match, then prefix/suffix match.
Be sure to review the content before saving. Fields that were not matched are left blank and are skipped at runtime.
To override, click a field and select a variable from **\[Insert Variable]**. Alternatively, directly enter the path (e.g., `{{trigger.user_displayName}}`) to override.
Only one `{{trigger.X}}` can be set per field. Entering multiple values makes the field invalid.
**Target**: Currently, only "identity" can be selected.
**Field Mapping**: Defines the conversion rules from the data source to the target fields. [Custom fields](/en/it-management/workflows/rdeflerejh-automation-custom) can also be configured.
Identity
In the "Builder" screen, under **"3. Identity"**, perform the following actions on the target user.
 | Item | Description |
| -------------- | -------------------------------------------------------------------------------------------------------------------------------------------------------------------------------------------------------------------------------------------------------------------------------------------------------------------------------------------------------------------------------------------------------------------------------------- |
| **Action** | The operation type for the identity is pre-selected as follows: **Update Identity**: Displayed when the template "Real-Time Identity Sync / External Offboarding Sync" is selected. **Create Identity**: Displayed when the template "External Onboarding Sync" is selected. |
| **Parameters** | Parameter fields are displayed dynamically. Depending on the action type shown above, **"Update Identity Parameters"** or **"Create Identity Parameters"** are shown. Verify that variables such as `{{identity.displayName}}` (display name) and `{{identity.primaryEmail}}` (primary email address) are correctly mapped. Job title, department name, employee ID, contract end date, and other fields can also be mapped as needed. |
| Item | Description |
| -------------- | -------------------------------------------------------------------------------------------------------------------------------------------------------------------------------------------------------------------------------------------------------------------------------------------------------------------------------------------------------------------------------------------------------------------------------------- |
| **Action** | The operation type for the identity is pre-selected as follows: **Update Identity**: Displayed when the template "Real-Time Identity Sync / External Offboarding Sync" is selected. **Create Identity**: Displayed when the template "External Onboarding Sync" is selected. |
| **Parameters** | Parameter fields are displayed dynamically. Depending on the action type shown above, **"Update Identity Parameters"** or **"Create Identity Parameters"** are shown. Verify that variables such as `{{identity.displayName}}` (display name) and `{{identity.primaryEmail}}` (primary email address) are correctly mapped. Job title, department name, employee ID, contract end date, and other fields can also be mapped as needed. |
Service Selection (Parallel Execution)
1. Under **"Parallel Execution"**, click **\[+ Add Another Service]** to add the services you want to configure in the workflow.
 2. Select the service shown under "Provisioning" or "Deprovisioning".
The displayed services are those [preconfigured (mapped)](/en/it-management/workflows/ms4wo45v27-admina-automation-wic).
If configuring multiple services in the workflow, turn on "Multiple Selection".
3. On the "Parallel Execution" screen, click a selected service to display the "Settings" panel on the right.
Select "Service Settings - Workspace Name" from the dropdown.
To configure multiple services, click **\[+ Add Another Service]**.
2. Select the service shown under "Provisioning" or "Deprovisioning".
The displayed services are those [preconfigured (mapped)](/en/it-management/workflows/ms4wo45v27-admina-automation-wic).
If configuring multiple services in the workflow, turn on "Multiple Selection".
3. On the "Parallel Execution" screen, click a selected service to display the "Settings" panel on the right.
Select "Service Settings - Workspace Name" from the dropdown.
To configure multiple services, click **\[+ Add Another Service]**.
Notification
1. Under **"Notification"**, click **\[+ Add Another Notification]**.
2. On the "Message" screen, select the notification method "Slack/Email".
If you want to set up multiple notifications, turn on "Multiple Selection".
For Slack setup steps, see [Notification Method "Slack" Setup Instructions](/en/it-management/workflows/ygzni03g1c-admina-automation-wic-ggx).
3. On the "Notification" screen, click the selected message to display the "Settings" panel on the right.
HTTP Request
In **"4. HTTP Request"**, if a callback to an external API is needed, configure the method (POST, etc.) and endpoint URL.
Configure the sender to send Webhooks in the following format:
| Item | Value / Requirement |
| --------------------------- | ---------------------------------------------------------------------------- |
| Endpoint | The Webhook URL generated in this service |
| Method | POST |
| Header: Content-Type | application/json |
| Header: X-Timestamp | Unix timestamp (milliseconds, string) |
| Header: X-Webhook-Signature | sha256=HMAC-SHA256(secret, "{ts}.{body}") |
| Request Body | Compact JSON (no spaces or indentation). The keys you send become variables. |
## Automatic Execution and How to Verify
This workflow does not need to be started manually. It runs automatically each time it receives a signed **POST** request.
When a valid request reaches the Webhook URL, it immediately validates the "timestamp" and "signature". Once validation passes, it saves the payload and starts the workflow in the background.
You can verify the payload values actually used in the latest execution in the following locations:
* Editor: View actual values in the variable picker.
* Execution Details: Detailed data of expanded values is displayed in the Variable Resolution panel.
### Steps to Verify Operation
Check the "Run" and "Log" tabs to verify that the built workflow is operating correctly.
Open the "Run" and "Log" tabs to see detailed information. This includes "Received Payload", "Resolved Variables", and "Success/Failure of Each Action".
Send real data (or use the debug panel) from your sending system. Then verify that the status progresses from `Pending` to complete. Also verify that identity creation and notifications occur as expected.
**If execution does not progress from `Pending`:** This may not be a configuration error, but rather a system-side queuing issue.
## Troubleshooting
| Symptom | Possible Cause and Solution |
| -------------------------- | ------------------------------------------------------------------------------------------------------------------- |
| 401 Unauthorized | Signature mismatch. Verify that the body is serialized as a compact string (no indentation) before signing. |
| 400 Bad Request | Check for missing headers, the timestamp format (milliseconds), or clock drift. |
| Variables are not resolved | Re-run **\[Auto-fill from Sample Payload]** in the mapping node and verify the path is correct. |
| Secret lost | Copy and save the secret from "Webhook Secret", then update the copied secret in your sending system and republish. |