> ## Documentation Index
> Fetch the complete documentation index at: https://hc.saas-manager.biz.nuro.jp/llms.txt
> Use this file to discover all available pages before exploring further.
# 3-3. Using Directory Custom Fields in Workflows
> Learn about the screens where you can configure custom fields in automation.
**Permission for this service:** This feature requires **Admin** or **Automation Manager** permissions.
**SaaS status:** The target SaaS must be connected with administrator privileges (including API permissions) sufficient to create and delete accounts.
Automation supports not only standard fields but also "custom fields" created in the Directory screen. You can use these custom fields as mapping sources or workflow trigger conditions.
This page explains each screen where you can configure custom fields.
#### **What are custom fields?**
Custom fields let you add company-specific attributes beyond standard fields (such as name and email address). Examples include employee numbers or automation flags. Custom fields display a \[Custom] label.
The custom fields supported in automation are directory custom fields.
To use custom fields in automation, you must first [add a custom input field in Directory Settings](/en/it-management/directory/gqqdb2621q-edit-uid#add-custom-fields).
 #### **Custom field configuration screens in automation**
You can configure custom fields on the following screens in automation:
* **Automation > "Services" tab**
* **Automation > "Automation" tab**
#### **"Services" tab**
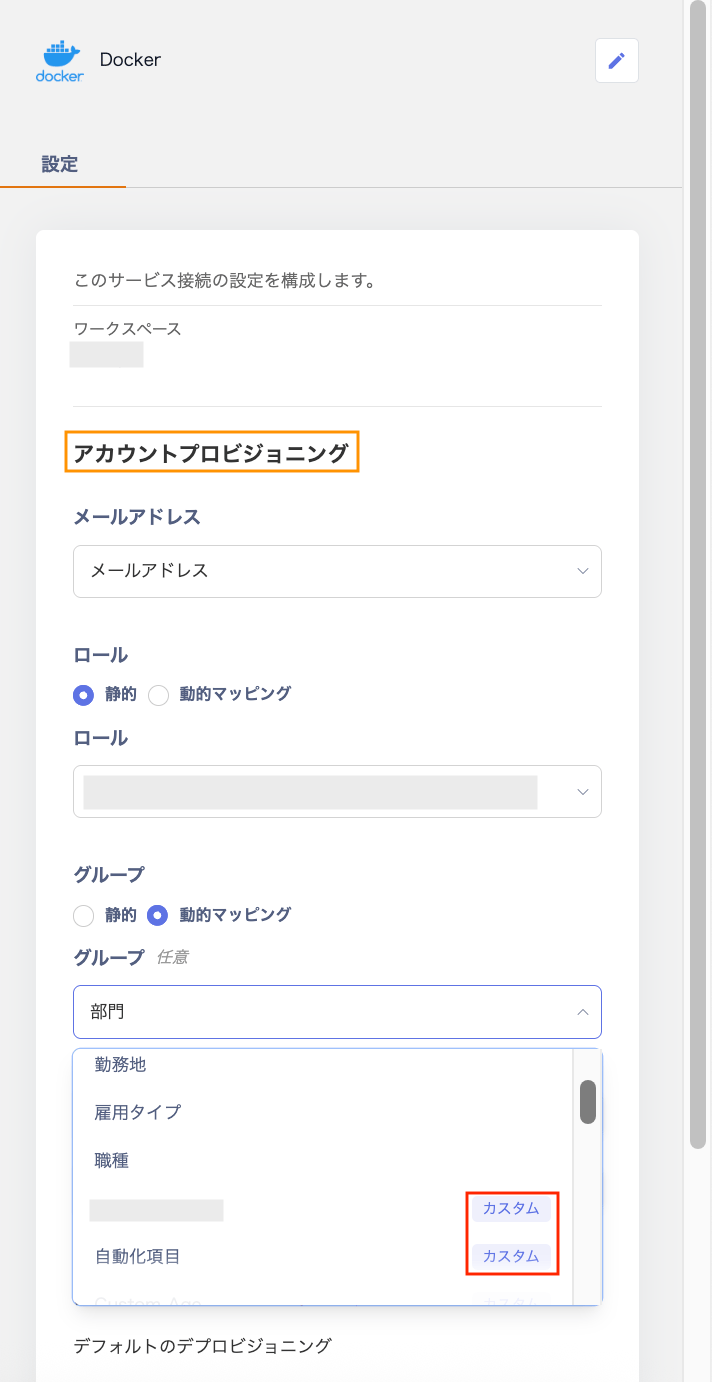
When creating accounts for a specific SaaS, you can assign custom fields to SaaS attributes such as roles and groups.
#### **How to configure**
1. Go to Automation > "Services" tab > "Connection Settings" screen, then click \[Add Connection]. Alternatively, click the three-dot menu \[**︙**] on the right side of the target service and select \[Edit].
#### **Custom field configuration screens in automation**
You can configure custom fields on the following screens in automation:
* **Automation > "Services" tab**
* **Automation > "Automation" tab**
#### **"Services" tab**
When creating accounts for a specific SaaS, you can assign custom fields to SaaS attributes such as roles and groups.
#### **How to configure**
1. Go to Automation > "Services" tab > "Connection Settings" screen, then click \[Add Connection]. Alternatively, click the three-dot menu \[**︙**] on the right side of the target service and select \[Edit].
 2. On the "Settings" screen, under "Account Provisioning," select "Dynamic Mapping" via the radio button for each field. Then choose a "Custom" field from the dropdown menu. Custom fields display a "Custom" label. For details on dynamic and static mapping, see [Differences in Mapping Methods](/en/it-management/workflows/ms4wo45v27-admina-automation-wic).
 #### **"Automation" tab**
In the Workflow > "Builder" screen, you can use custom fields as trigger conditions. You can also use them as data mapping sources on the following screens.
| Screen | Setup step | Overview / configurable content | Example use of custom fields |
| -------------------------------------------------------------------------------- | ------------------------------------------------- | -------------------------------------------------------------------------------- | -------------------------------------------------------------------------------------------------------------- |
| "1. A new employee has been added"
#### **"Automation" tab**
In the Workflow > "Builder" screen, you can use custom fields as trigger conditions. You can also use them as data mapping sources on the following screens.
| Screen | Setup step | Overview / configurable content | Example use of custom fields |
| -------------------------------------------------------------------------------- | ------------------------------------------------- | -------------------------------------------------------------------------------- | -------------------------------------------------------------------------------------------------------------- |
| "1. A new employee has been added"
"1. A retired employee has been deleted" | Trigger (new addition / deletion or deactivation) | Use custom fields as conditions (filters) to determine when the workflow starts. | Run account creation only for employees whose custom field "Automation Flag" is set to "Target." |
| "2. Data Mapping" | Data mapping | Map a directory custom field value to a connected service field. | Automatically sync the directory custom field "Sync ID" to the corresponding custom field in Google Workspace. |
#### **"1. A new employee has been added" / "1. A retired employee has been deleted" screen**
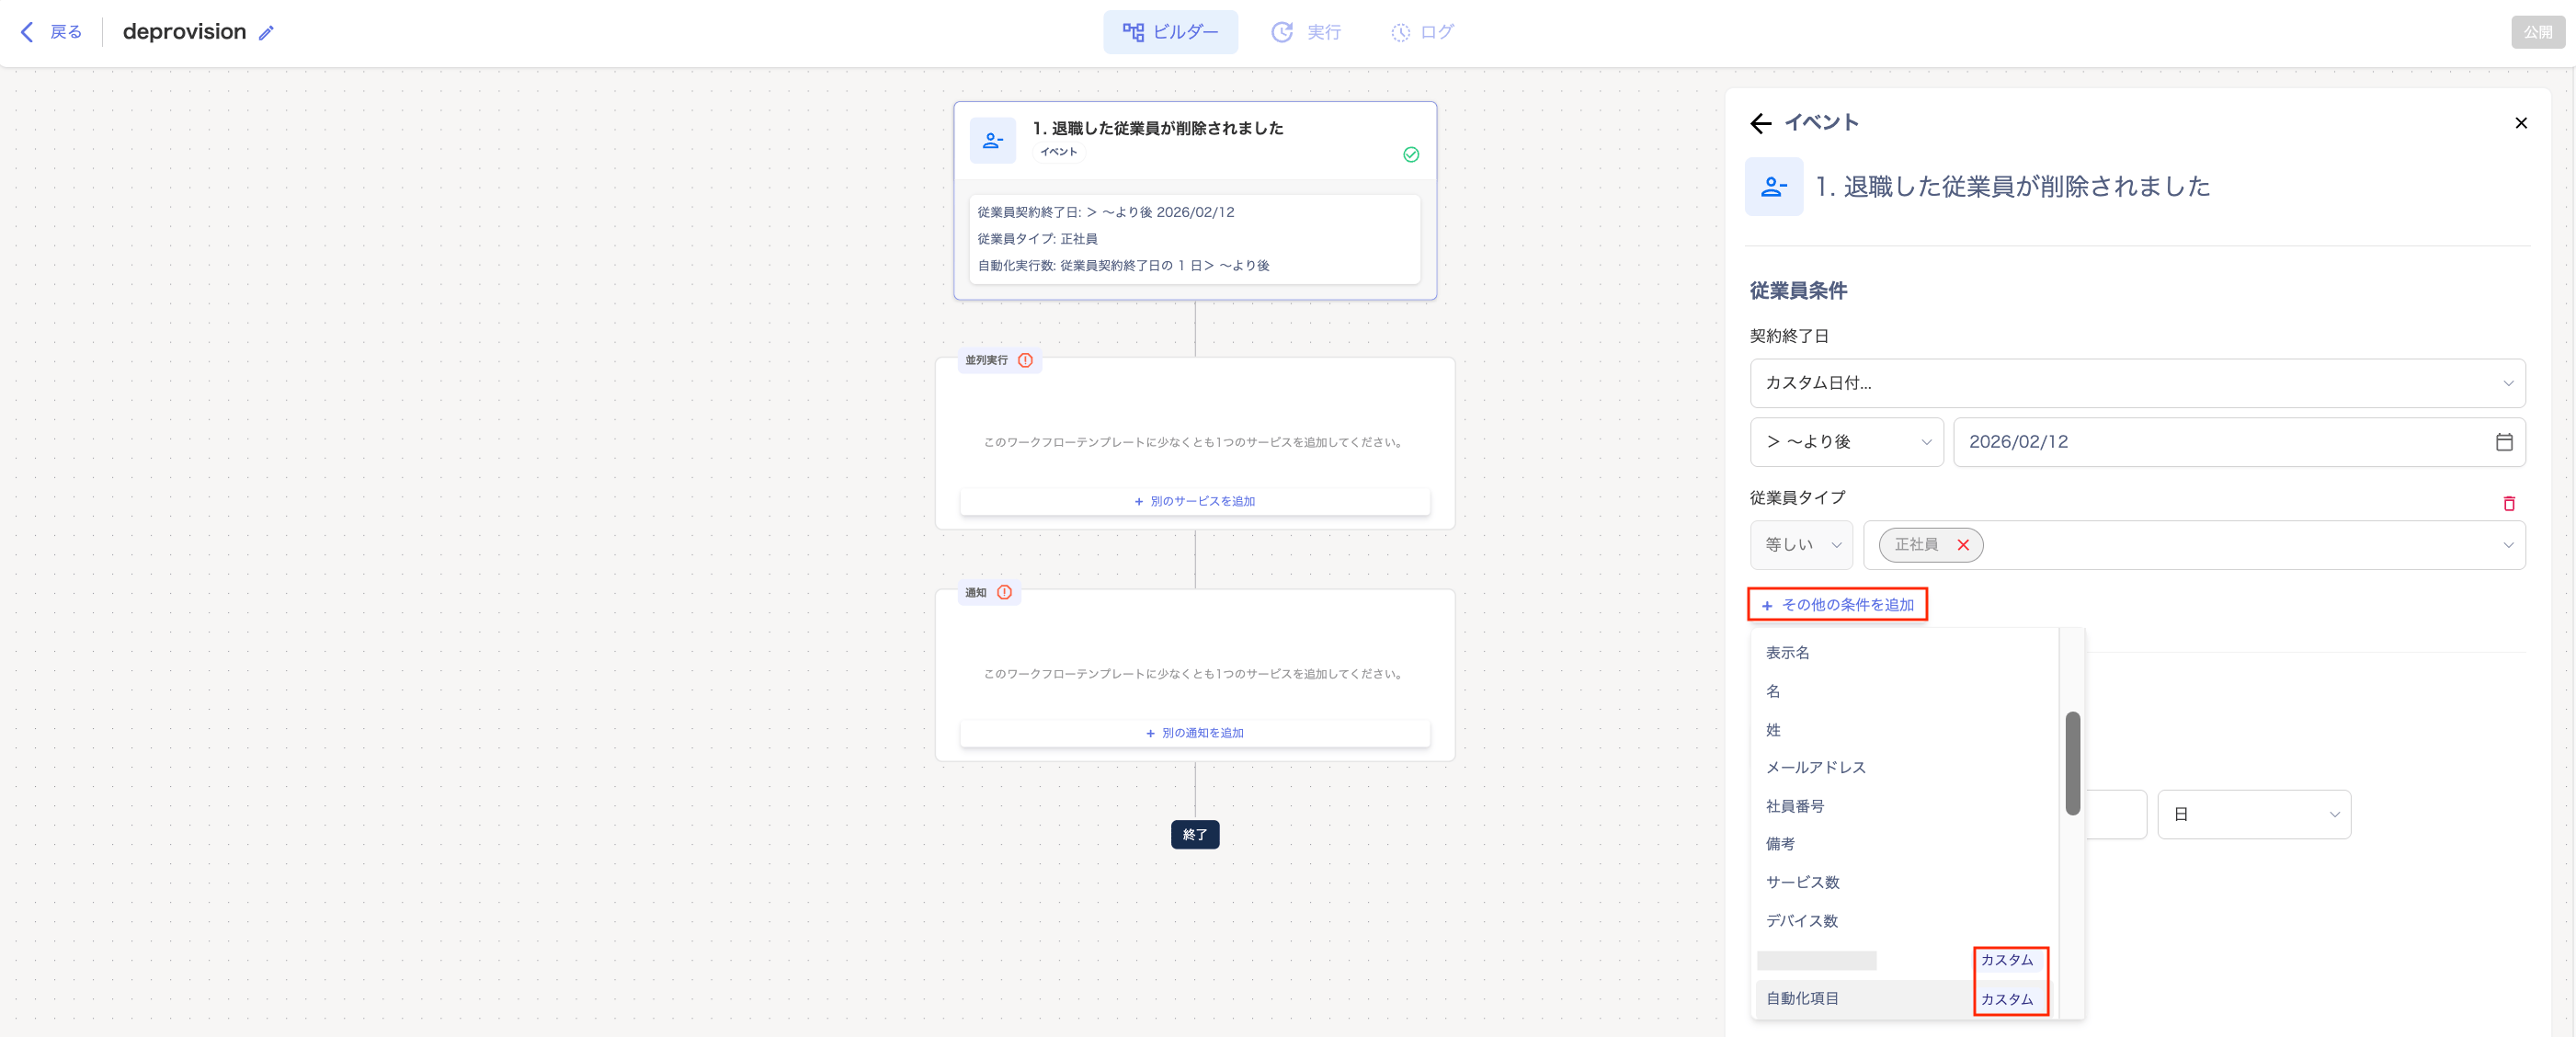
Click "Add another condition" and select a previously created custom field from the dropdown. This restricts the workflow to users with specific attributes.

 #### **"2. Data Mapping" screen**
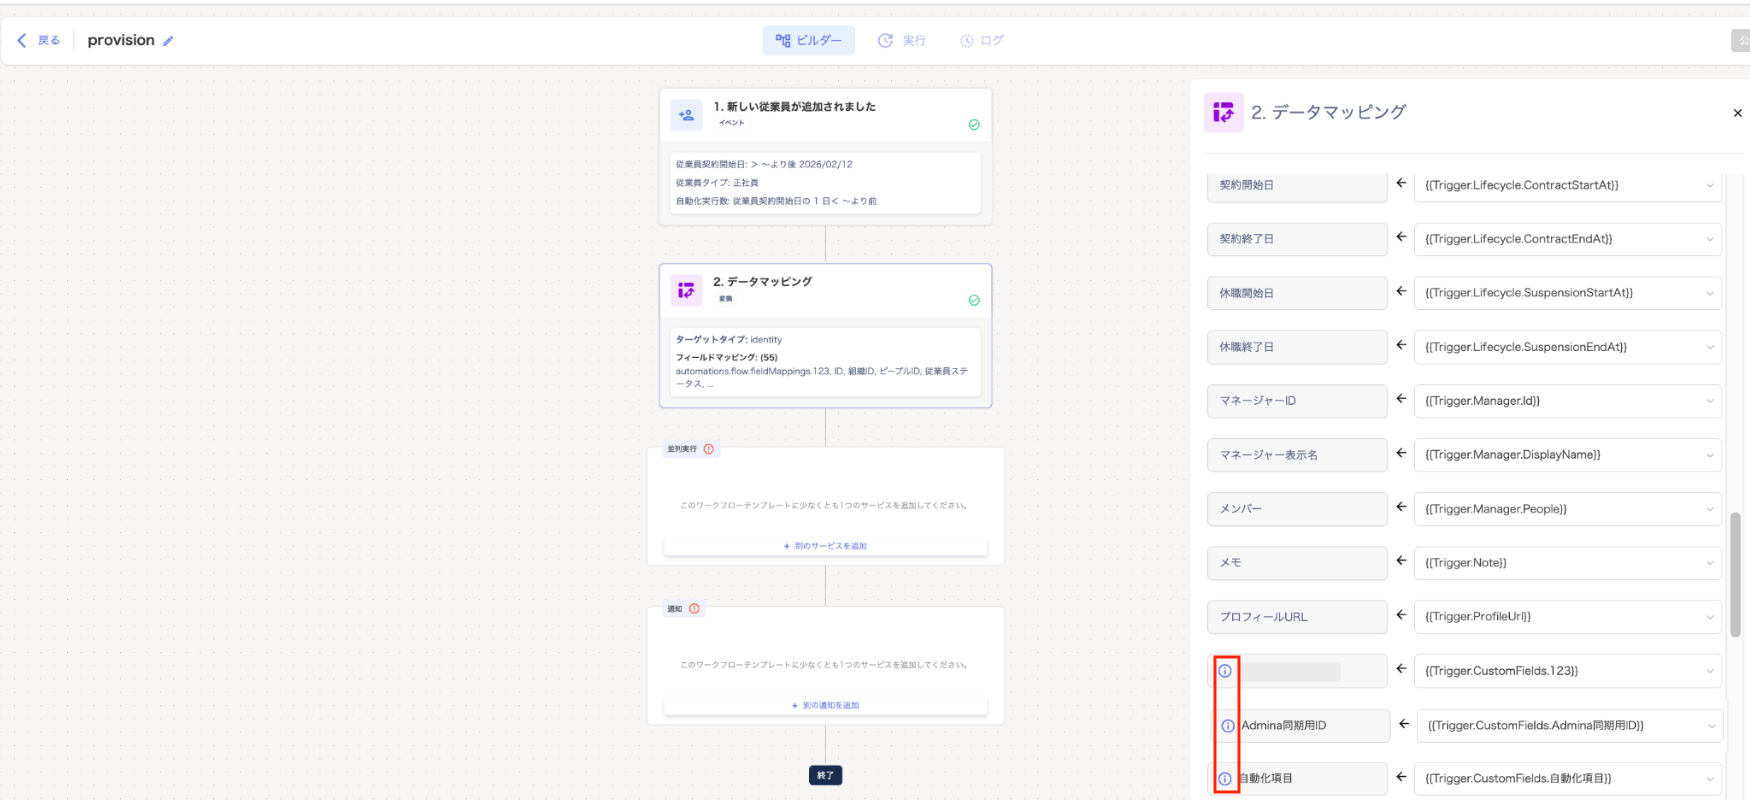
On the "Data Mapping" screen, you can specify a custom field as a mapping target. You can also use it as a source (the value reference).
Use the format `{{Trigger.CustomFields.FieldName}}` in the input field on the right side of the screen. This references a custom field value and assigns it to each field.
#### **"2. Data Mapping" screen**
On the "Data Mapping" screen, you can specify a custom field as a mapping target. You can also use it as a source (the value reference).
Use the format `{{Trigger.CustomFields.FieldName}}` in the input field on the right side of the screen. This references a custom field value and assigns it to each field.