> ## Documentation Index
> Fetch the complete documentation index at: https://hc.saas-manager.biz.nuro.jp/llms.txt
> Use this file to discover all available pages before exploring further.
# Google Cloud Platform
> Google Cloud Platformとの連携手順です。マネーフォワードAdminaからGoogle Cloud Platformへの、管理者のログインから、連携方法まで一連の手順を解説します。
## サポートする機能
アカウント削除 アカウント作成
## Google Cloud Platformとの連携概要
Google Cloud Platformとの連携はOAuthでの連携とAPIの連携の2種類ございます。以下の特長をご覧いただき、お客様の管理に合致する方法で連携を実施ください。
| 可能な操作 / 連携手順 | OAuth(New) | API(Old) |
| ---------------- | --------------- | ---------- |
| **インテグレーション単位** | すべてのプロジェクトの一括連携 | プロジェクト毎の連携 |
| **連携可能な管理者** | アカウント管理者 | プロジェクト管理者 |
| **サポート可能なアクション** | ユーザーの同期、削除 | ユーザの同期のみ |
## OAuthでの連携(New:推奨)
### 事前準備
#### Google Cloud Platformへのログイン
[Google Cloud Platformログインページ](https://accounts.google.com/signin/v2/identifier?service=cloudconsole\&passive=1209600\&osid=1\&continue=https%3A%2F%2Fconsole.cloud.google.com%2F%3Fhl%3Dja%26pli%3D1\&followup=https%3A%2F%2Fconsole.cloud.google.com%2F%3Fhl%3Dja%26pli%3D1\&hl=ja\&flowName=GlifWebSignIn\&flowEntry=ServiceLogin)にて、管理者権限アカウントのメールアドレス・パスワードを入力し、ログインします。
#### Cloud Resource Manager APIの有効化
1. Google Cloud Platformにログイン後、プロジェクトを作成するか、**連携を実施したいプロジェクト**に移動します。
2. **APIs & Services** > **Enabled APIs & Services** に移動し、**Enable APIs and Services**をクリックします。
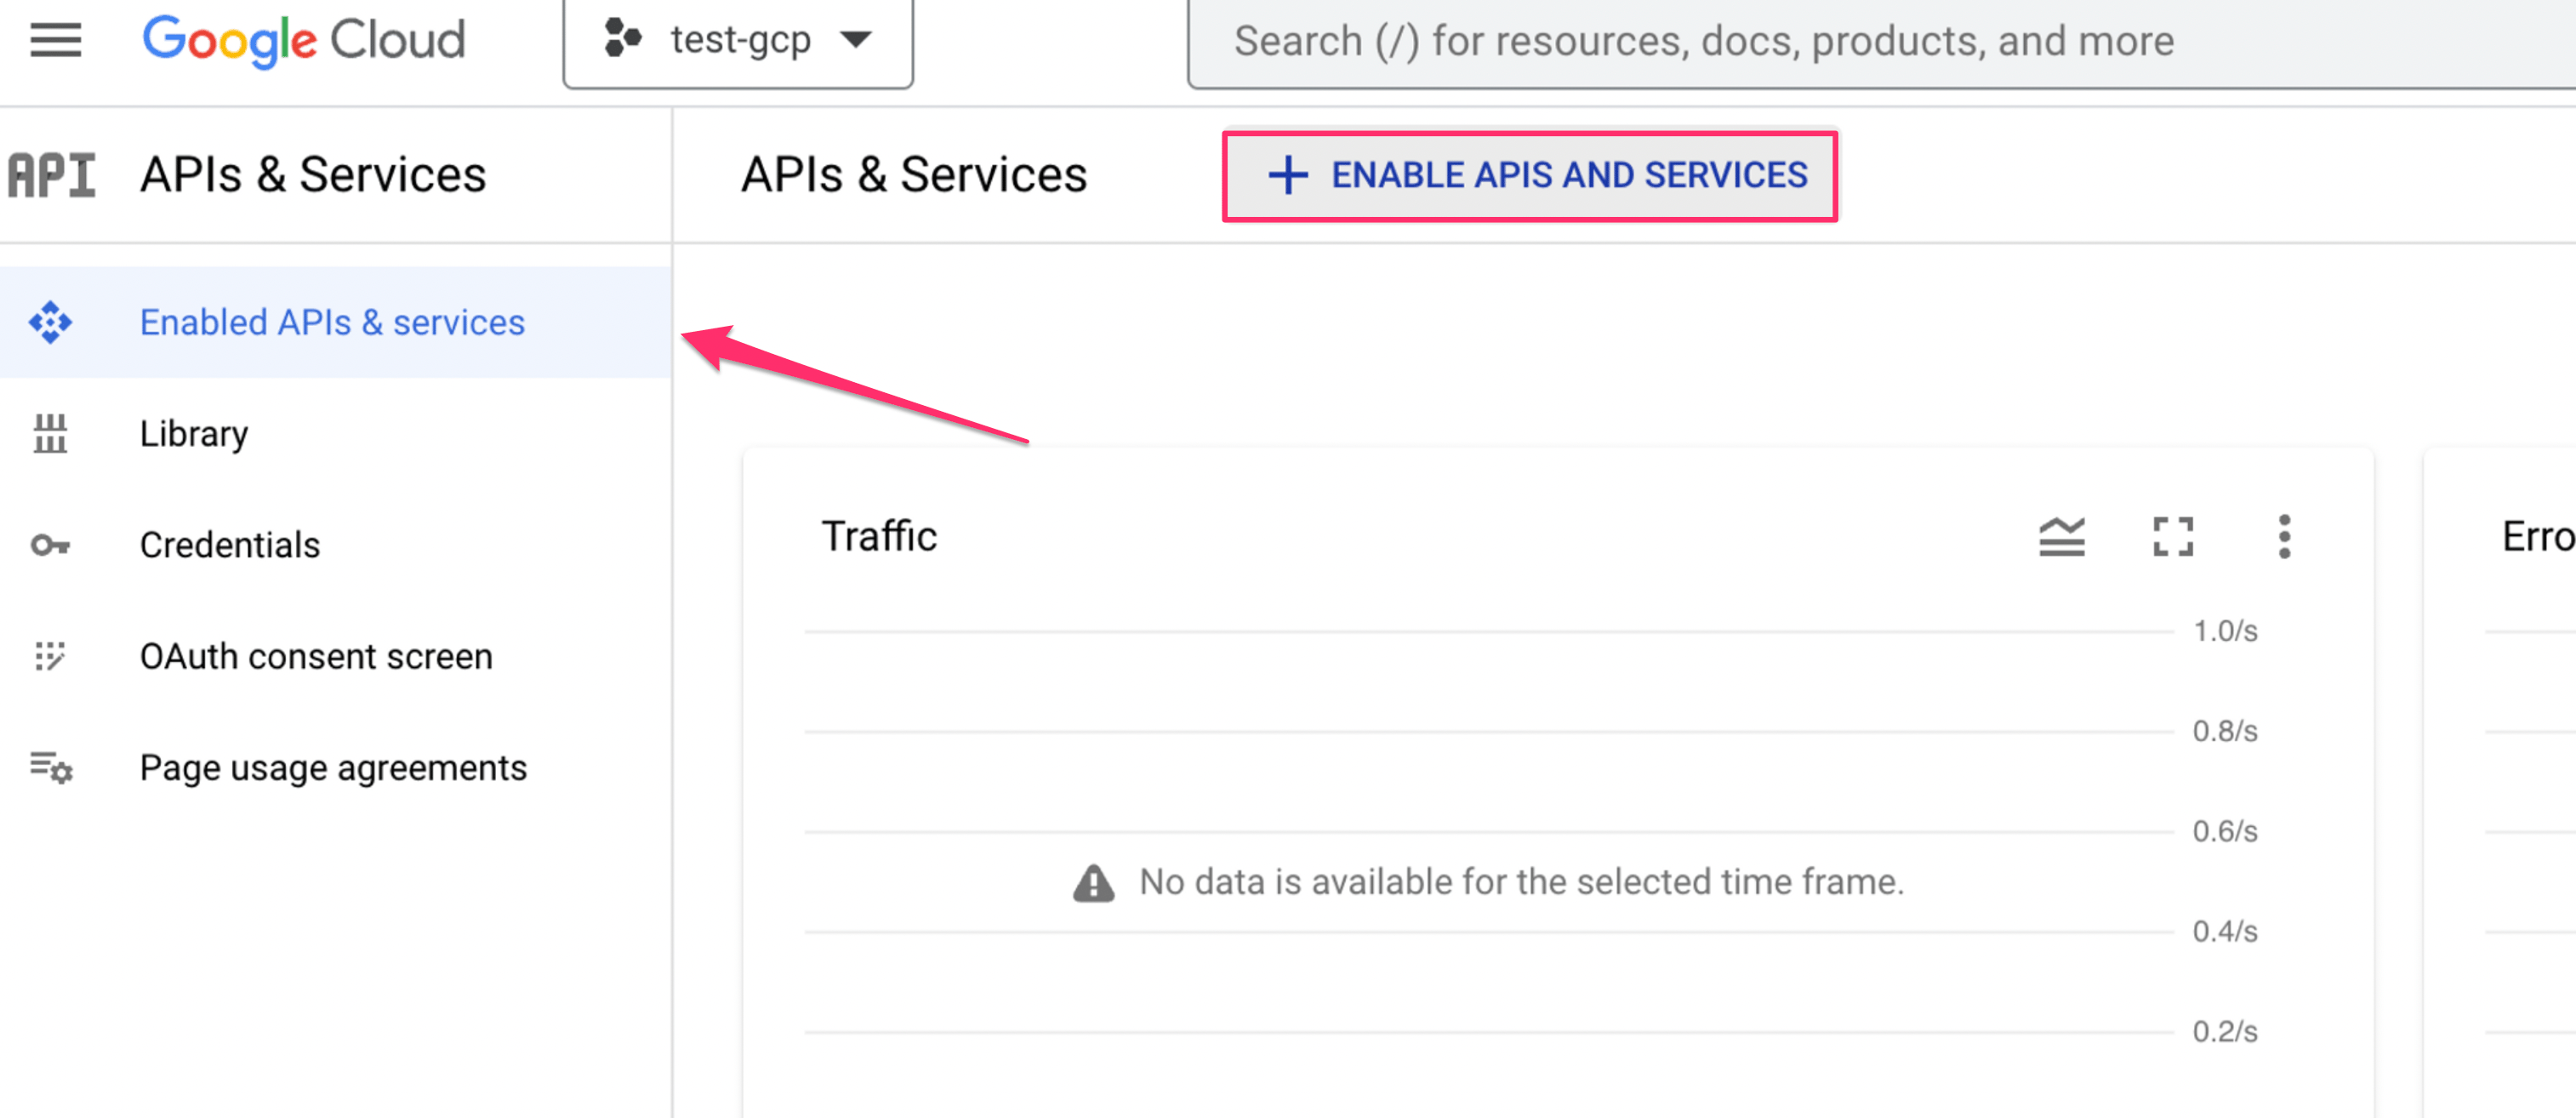 3. 検索欄から**Cloud Resource Manager API**を検索し、**Enable**をクリックします。
 #### 連携用OAuthアプリケーションの作成
4. Google Cloud Platformにログイン後 、**APIとサービス > OAuth同意画面** に移動します。
5. Use Typeは`内部` を選択し、**作成**をクリックします。
「Error 403: org\_internal」と表示され、連携に失敗する場合、Use Type`外部` で作成してください。
#### 連携用OAuthアプリケーションの作成
4. Google Cloud Platformにログイン後 、**APIとサービス > OAuth同意画面** に移動します。
5. Use Typeは`内部` を選択し、**作成**をクリックします。
「Error 403: org\_internal」と表示され、連携に失敗する場合、Use Type`外部` で作成してください。
 6. アプリ情報にアプリケーション名(例:Admina)とユーザーサポートメール、デベロッパーの連絡先情報のメールアドレスを入力し、**保存して次へ**をクリックします。
7. スコープの追加と削除をクリックし、以下、いずれかのScope(URL)フィルタに追加し、表示されたScopeを追加します。画像はRead & Writeを許可する場合のScopeの設定例です。
* **Read & Write**(ユーザーの同期、削除を許可する場合): `https://www.googleapis.com/auth/cloud-platform`
* **Read Only**(ユーザーの同期のみを許可する場合): `https://www.googleapis.com/auth/cloud-platform.read-only`
6. アプリ情報にアプリケーション名(例:Admina)とユーザーサポートメール、デベロッパーの連絡先情報のメールアドレスを入力し、**保存して次へ**をクリックします。
7. スコープの追加と削除をクリックし、以下、いずれかのScope(URL)フィルタに追加し、表示されたScopeを追加します。画像はRead & Writeを許可する場合のScopeの設定例です。
* **Read & Write**(ユーザーの同期、削除を許可する場合): `https://www.googleapis.com/auth/cloud-platform`
* **Read Only**(ユーザーの同期のみを許可する場合): `https://www.googleapis.com/auth/cloud-platform.read-only`
 スコープの追加後、**ダッシュボードに戻る**をクリックします。
8. 認証情報メニューをクリックし、+認証情報を作成 > OAuth クライアントIDをクリックします。
スコープの追加後、**ダッシュボードに戻る**をクリックします。
8. 認証情報メニューをクリックし、+認証情報を作成 > OAuth クライアントIDをクリックします。
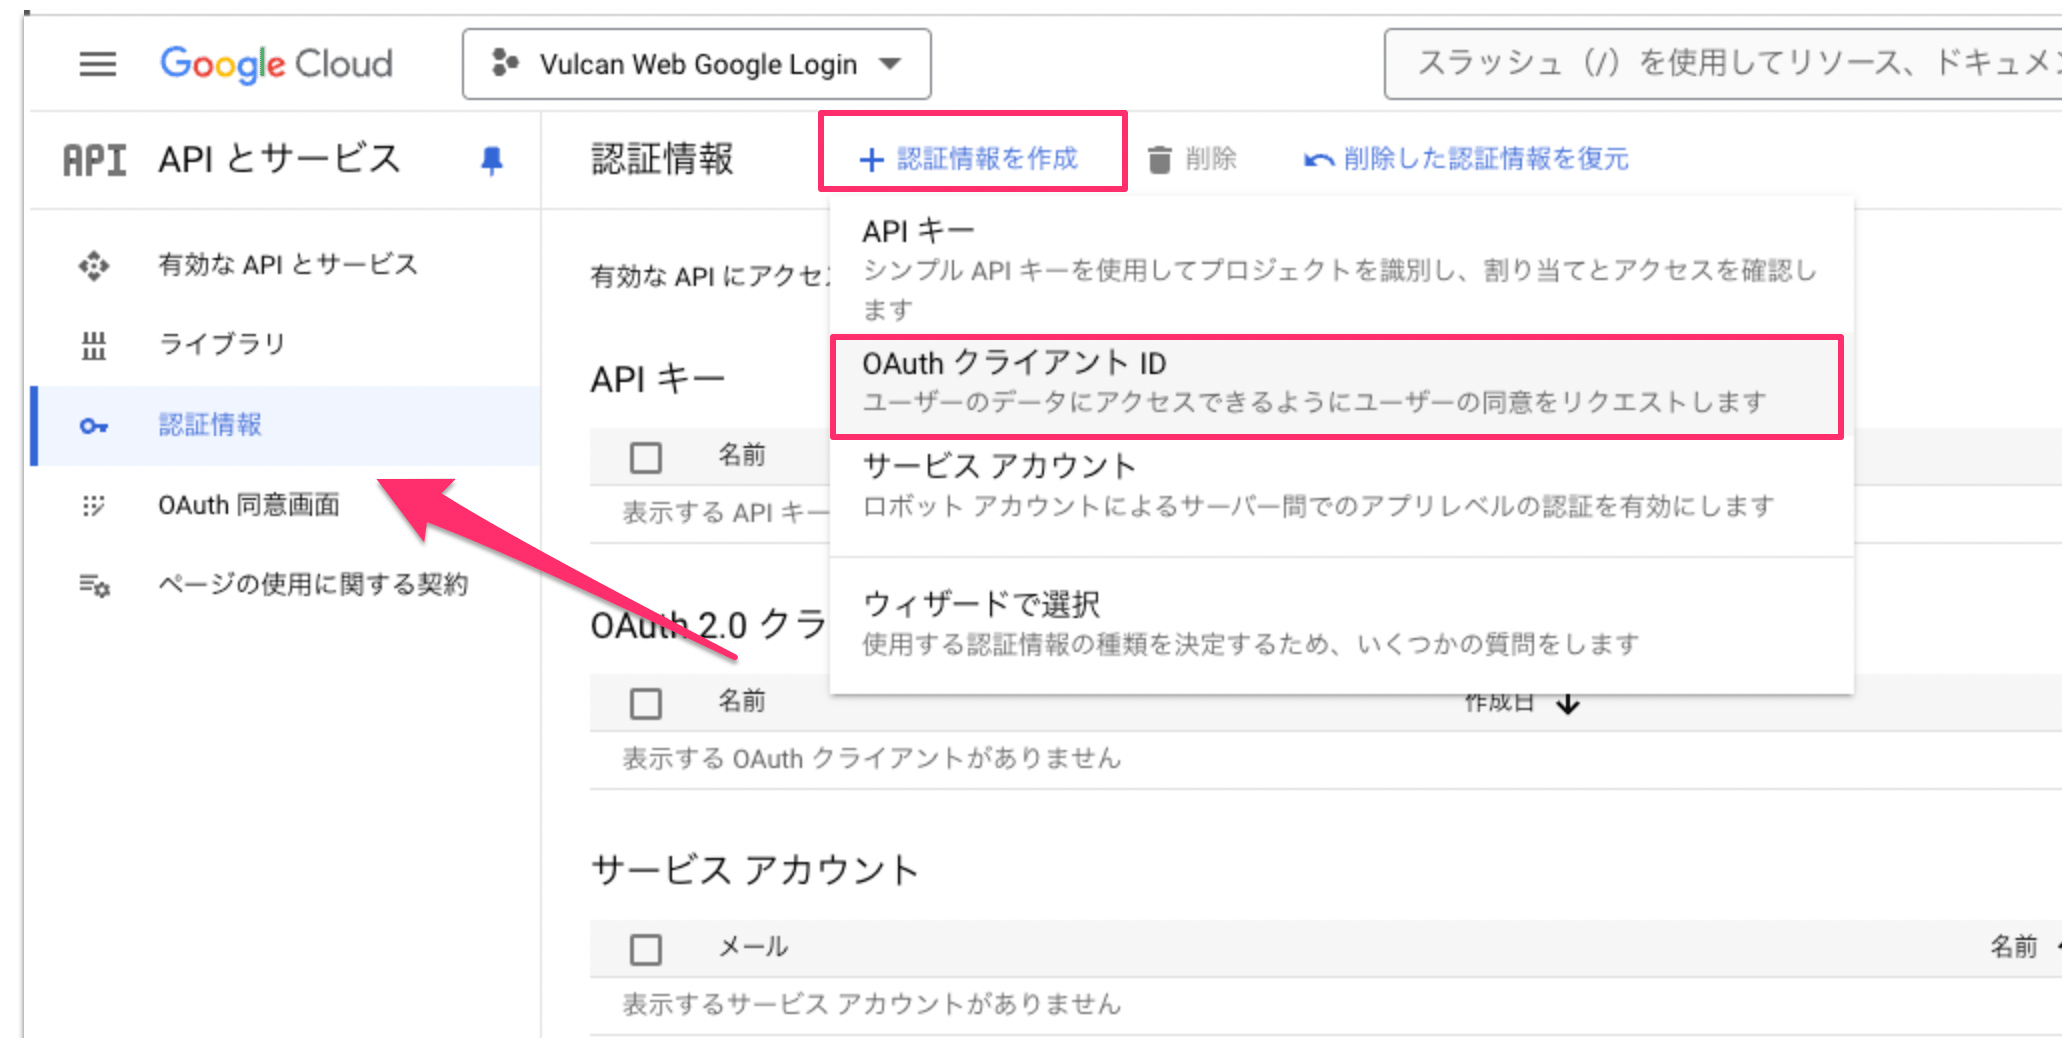 9. 以下のとおりOAuthクライアントIDの作成を実施し、作成をクリックします
* アプリケーションの種類:`ウェブアプリケーション`
* 名前:任意の名前(Adminaなど)
* 承認済みのリダイレクトURI:`https://itmc.i.moneyforward.com/oauth/callback`
9. 以下のとおりOAuthクライアントIDの作成を実施し、作成をクリックします
* アプリケーションの種類:`ウェブアプリケーション`
* 名前:任意の名前(Adminaなど)
* 承認済みのリダイレクトURI:`https://itmc.i.moneyforward.com/oauth/callback`
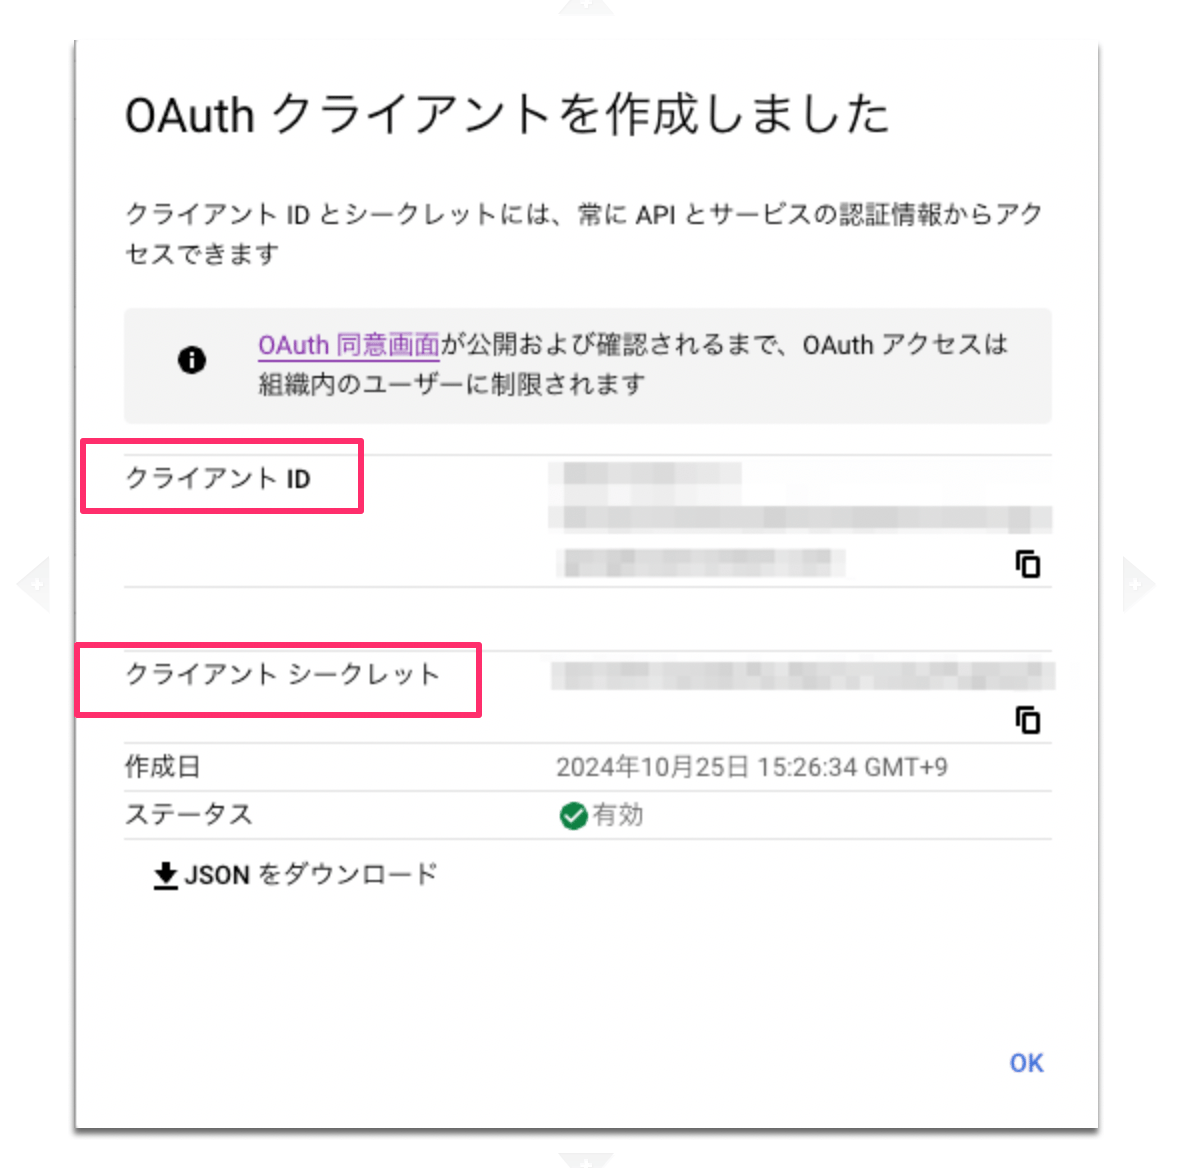
 10. 表示されたクライアントIDとクライアントシークレットの値をコピーしておきます。
 ### インテグレーションのセットアップ
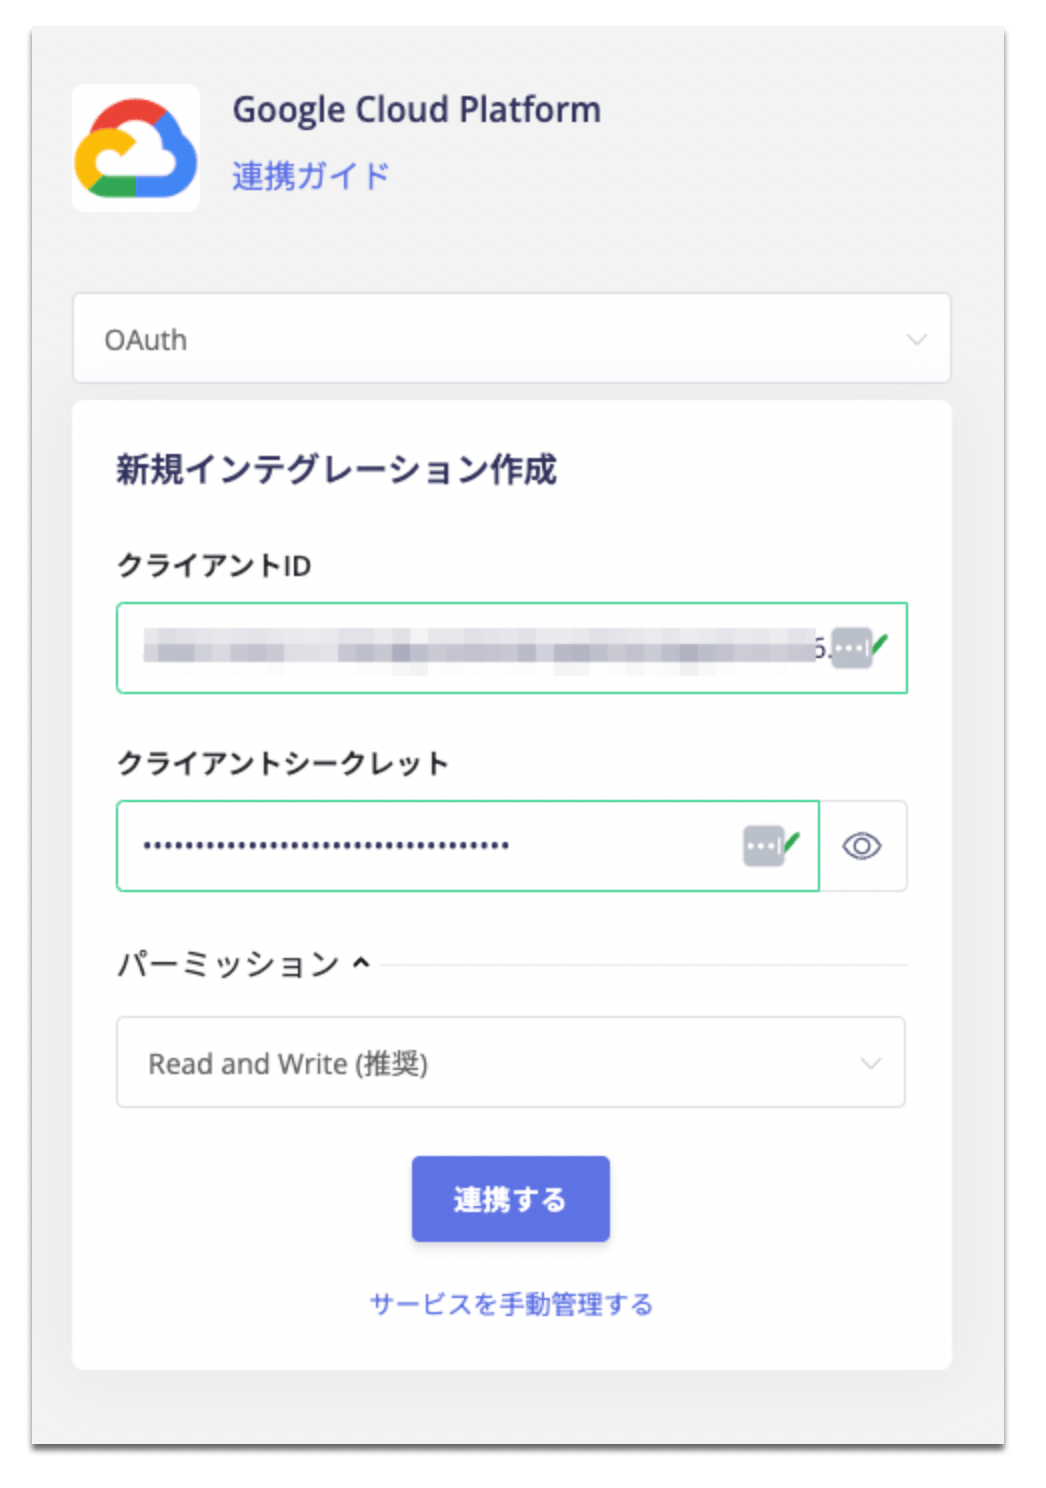
1. インテグレーション画面にて、**Google Cloud Platform**で検索します。タブをOAuthを選択します。
2. クライアントIDとクライアントシークレットを入力し、連携するをクリックします。パーミッションは⑦で設定したスコープに準じた内容を選択します。
### インテグレーションのセットアップ
1. インテグレーション画面にて、**Google Cloud Platform**で検索します。タブをOAuthを選択します。
2. クライアントIDとクライアントシークレットを入力し、連携するをクリックします。パーミッションは⑦で設定したスコープに準じた内容を選択します。
 連携に成功すると、アカウント一覧に登録済みのユーザー情報が表示されます。
正常に完了しない場合は、インテグレーション画面のステータスタブから編集し、再度連携をお試しください。
解決しない場合はチャットにてお問い合わせください。
Google Cloud Platformの連携概要については[連携ページ](http://admina.moneyforward.com/jp/integrations/google-cloud-platform)をご覧ください。
## API Keyでの連携(Old)
### 事前準備
#### Google Cloud Platformへのログイン
[Google Cloud Platformログインページ](https://accounts.google.com/signin/v2/identifier?service=cloudconsole\&passive=1209600\&osid=1\&continue=https%3A%2F%2Fconsole.cloud.google.com%2F%3Fhl%3Dja%26pli%3D1\&followup=https%3A%2F%2Fconsole.cloud.google.com%2F%3Fhl%3Dja%26pli%3D1\&hl=ja\&flowName=GlifWebSignIn\&flowEntry=ServiceLogin)にて、管理者権限アカウントのメールアドレス・パスワードを入力し、ログインします。
#### Cloud Resource Manager APIの有効化
1. Google Cloud Platformにログイン後、**連携を実施したいプロジェクト**に移動します。
連携はプロジェクト単位で実施します。取得したいユーザーのプロジェクトを選択し、連携操作を実施ください。複数回行うことで、複数のプロジェクトの連携が可能です。
2. **APIs & Services** > **Enabled APIs & Services** に移動し、**Enable APIs and Services**をクリックします。
3. 検索欄から**Cloud Resource Manager API**を検索し、**Enable**をクリックします。
#### 連携用サービスアカウントの作成
4. **APIs & Services > Credentials**に移動し、\[**CREATE CREDENTIALS**] をクリック、\[**Service account**]を選択します。
連携に成功すると、アカウント一覧に登録済みのユーザー情報が表示されます。
正常に完了しない場合は、インテグレーション画面のステータスタブから編集し、再度連携をお試しください。
解決しない場合はチャットにてお問い合わせください。
Google Cloud Platformの連携概要については[連携ページ](http://admina.moneyforward.com/jp/integrations/google-cloud-platform)をご覧ください。
## API Keyでの連携(Old)
### 事前準備
#### Google Cloud Platformへのログイン
[Google Cloud Platformログインページ](https://accounts.google.com/signin/v2/identifier?service=cloudconsole\&passive=1209600\&osid=1\&continue=https%3A%2F%2Fconsole.cloud.google.com%2F%3Fhl%3Dja%26pli%3D1\&followup=https%3A%2F%2Fconsole.cloud.google.com%2F%3Fhl%3Dja%26pli%3D1\&hl=ja\&flowName=GlifWebSignIn\&flowEntry=ServiceLogin)にて、管理者権限アカウントのメールアドレス・パスワードを入力し、ログインします。
#### Cloud Resource Manager APIの有効化
1. Google Cloud Platformにログイン後、**連携を実施したいプロジェクト**に移動します。
連携はプロジェクト単位で実施します。取得したいユーザーのプロジェクトを選択し、連携操作を実施ください。複数回行うことで、複数のプロジェクトの連携が可能です。
2. **APIs & Services** > **Enabled APIs & Services** に移動し、**Enable APIs and Services**をクリックします。
3. 検索欄から**Cloud Resource Manager API**を検索し、**Enable**をクリックします。
#### 連携用サービスアカウントの作成
4. **APIs & Services > Credentials**に移動し、\[**CREATE CREDENTIALS**] をクリック、\[**Service account**]を選択します。
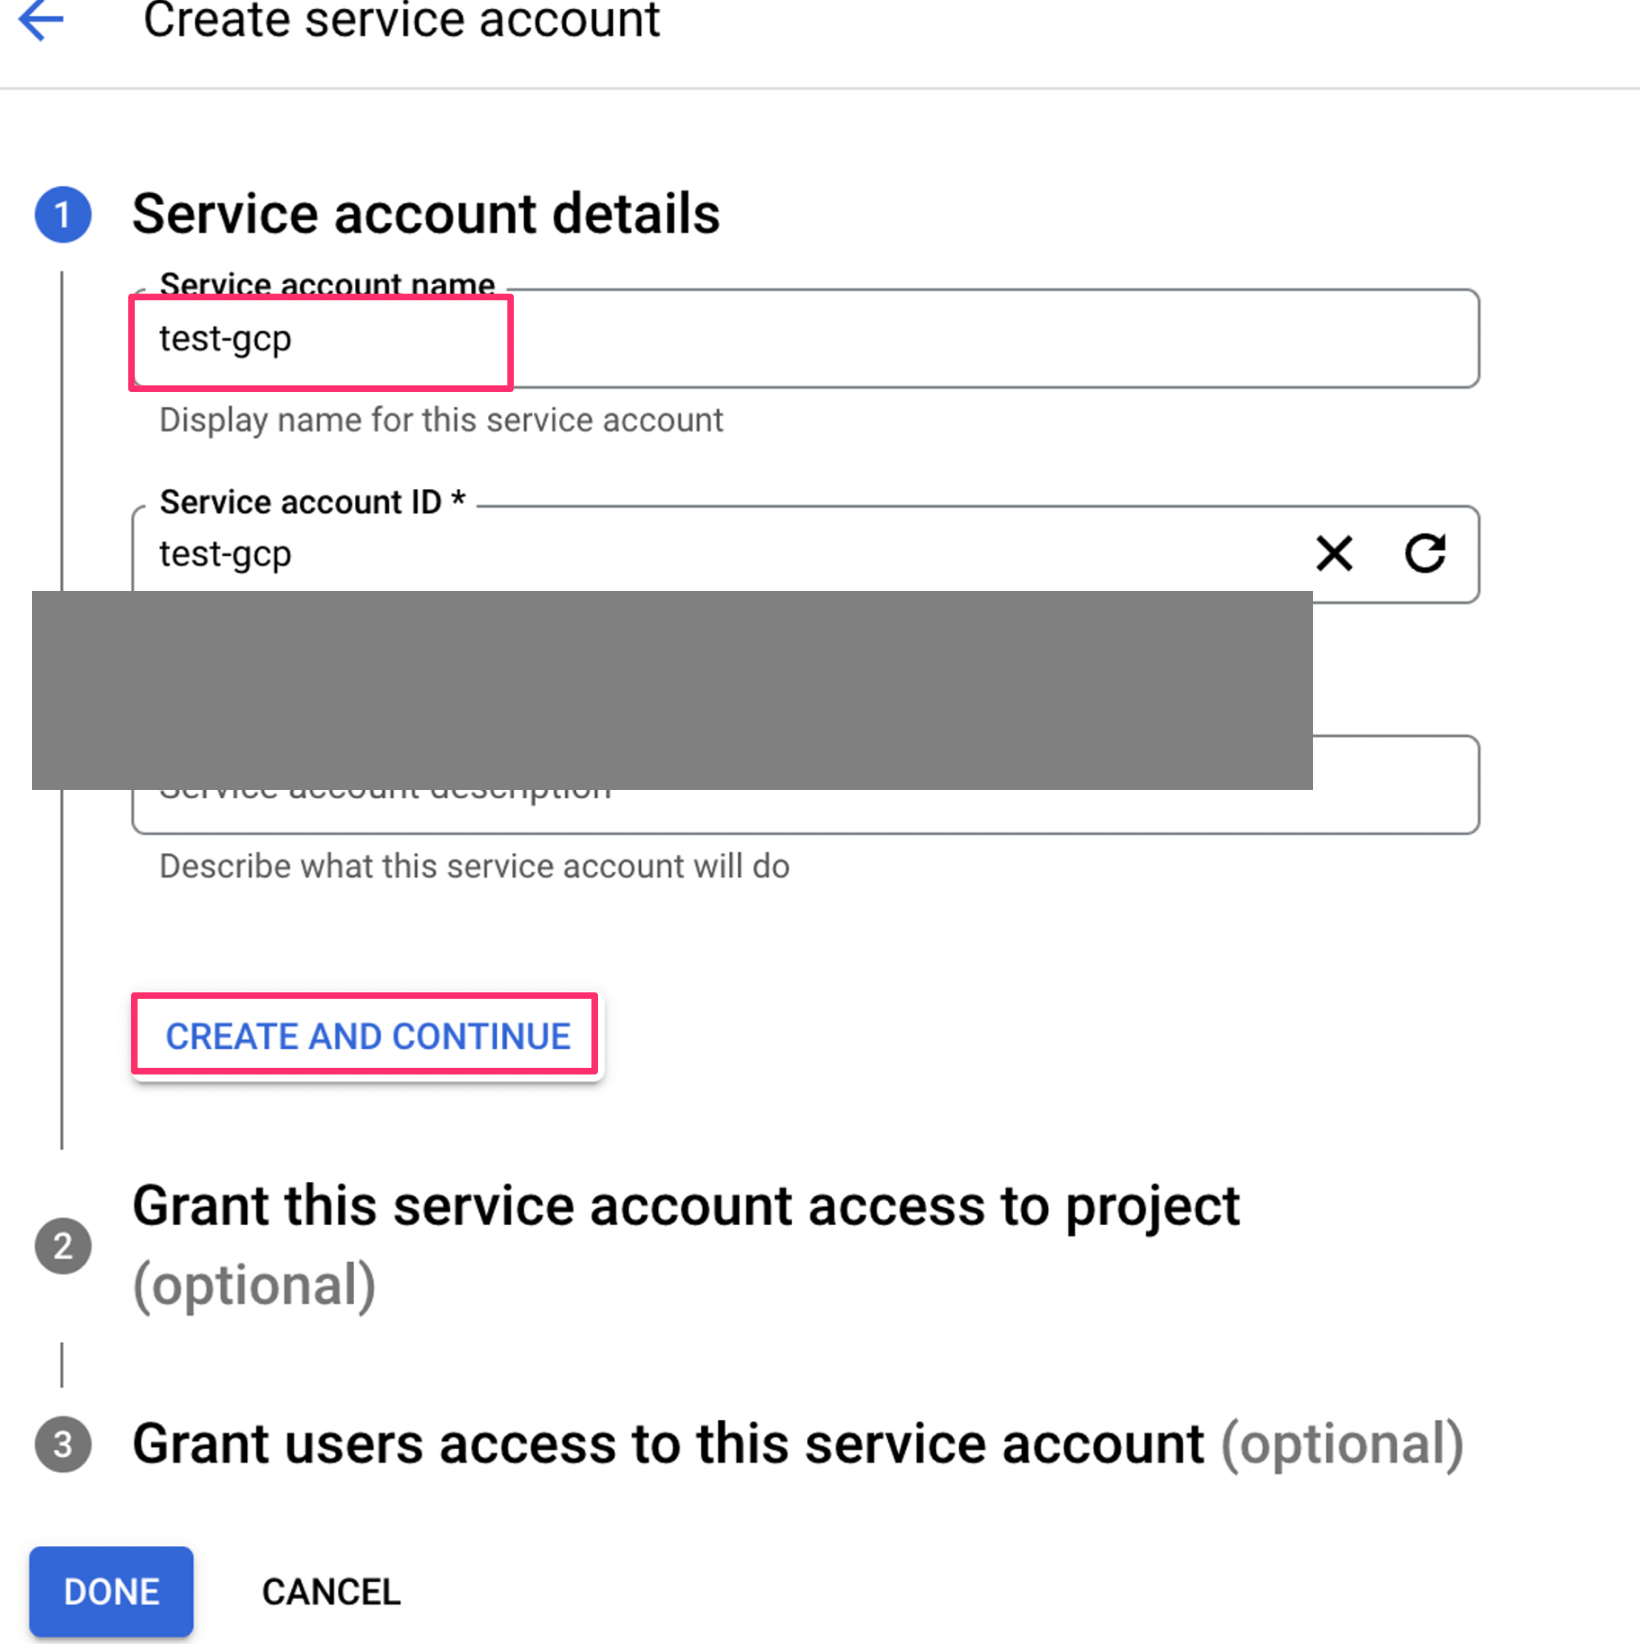
 5. サービスアカウント名(Service Account Name)に任意の名前を入力し、\*\*\[CREATE AND CONTINUE]\*\*をクリックします。
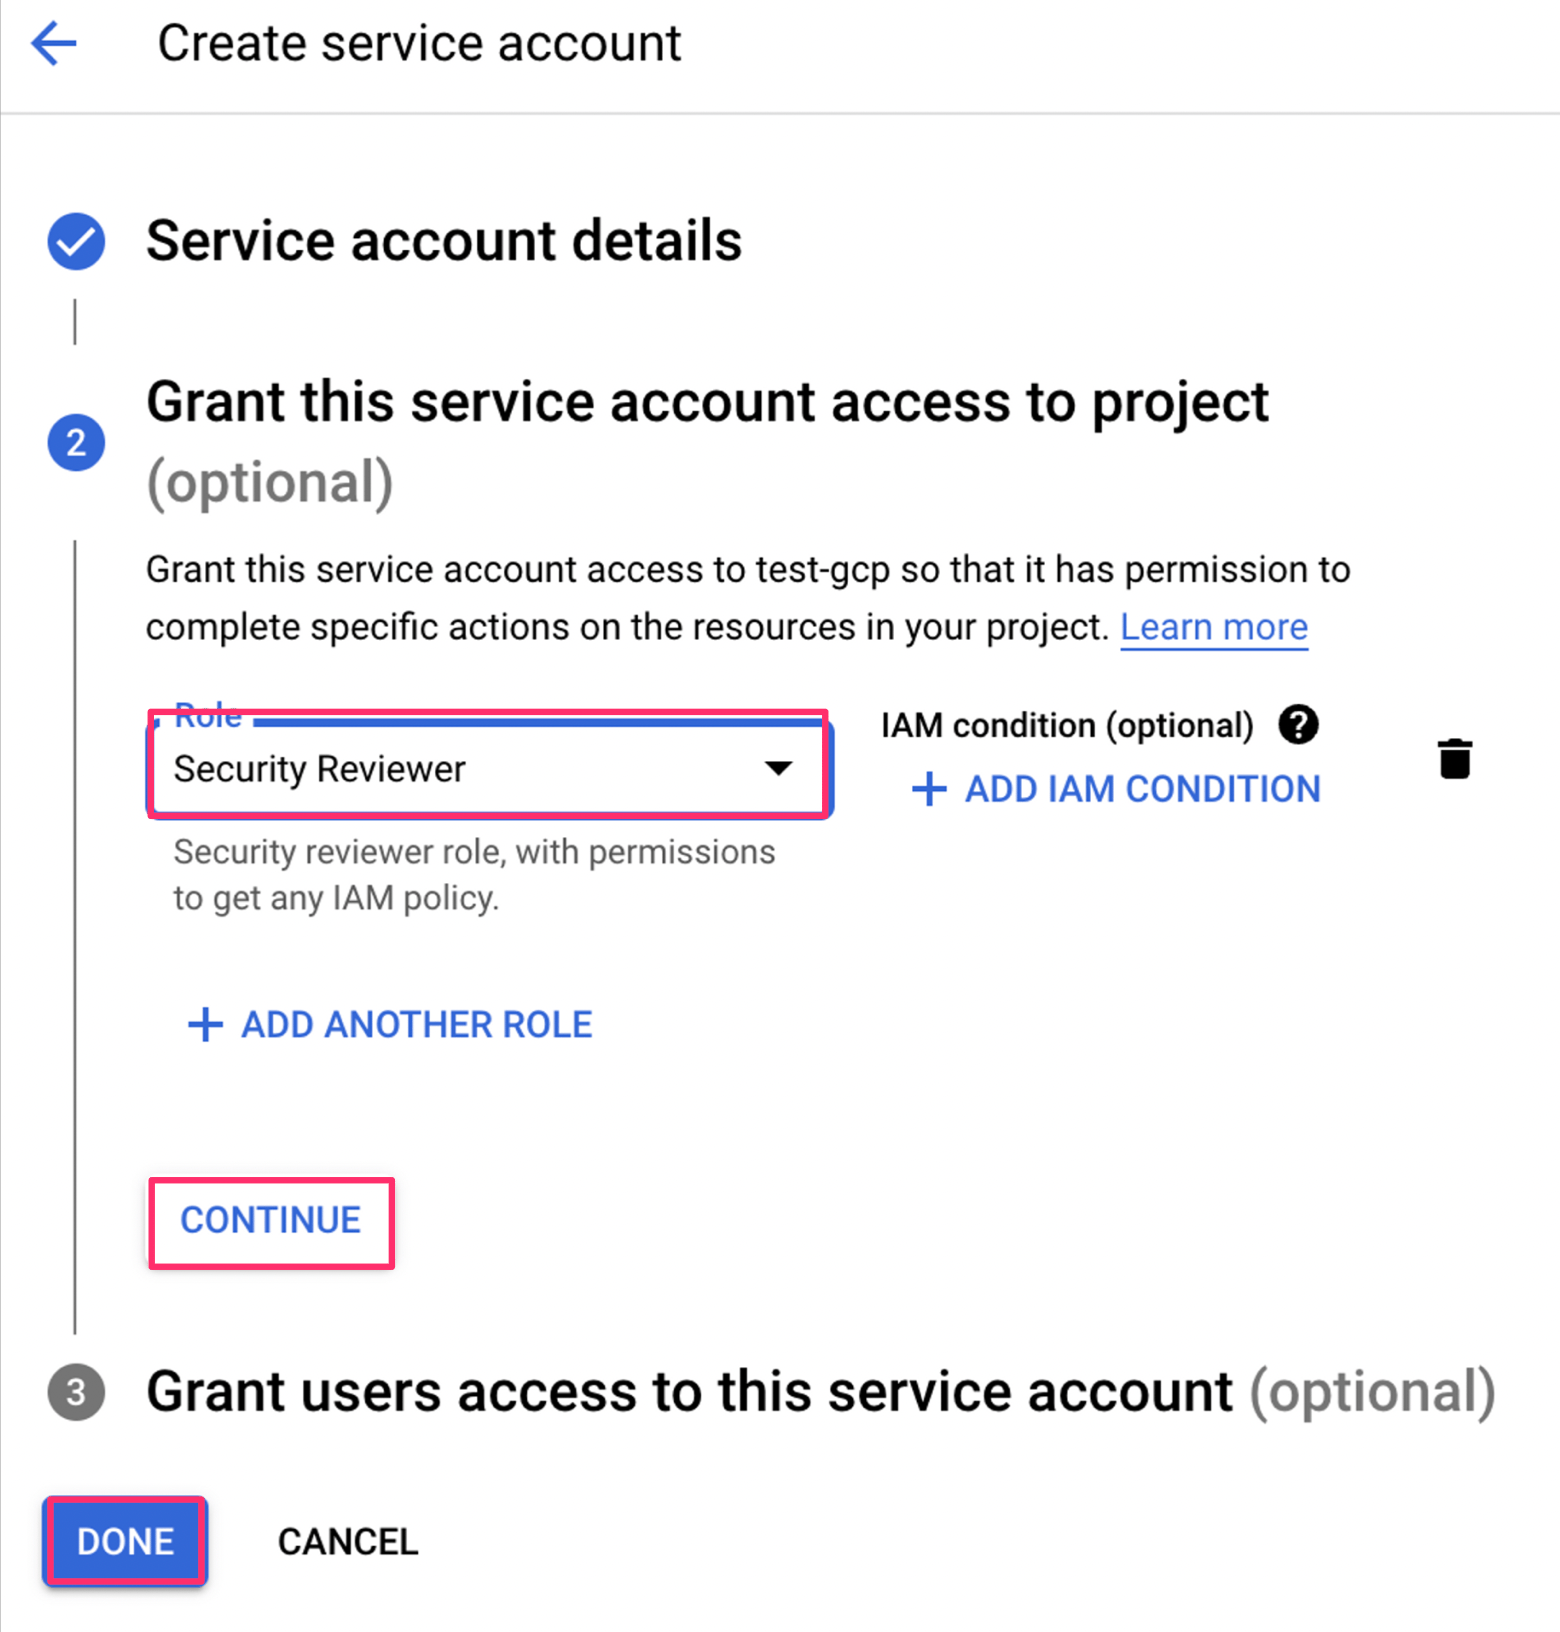
 6. ロールを設定します。**Security Reviewer(セキュリティ審査担当者)** を選択後、 **Continue**をクリックします。最後に**Done**をクリックします。
 #### 秘密鍵の作成
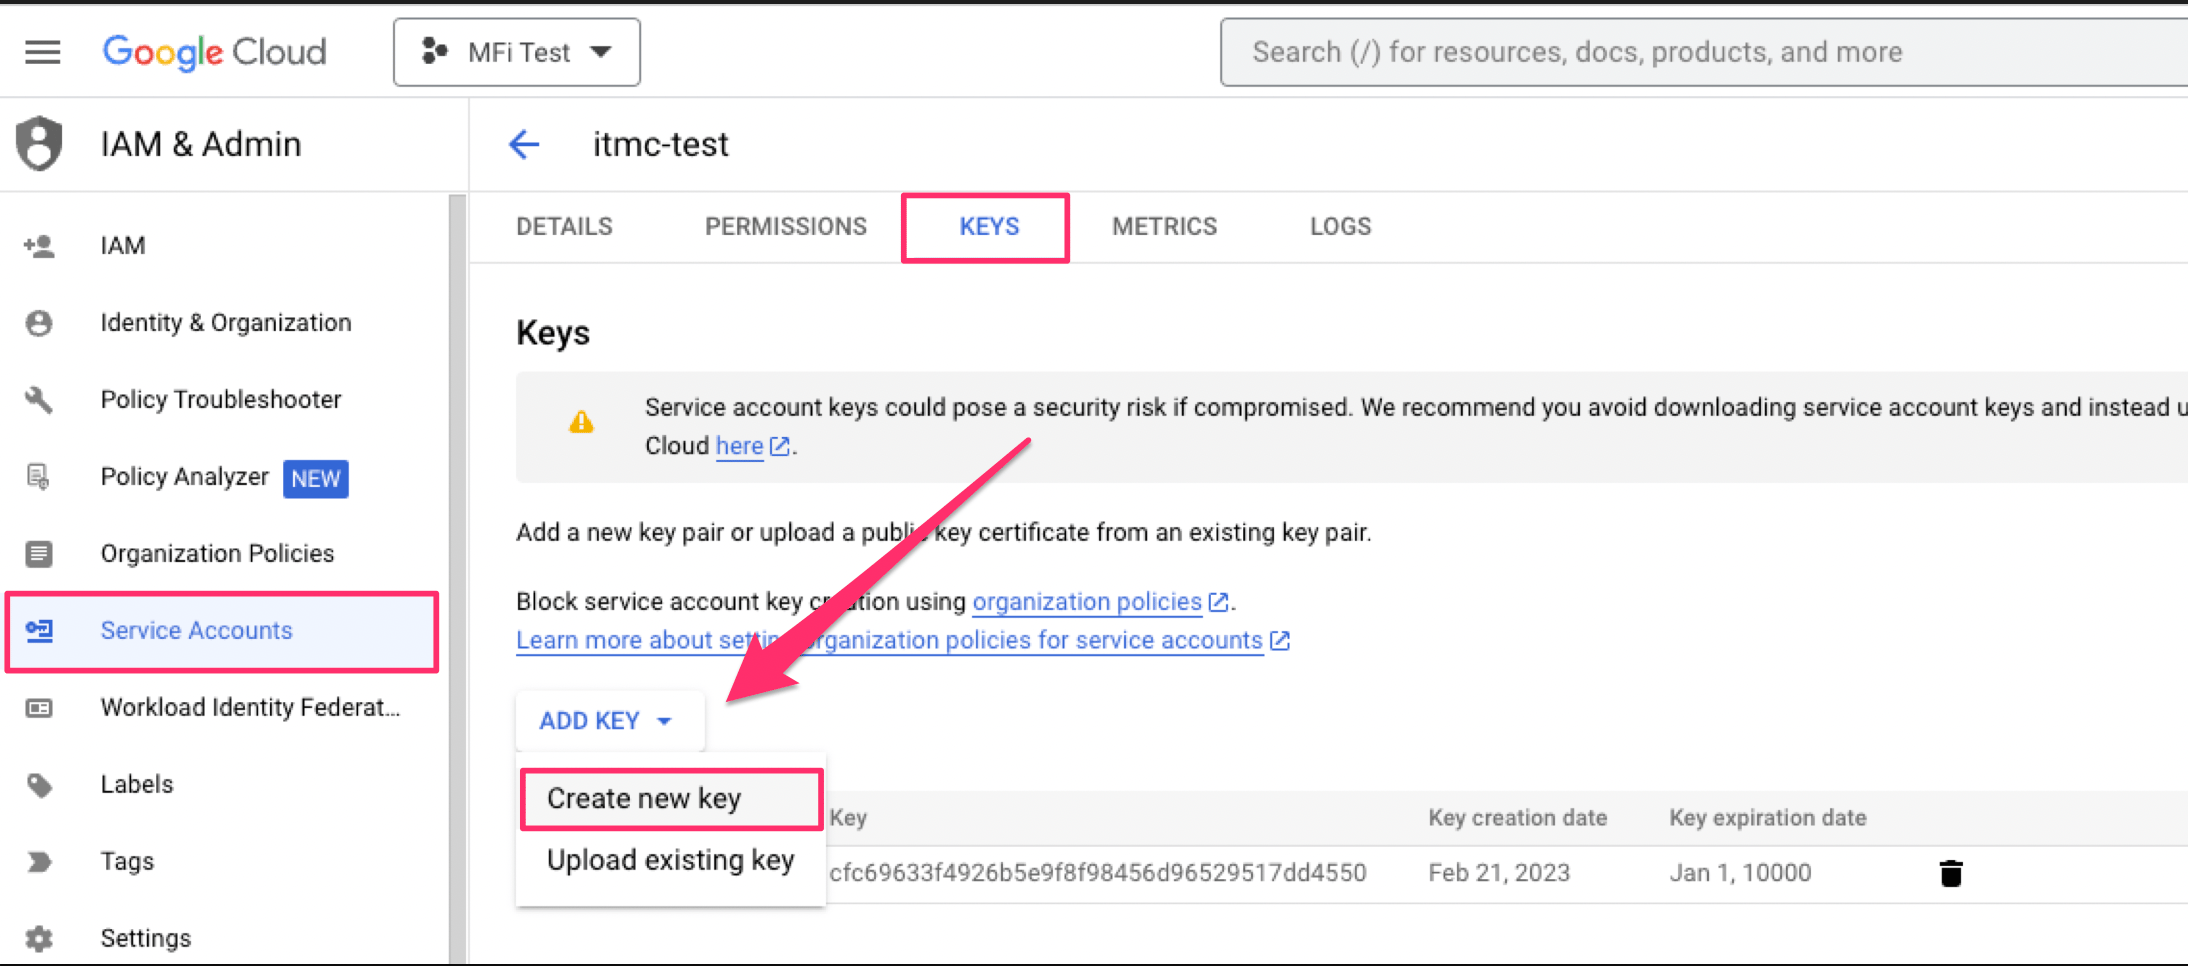
7. Service Accountから作成したサービスアカウント名をクリックし、\[**KEYS**]タブ > **ADD KEY** > **Create new key**をクリックします。
#### 秘密鍵の作成
7. Service Accountから作成したサービスアカウント名をクリックし、\[**KEYS**]タブ > **ADD KEY** > **Create new key**をクリックします。
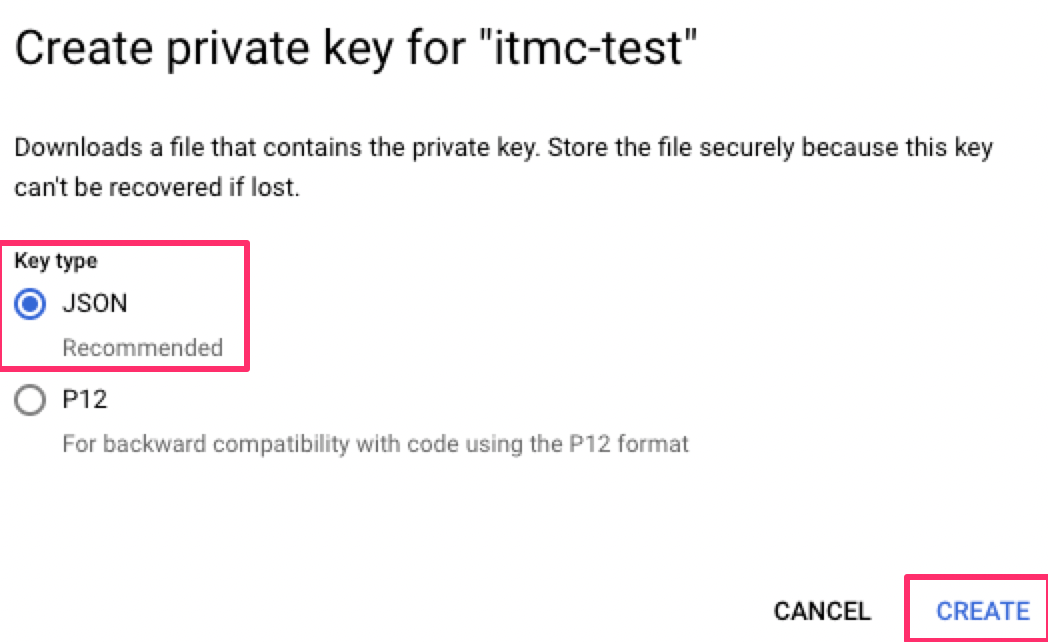
 8. Key typeはJSONを選択し、CREATEをクリックします。
 9. JSONファイルがダウンロードされますので保存しておきます。テキストエディタで開き、内容を確認ください。**JSONファイルの中に、連携に必要なパラメータがすべて記載されています。**
以上で事前準備は完了です。
### インテグレーションのセットアップ
1. インテグレーション画面にて、**Google Cloud Platform**で検索します。タブをAPIに切り替えます。
9. JSONファイルがダウンロードされますので保存しておきます。テキストエディタで開き、内容を確認ください。**JSONファイルの中に、連携に必要なパラメータがすべて記載されています。**
以上で事前準備は完了です。
### インテグレーションのセットアップ
1. インテグレーション画面にて、**Google Cloud Platform**で検索します。タブをAPIに切り替えます。
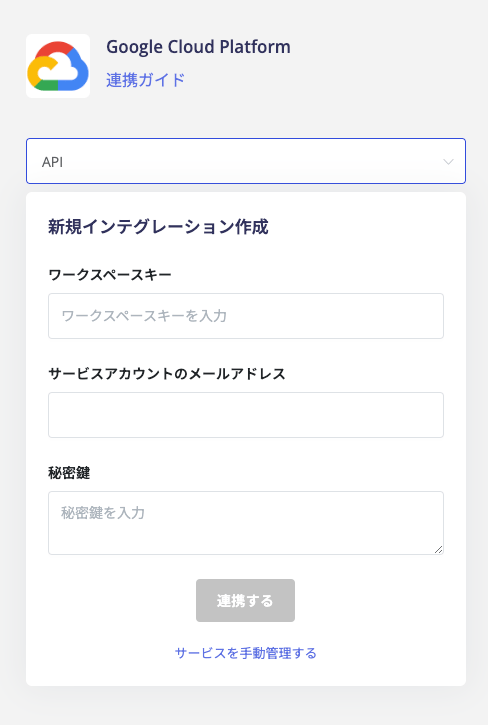 2. 前の手順でダウンロードしたJSONファイルの中に記述されている、以下の値をそれぞれ入力し、**連携する**をクリックします。
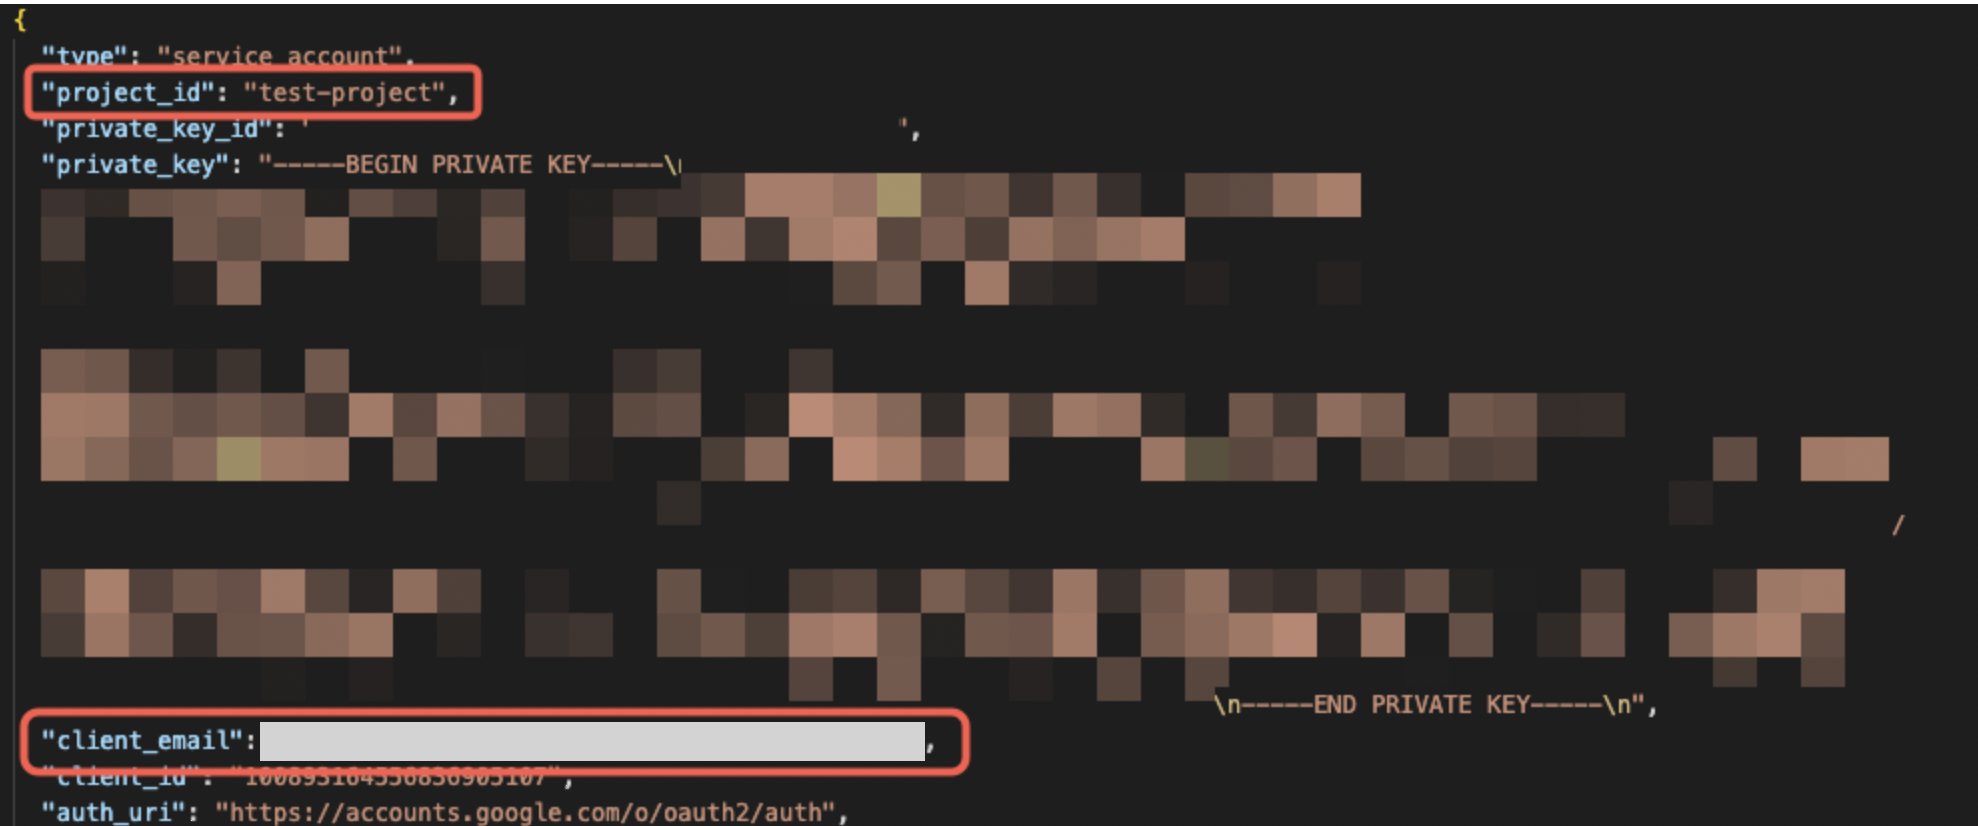 * **ワークスペースキー:** `project_id` を入力します
* **サービスアカウントのEメールアドレス:** `client_email`を入力します。
* **秘密鍵:** `private_key`を入力します。
**-----BEGIN PRIVATE KEY-----** から **-----END PRIVATE KEY-----** までを入力ください。(先頭の `"` および最後の `\n",` は不要です。)
エラーが表示される場合は、以下のヘルプをご参照ください。
[「このアプリはGoogleで確認されていません」と表示される](/it-management/faq/dqpoevdgwg-google-error)
「このアプリはGoogleで確認されません」エラーが表示される
連携に成功すると、アカウント一覧に登録済みのユーザー情報が表示されます。
正常に完了しない場合は、インテグレーション画面のステータスタブから編集し、再度連携をお試しください。
解決しない場合はチャットにてお問い合わせください。
Google Cloud Platformの連携概要については[連携ページ](http://admina.moneyforward.com/jp/integrations/google-cloud-platform)をご覧ください。
* **ワークスペースキー:** `project_id` を入力します
* **サービスアカウントのEメールアドレス:** `client_email`を入力します。
* **秘密鍵:** `private_key`を入力します。
**-----BEGIN PRIVATE KEY-----** から **-----END PRIVATE KEY-----** までを入力ください。(先頭の `"` および最後の `\n",` は不要です。)
エラーが表示される場合は、以下のヘルプをご参照ください。
[「このアプリはGoogleで確認されていません」と表示される](/it-management/faq/dqpoevdgwg-google-error)
「このアプリはGoogleで確認されません」エラーが表示される
連携に成功すると、アカウント一覧に登録済みのユーザー情報が表示されます。
正常に完了しない場合は、インテグレーション画面のステータスタブから編集し、再度連携をお試しください。
解決しない場合はチャットにてお問い合わせください。
Google Cloud Platformの連携概要については[連携ページ](http://admina.moneyforward.com/jp/integrations/google-cloud-platform)をご覧ください。