

How to configure SCIM
You need to enable SAML before using SCIM. Refer to the SAML configuration guide and enable SAML first.Obtain your organization’s SCIM credentials
Go to Settings > Security and open the SCIM section to get the tenant URL and secret token required for your IdP. If no secret token exists, click the generate button. Each organization can only have one SCIM secret token at a time. Generating a new token immediately invalidates the previous one.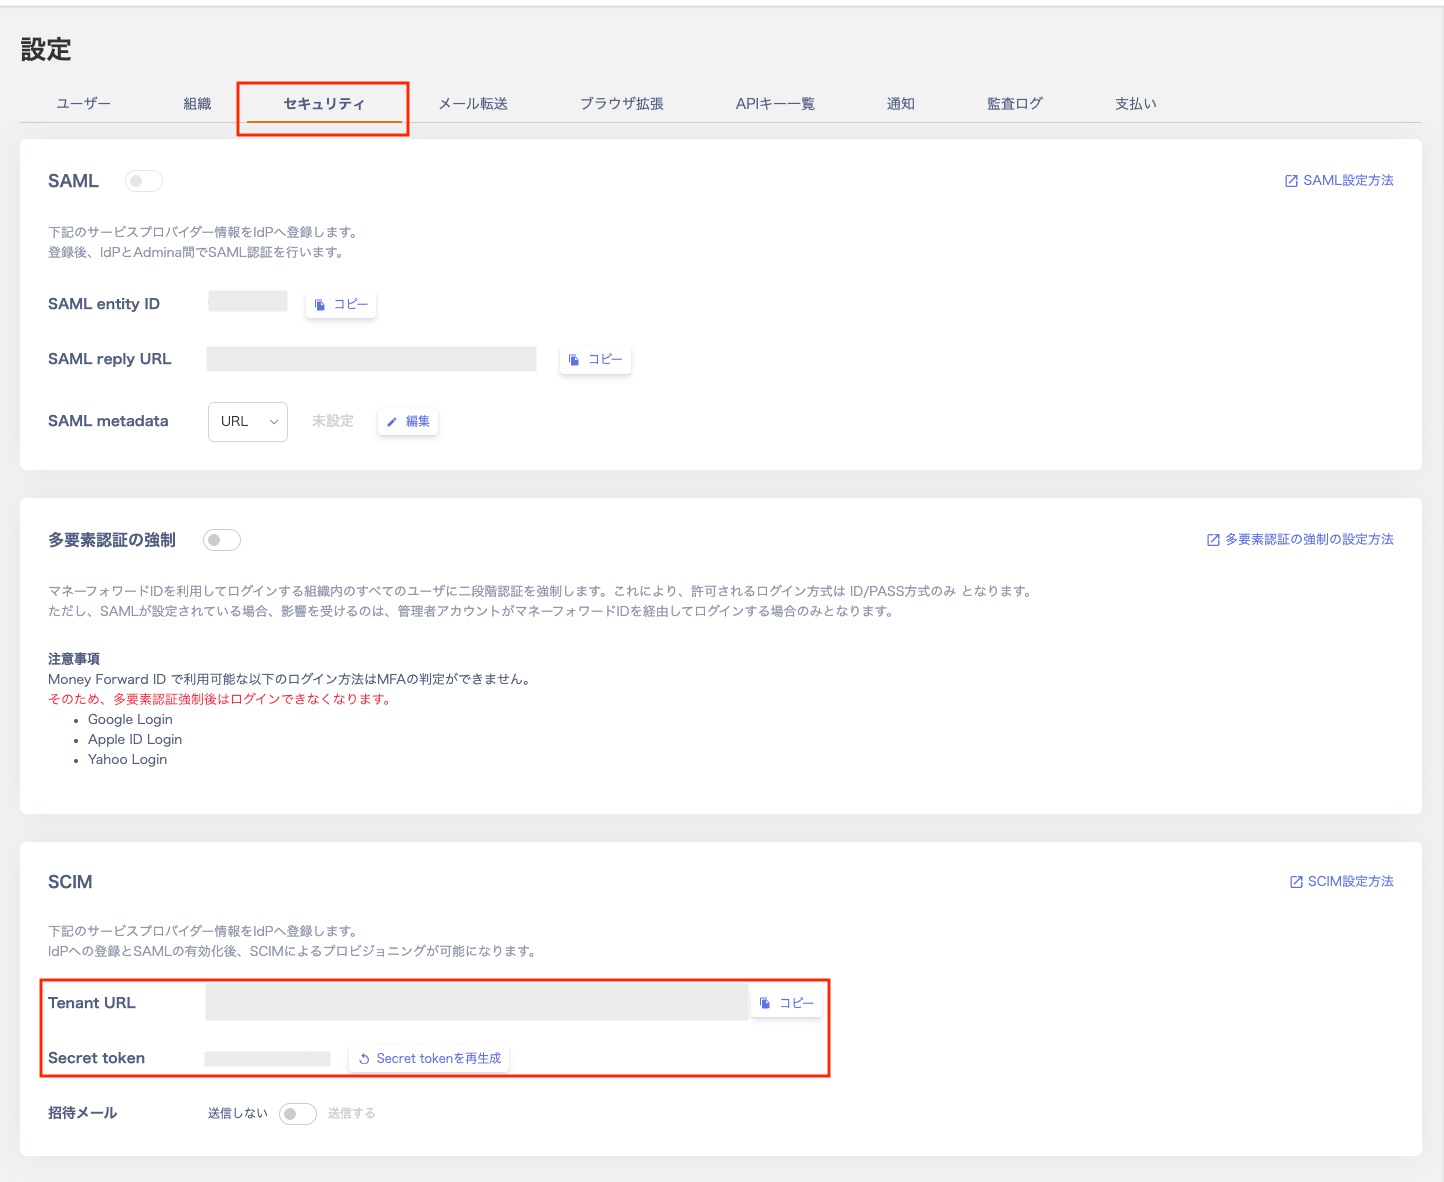
Configure SCIM invitation emails
When provisioning users via SCIM, you can choose whether to send an invitation email to newly added users.Prerequisites
- SAML must be configured and enabled.
- The invitation email toggle appears only after a secret token has been generated.
- This setting applies to users created after SCIM is configured. Invitation emails are not re-sent to already-provisioned users.
Configuration steps
-
Go to Settings > Security > SCIM > Secret token and click Regenerate Secret Token.
Note: Regenerating the token invalidates the previous token. If you are already using the token in your IdP, update the token on the IdP side as well. -
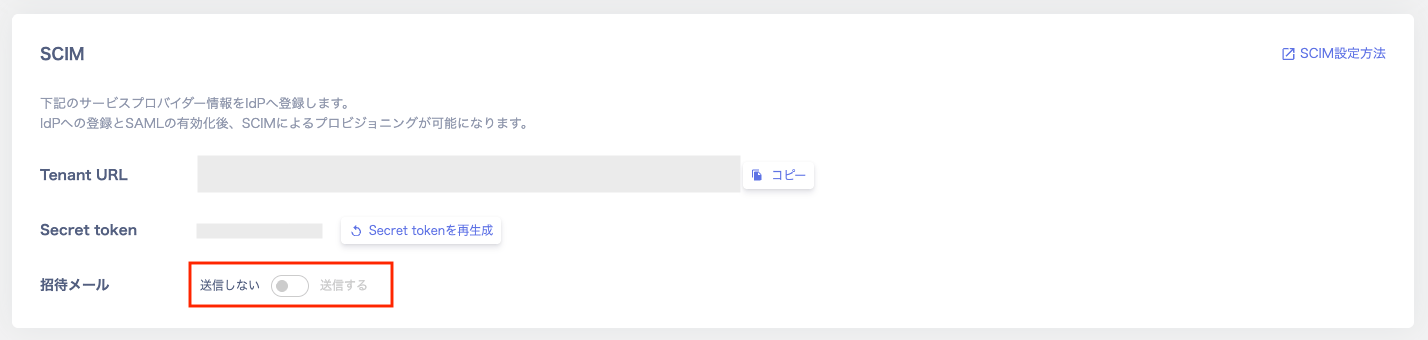
Once the token is generated, an Invitation email toggle appears below it.
Do not send: The user is created without any notification email.
Send: An invitation email to the service is automatically sent when the user is created. -
Use the Invitation email toggle to choose your preference.
Enable SCIM in your IdP
Open the application you created in your IdP for SAML.Entra ID
Entra ID guide-
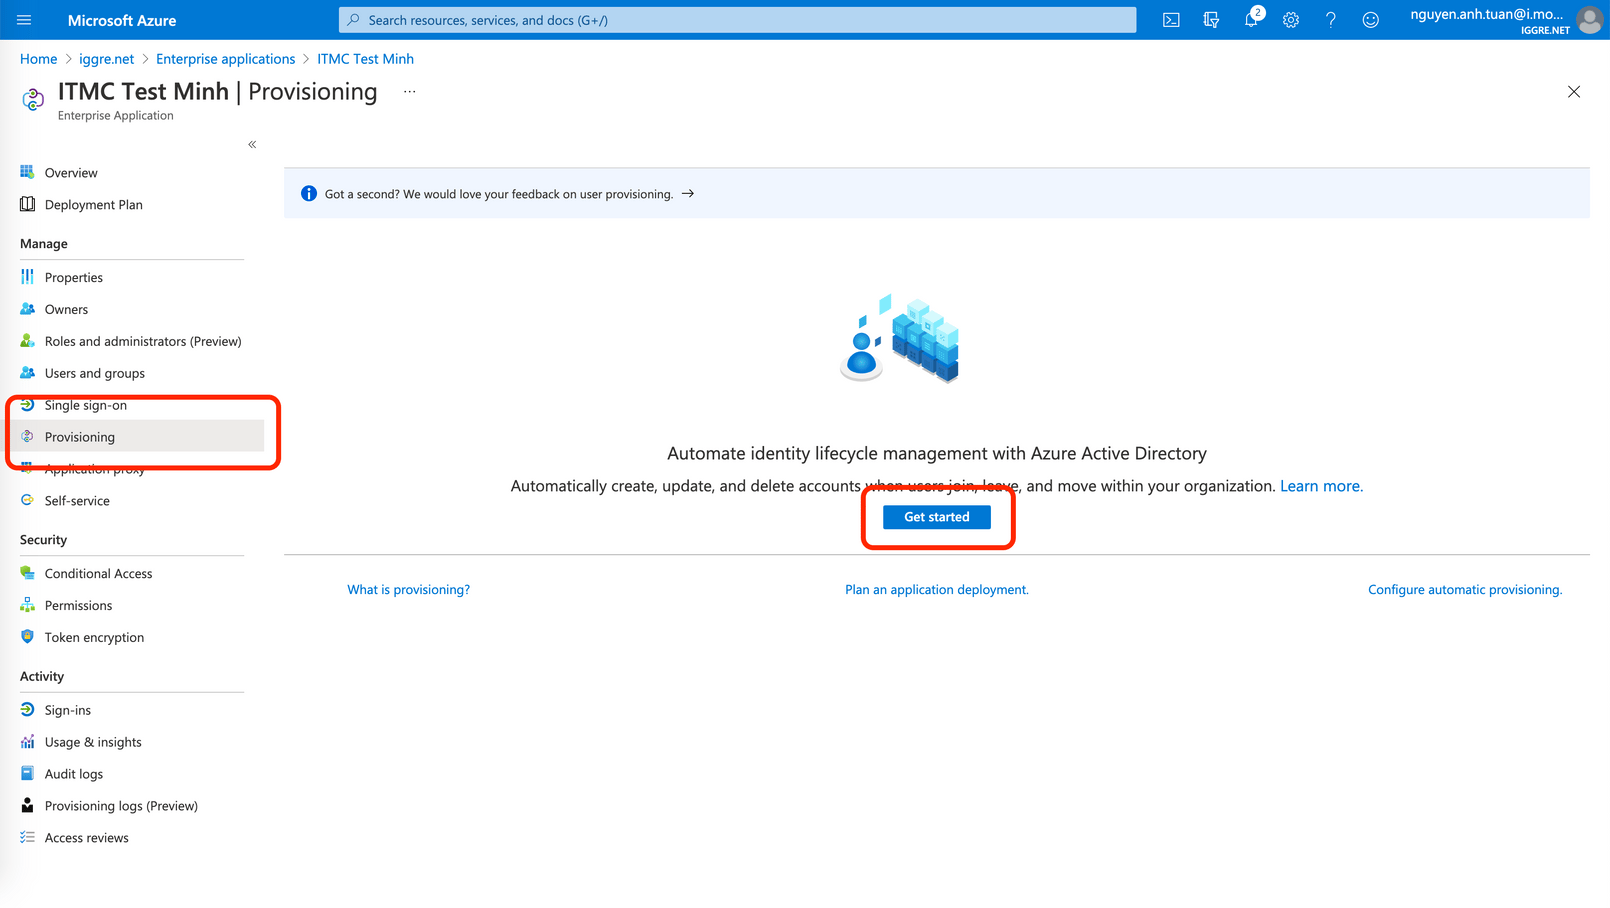
Select Provisioning from the side menu and click the Get Started button.
-
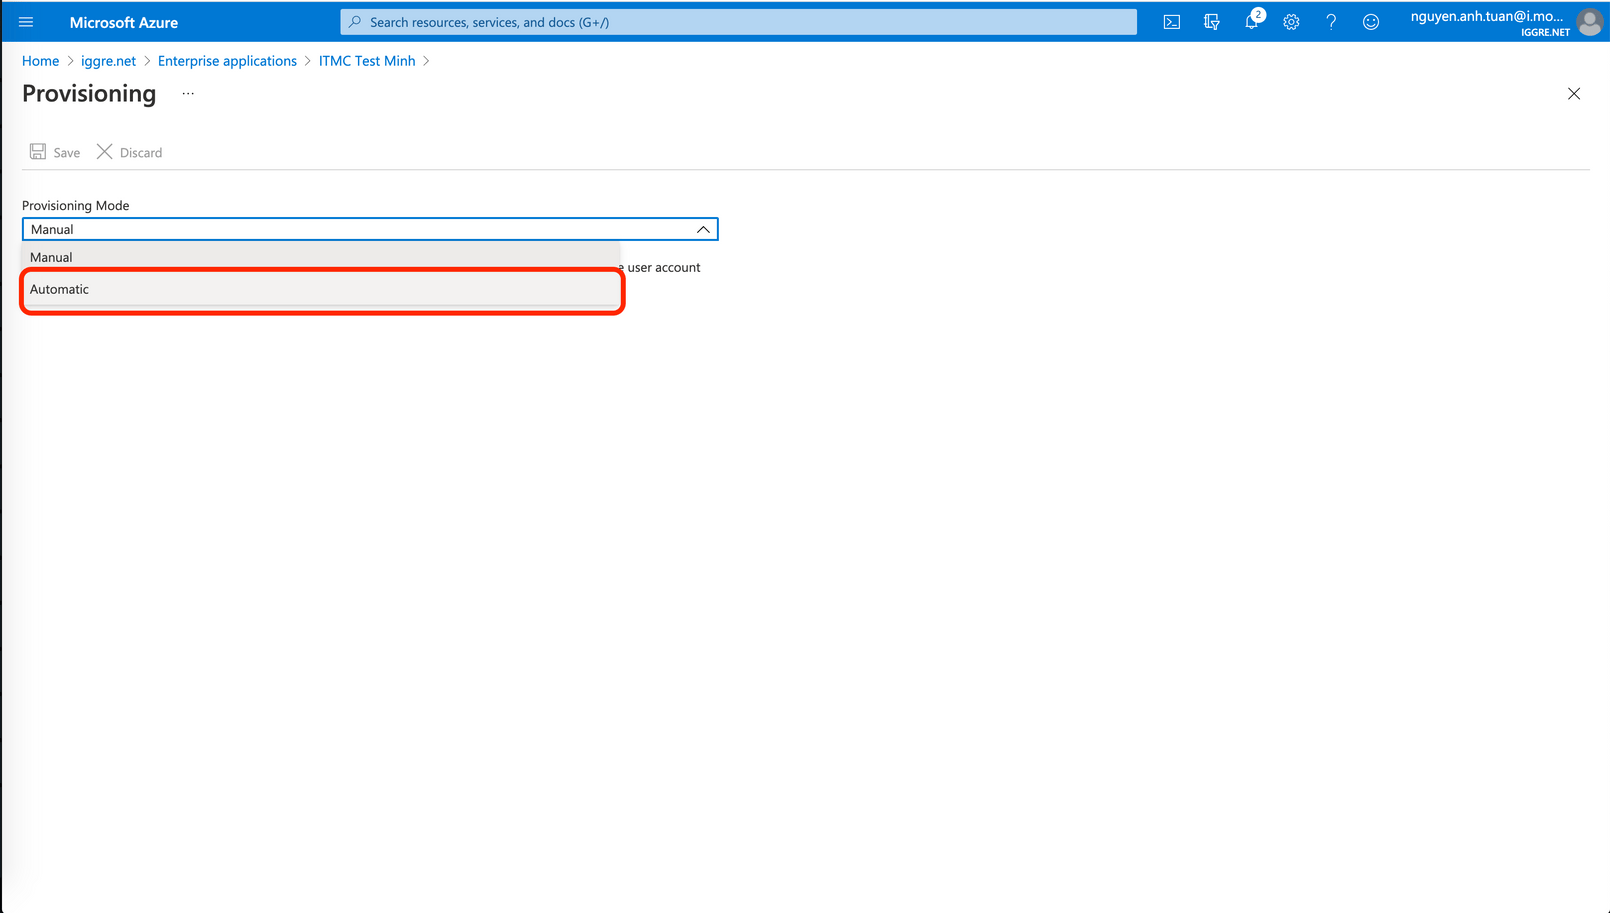
Select Automatic mode.
-
Enter the tenant URL and secret token obtained from the service.
For Select authentication method, choose Bearer authentication.
Click Save in the upper left to save the settings.
(When running Test Connection, SAML must be enabled in the service.)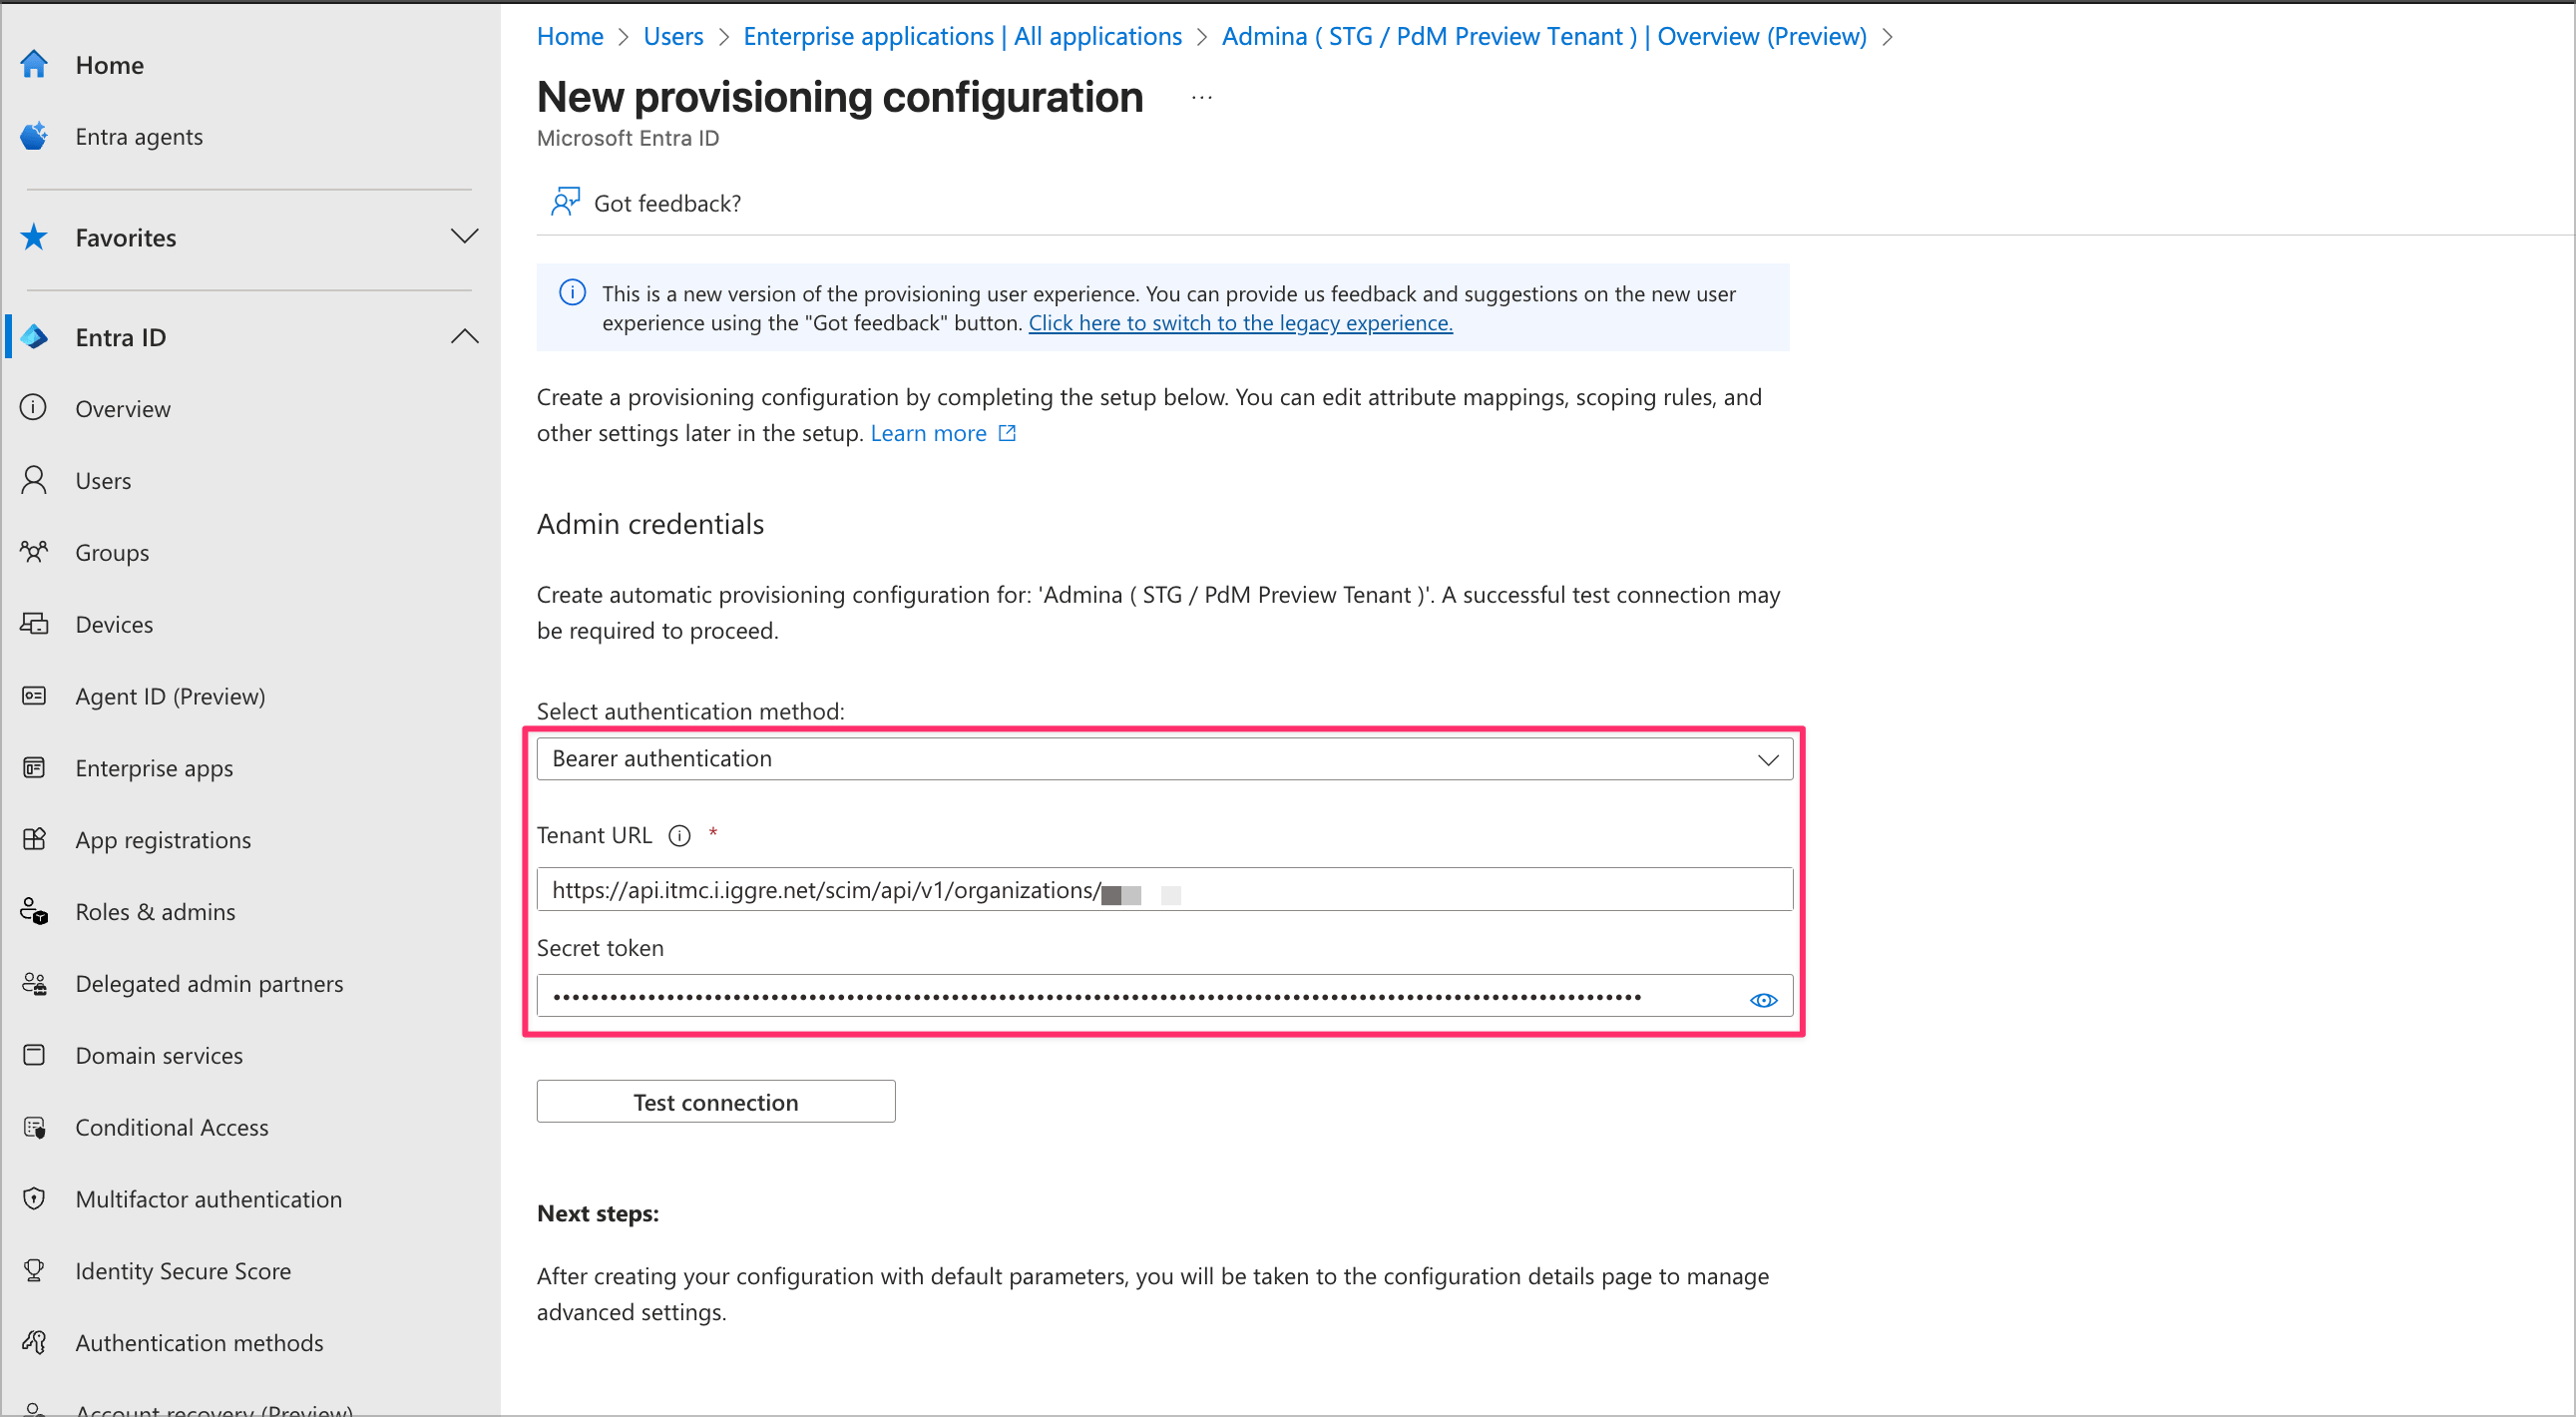
 You do not need to store the secret token elsewhere.
You can regenerate it whenever you need a new one. -
Open Mappings and disable group provisioning.

-
Select Provision Entra ID Users and configure the Microsoft Entra ID Attribute as shown in the image below.

-
Configure the attributes as shown in the image below.
Confirm that the Matching precedence foruserPrincipalNameis set to1.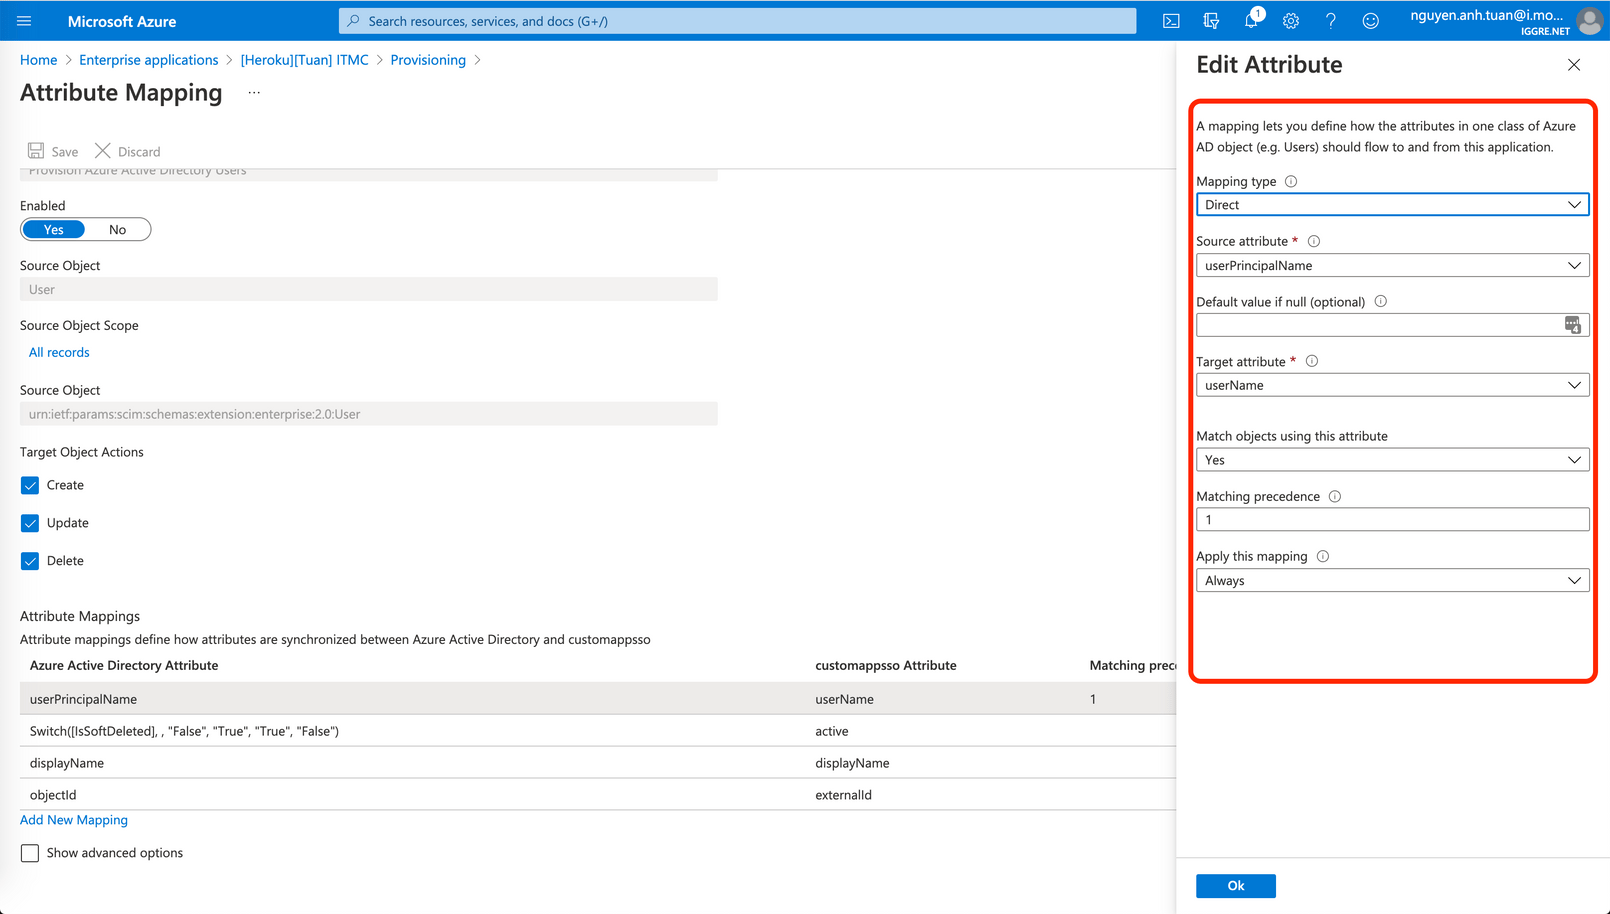
-
Click Save in the upper left again to complete the setup.
Users assigned to the application are automatically provisioned to the service.
Okta
The service now supports the Okta Integration Network (OIN), which makes configuration easier. See the setup guide here: SAML/SCIM configuration with Okta Integration Network
Supported features
| Feature | Description |
|---|---|
| Create new users | When a user is created in Okta, a corresponding user is created in the service. |
| Update user profiles | User information updated in Okta is reflected in the service. |
| Deactivate (and reactivate) or delete users | Deactivations, reactivations, and deletions in Okta are reflected in the service. |
Prerequisites
- You need to enable SAML before using SCIM. Refer to the SAML configuration guide and enable SAML in advance.
Configuration steps
-
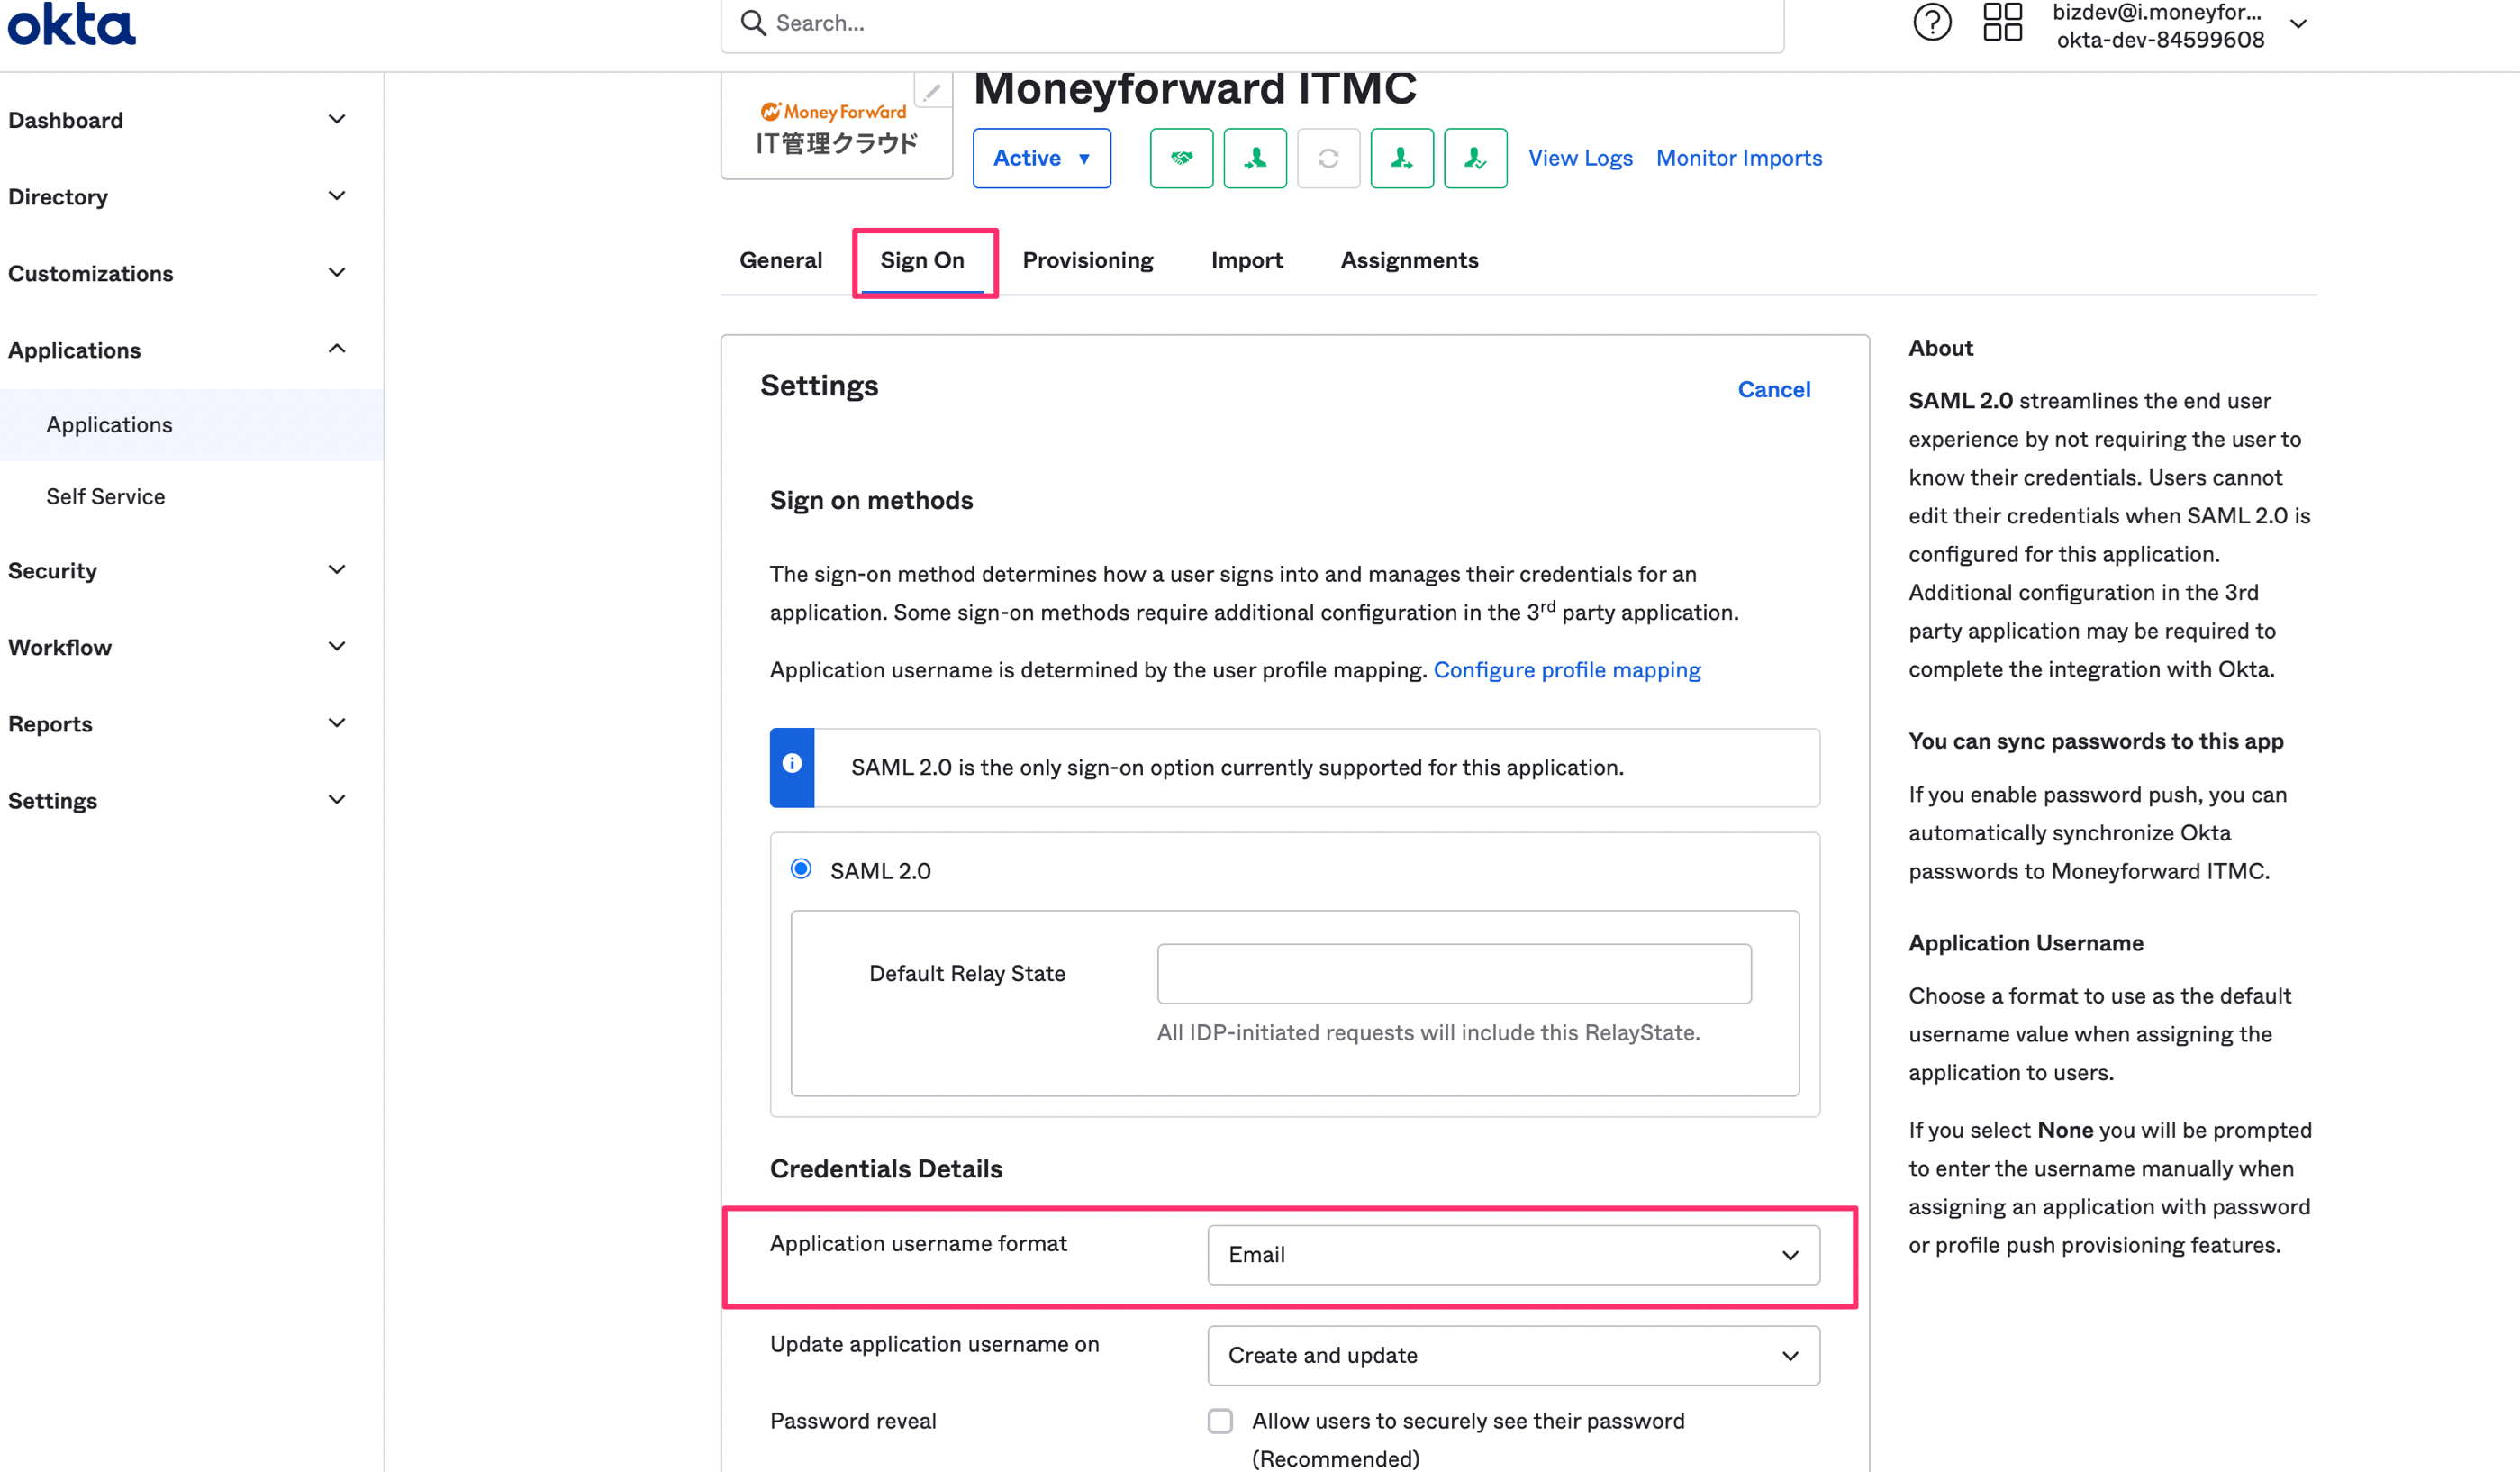
Open your application from Applications, go to the Sign on tab, and change Application username format to Email.
-
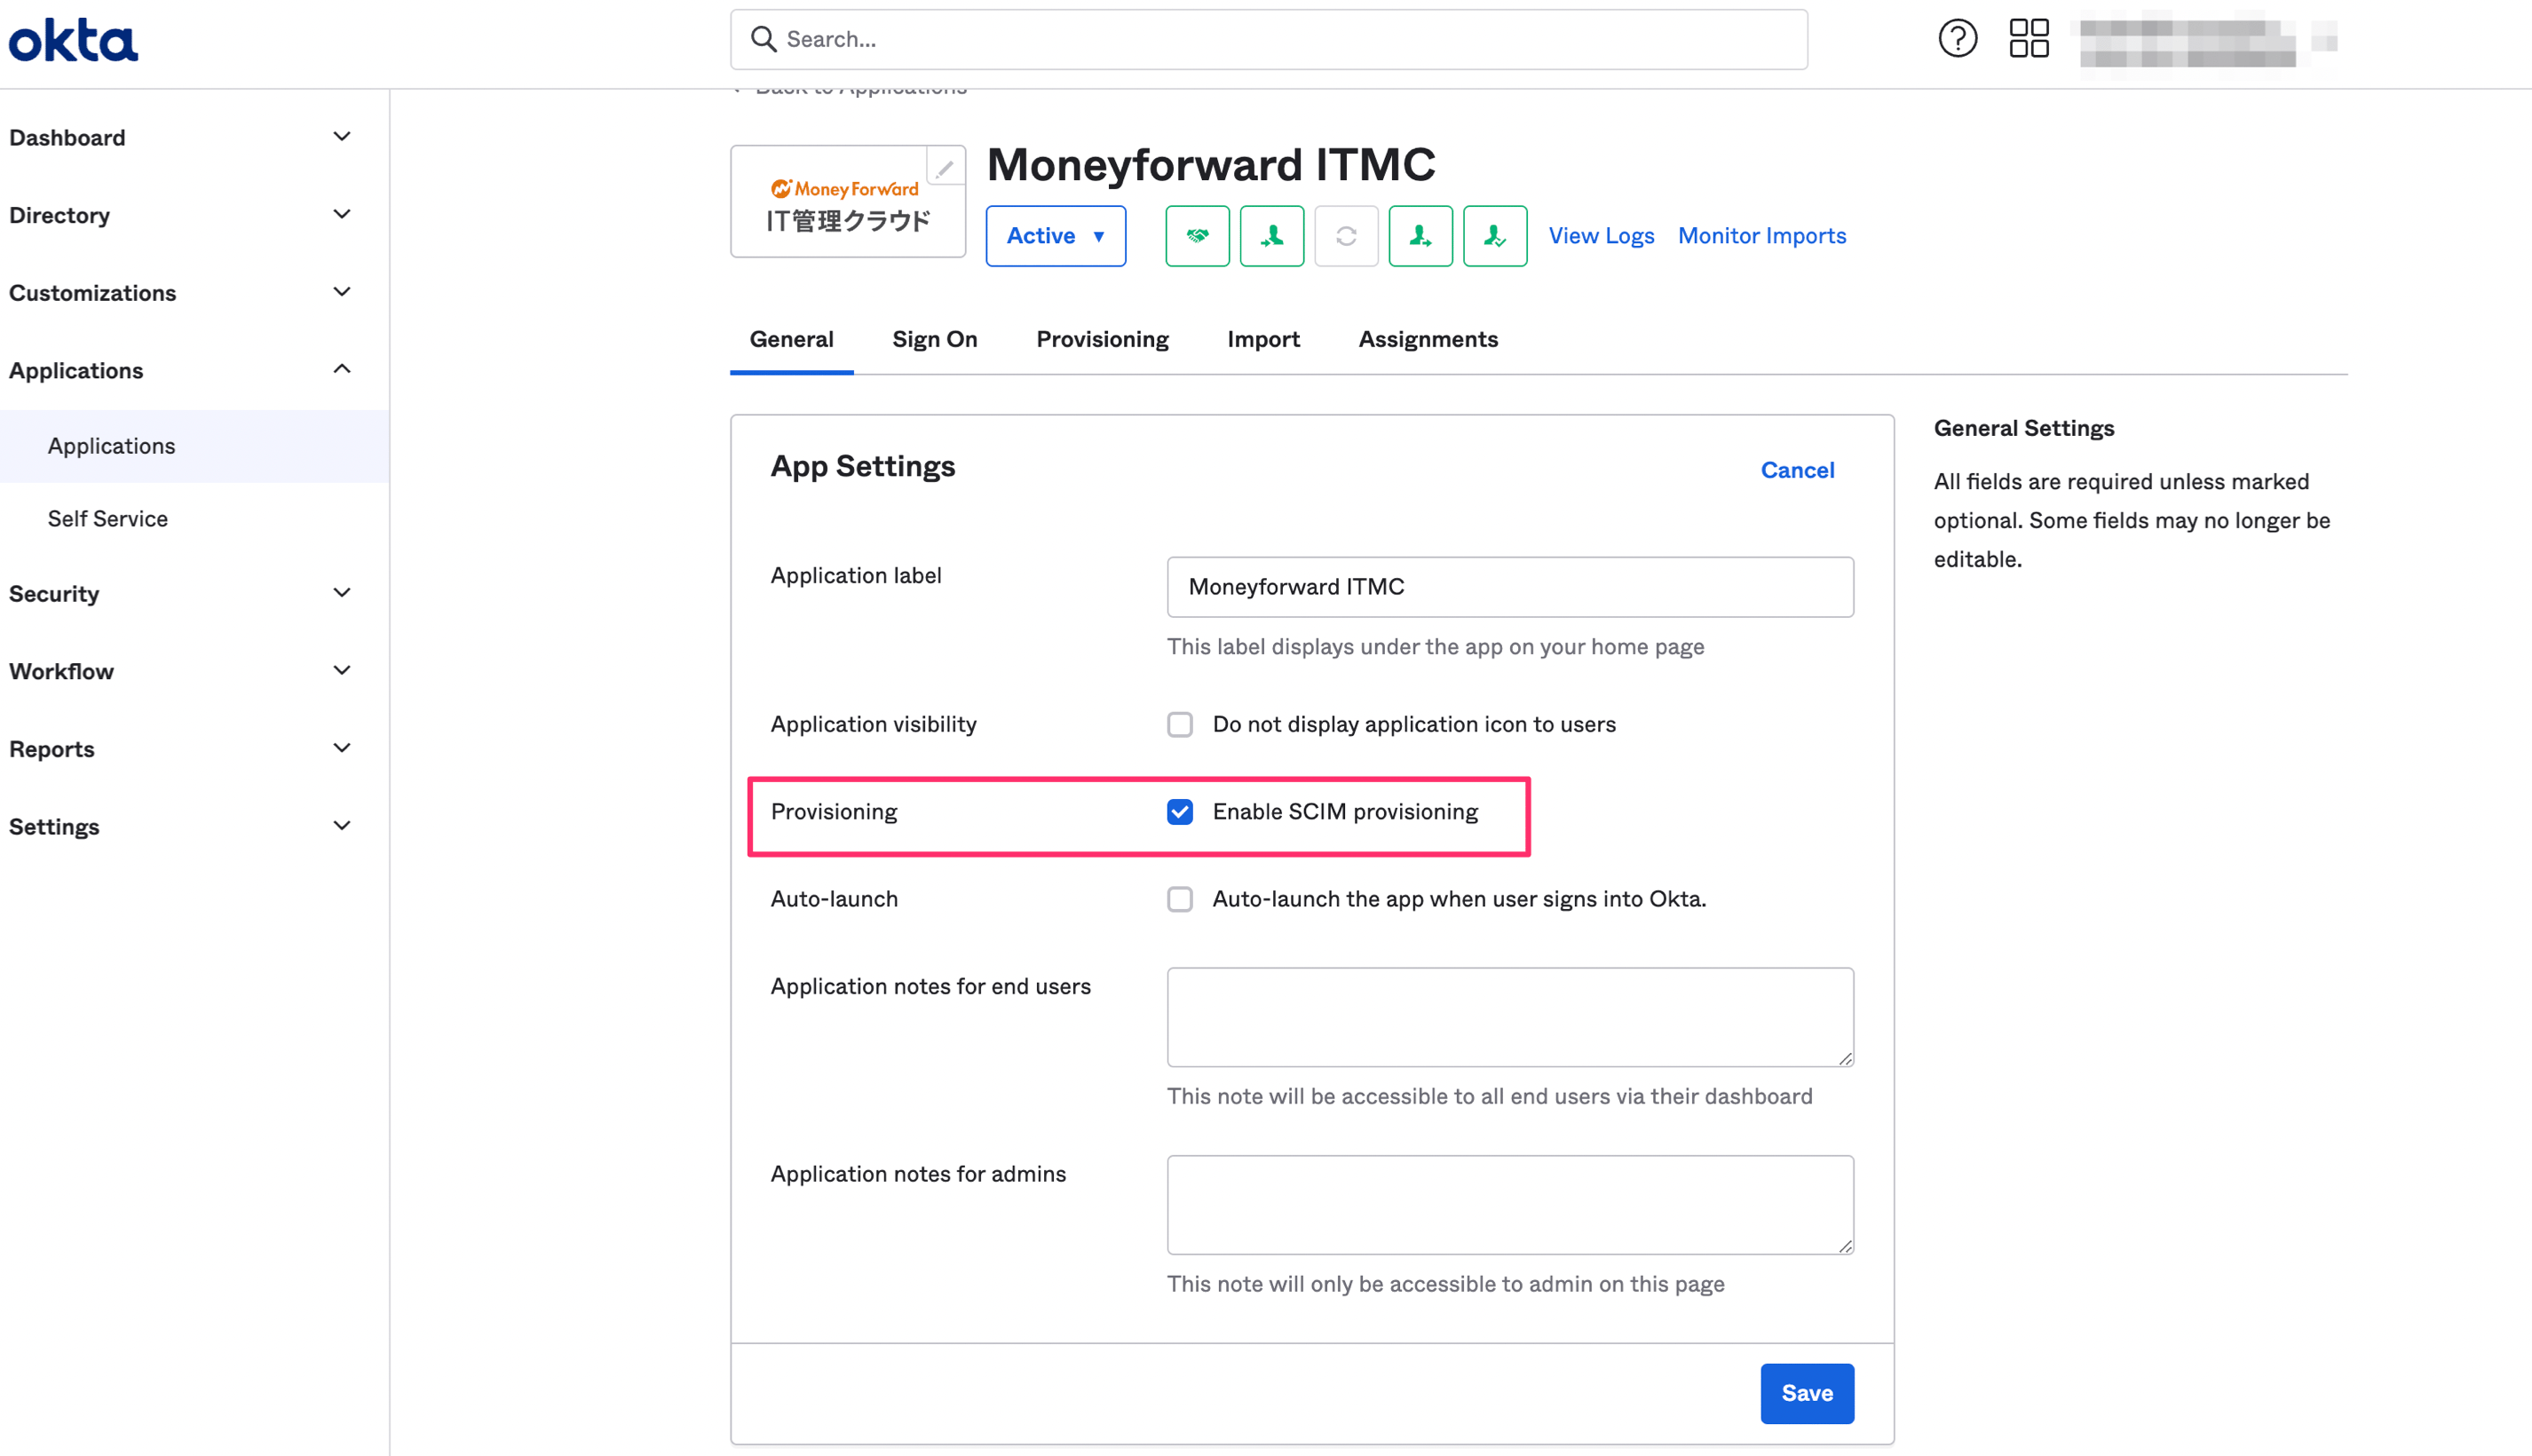
On the General tab, select Enable SCIM provisioning under Provisioning.
-
Open the Provisioning tab and enter the following information.
Field Value SCIM connector base URLEnter the Tenant URL obtained from the service Unique identifier field for usersEnter userName Supported provisioning actionsCheck the following values:
- Import New Users and Profile Updates
- Push New Users
- Push Profile UpdatesAuthentication ModeSelect HTTP Header AuthorizationEnter the Secret Token obtained from the service 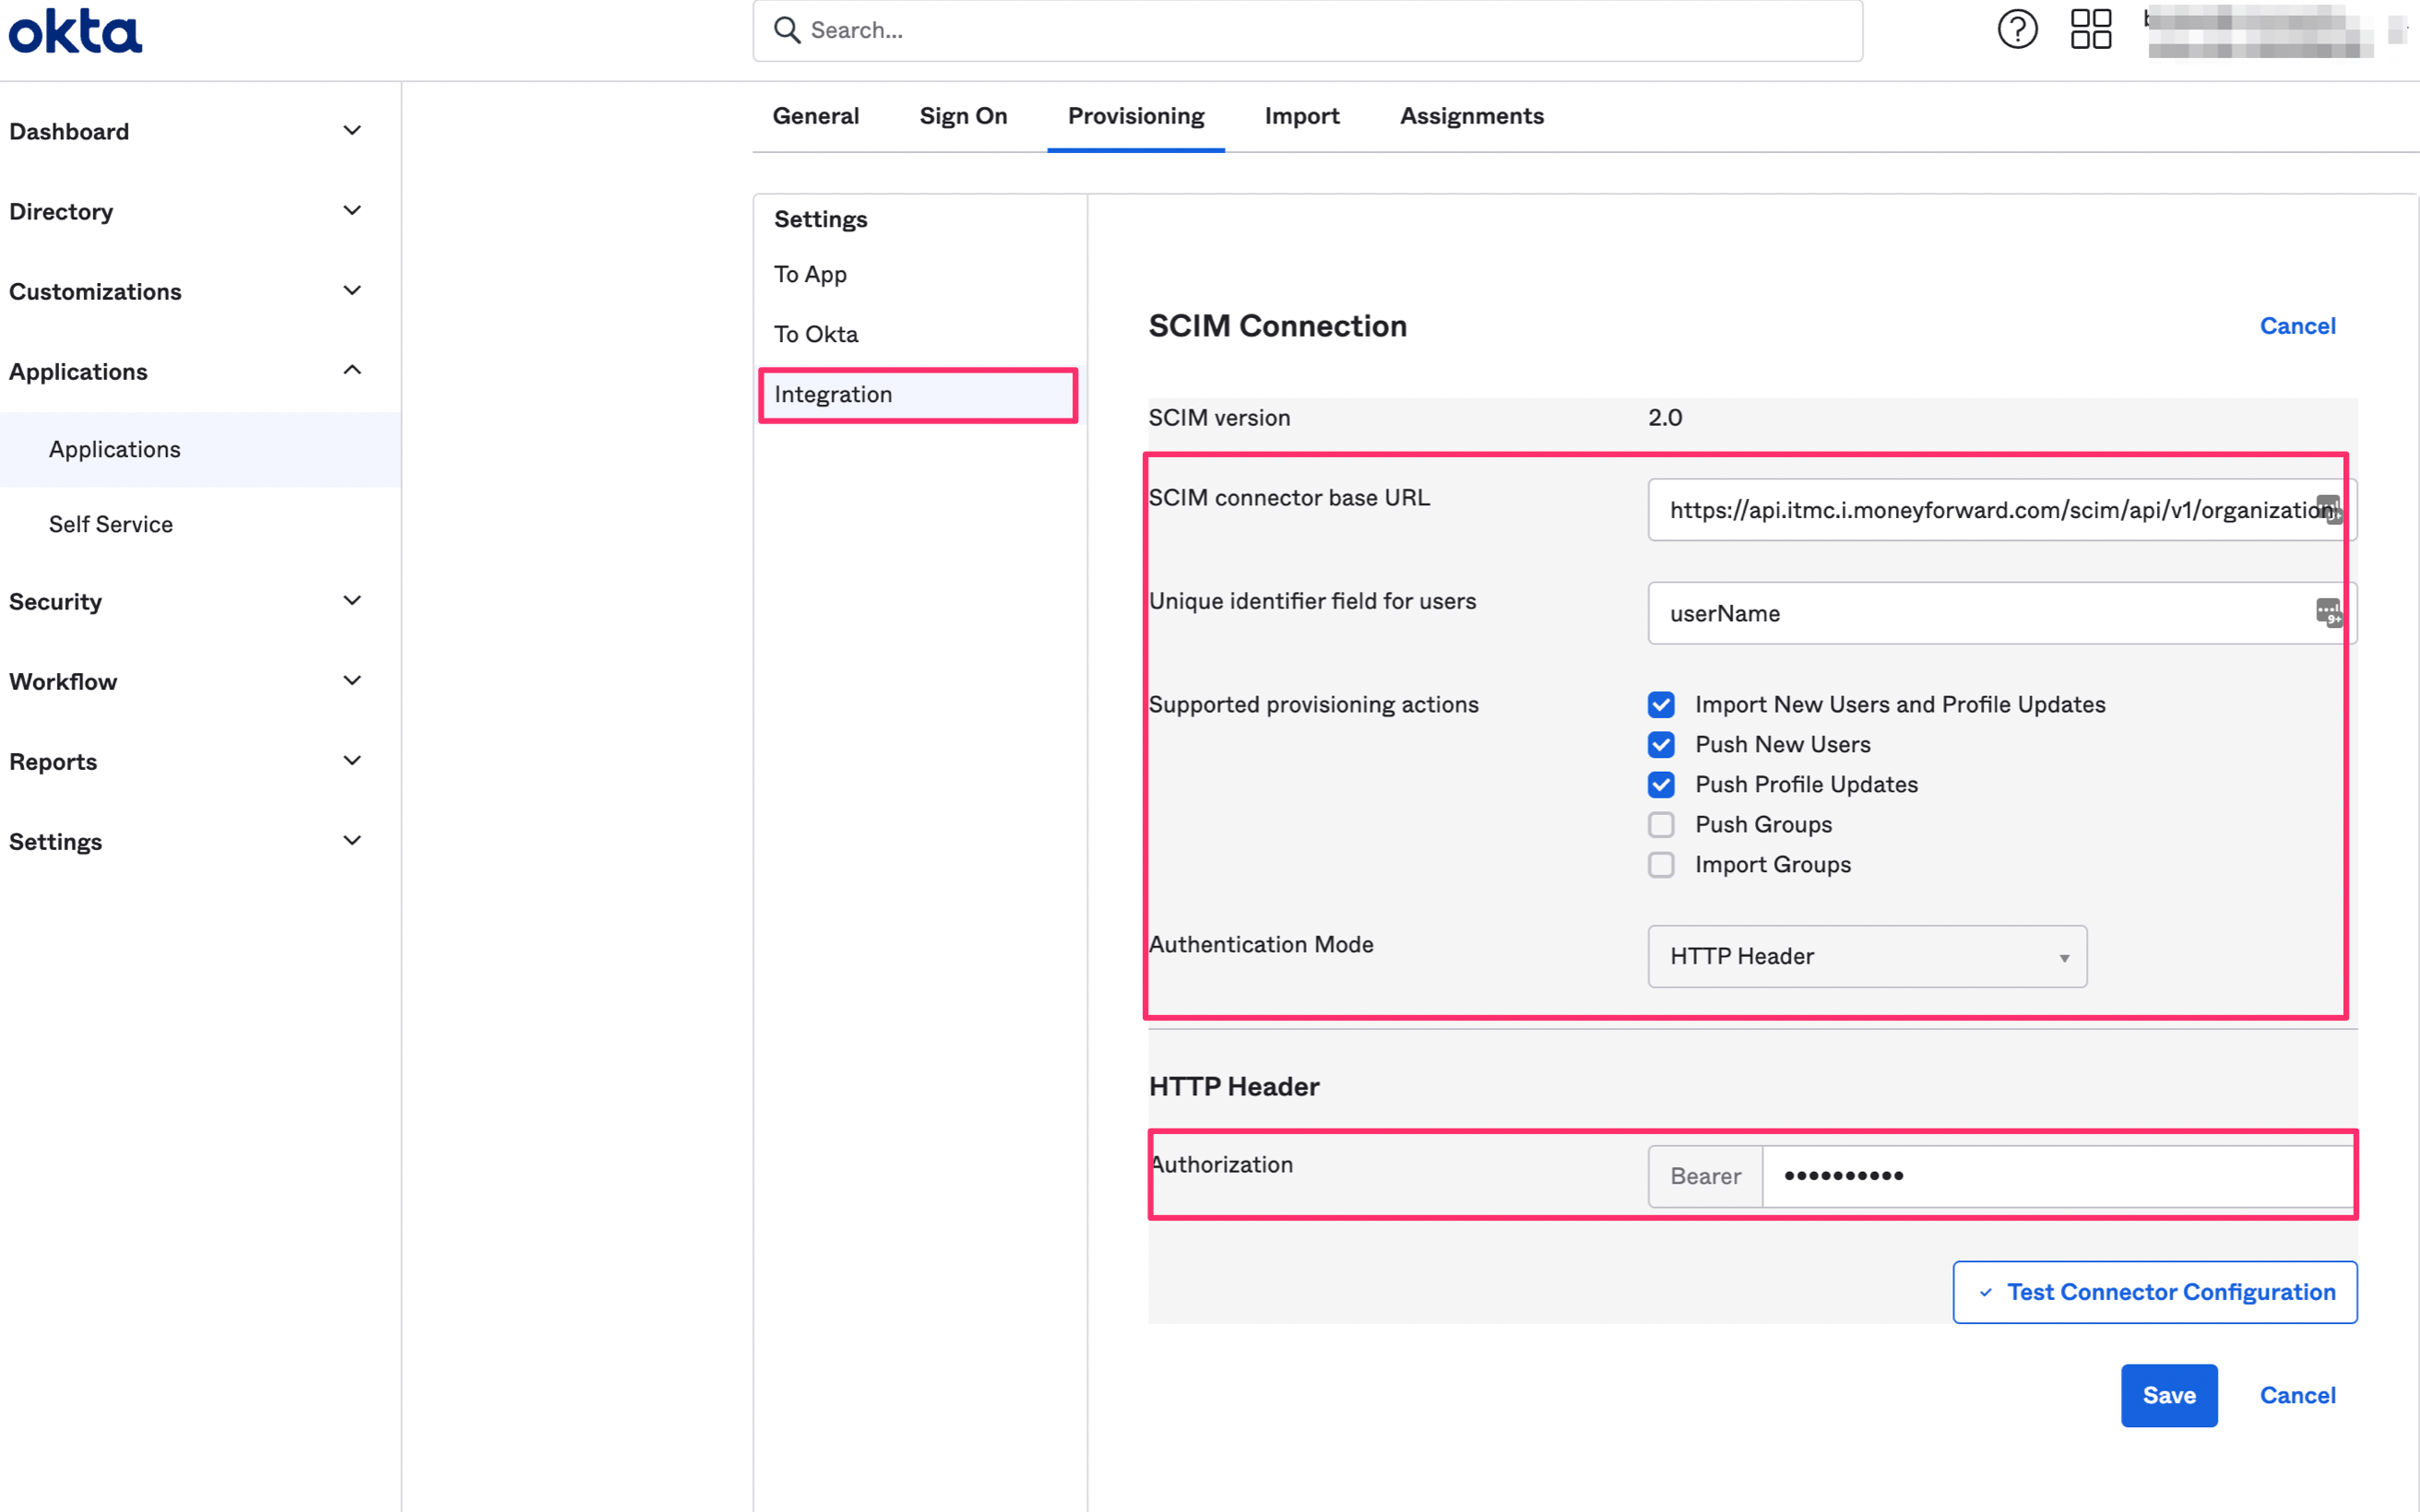
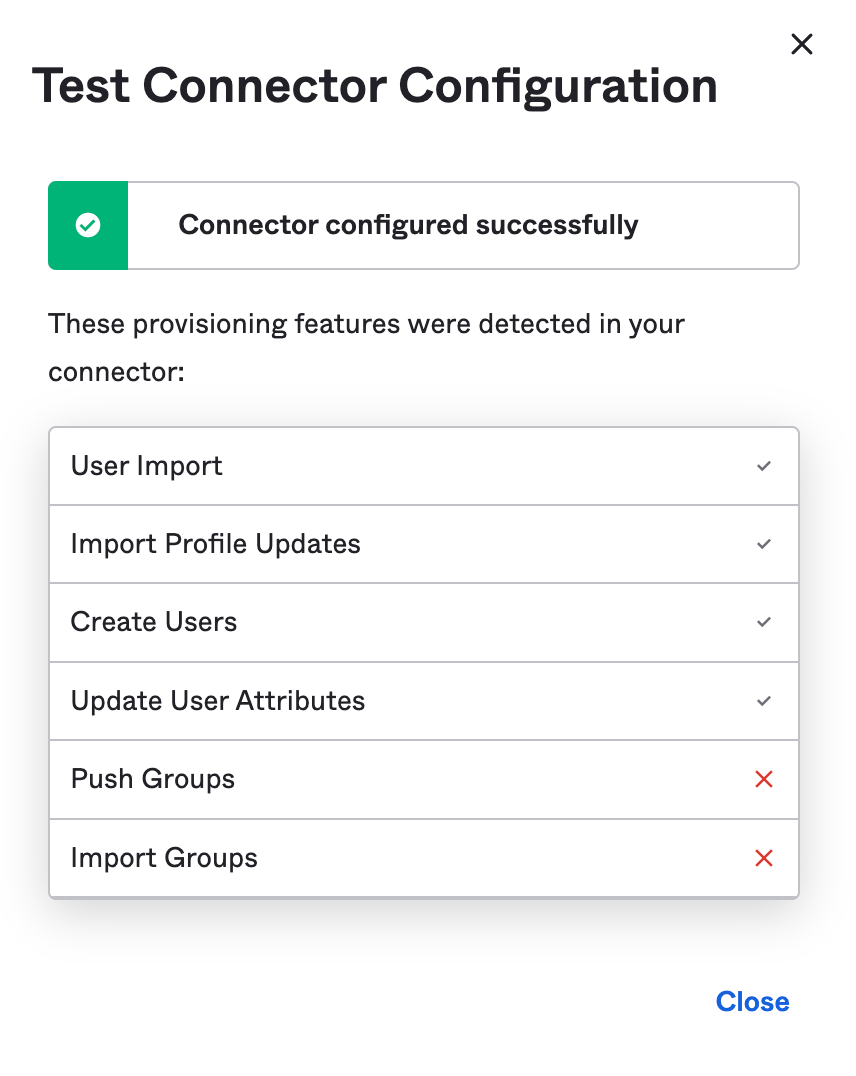
- Click Test Connector Configuration and confirm that everything succeeds except Push groups and Import groups.
-
After a successful test, click Close and save.
-
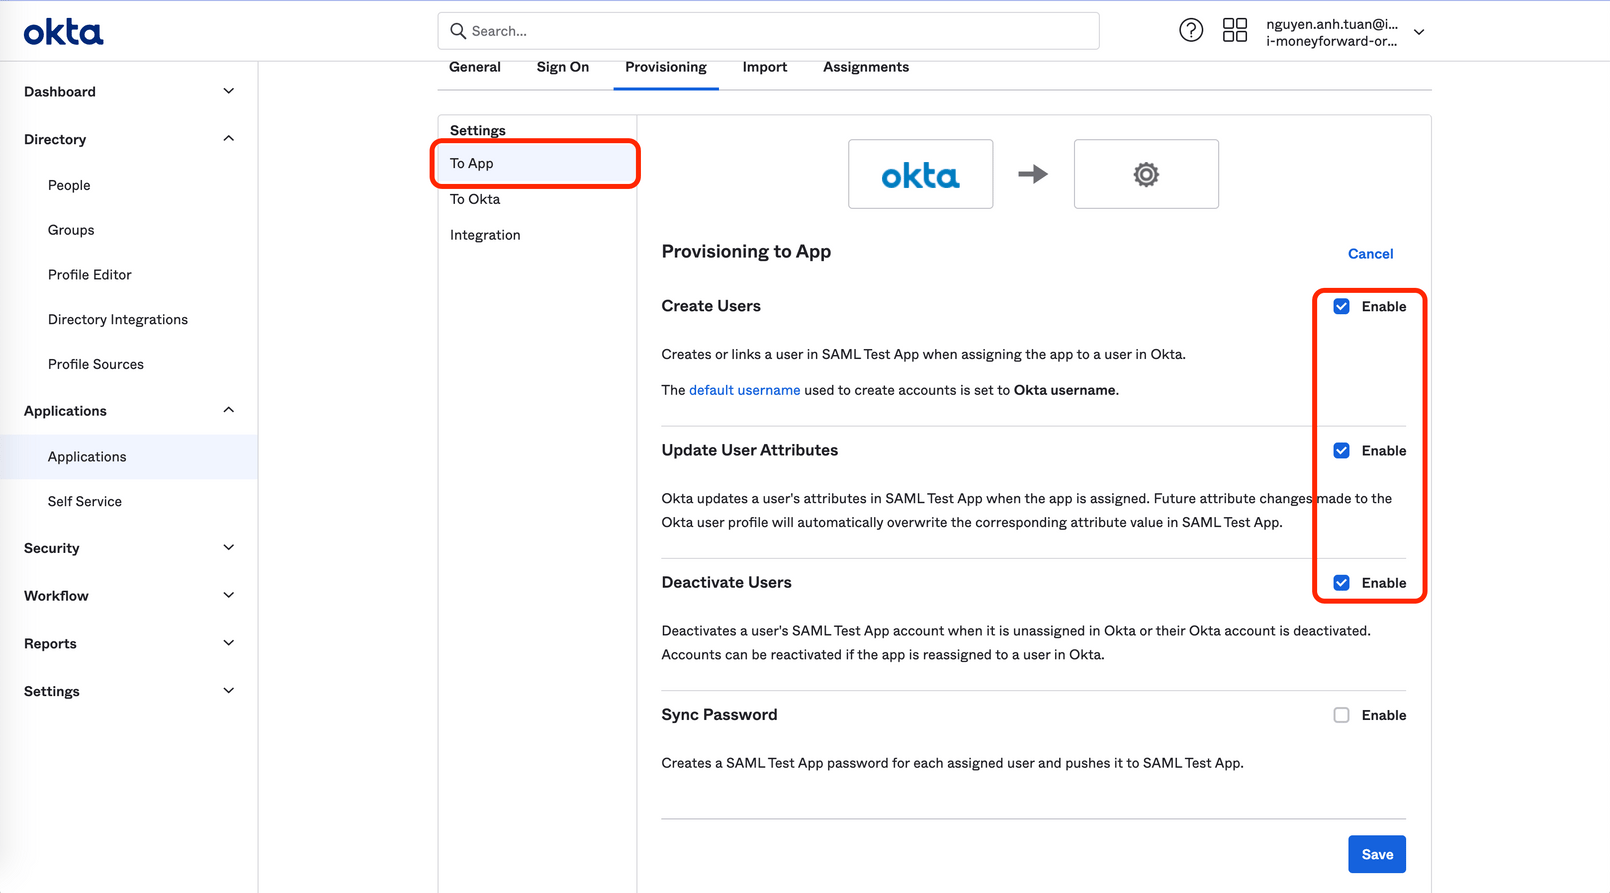
In the To App section on the next screen, enable the following:\
- Create Users\
- Update User Attributes\
- Deactivate Users
-
Scroll further down on the same screen to the Attribute Mappings section.
Match the configuration to the screenshot.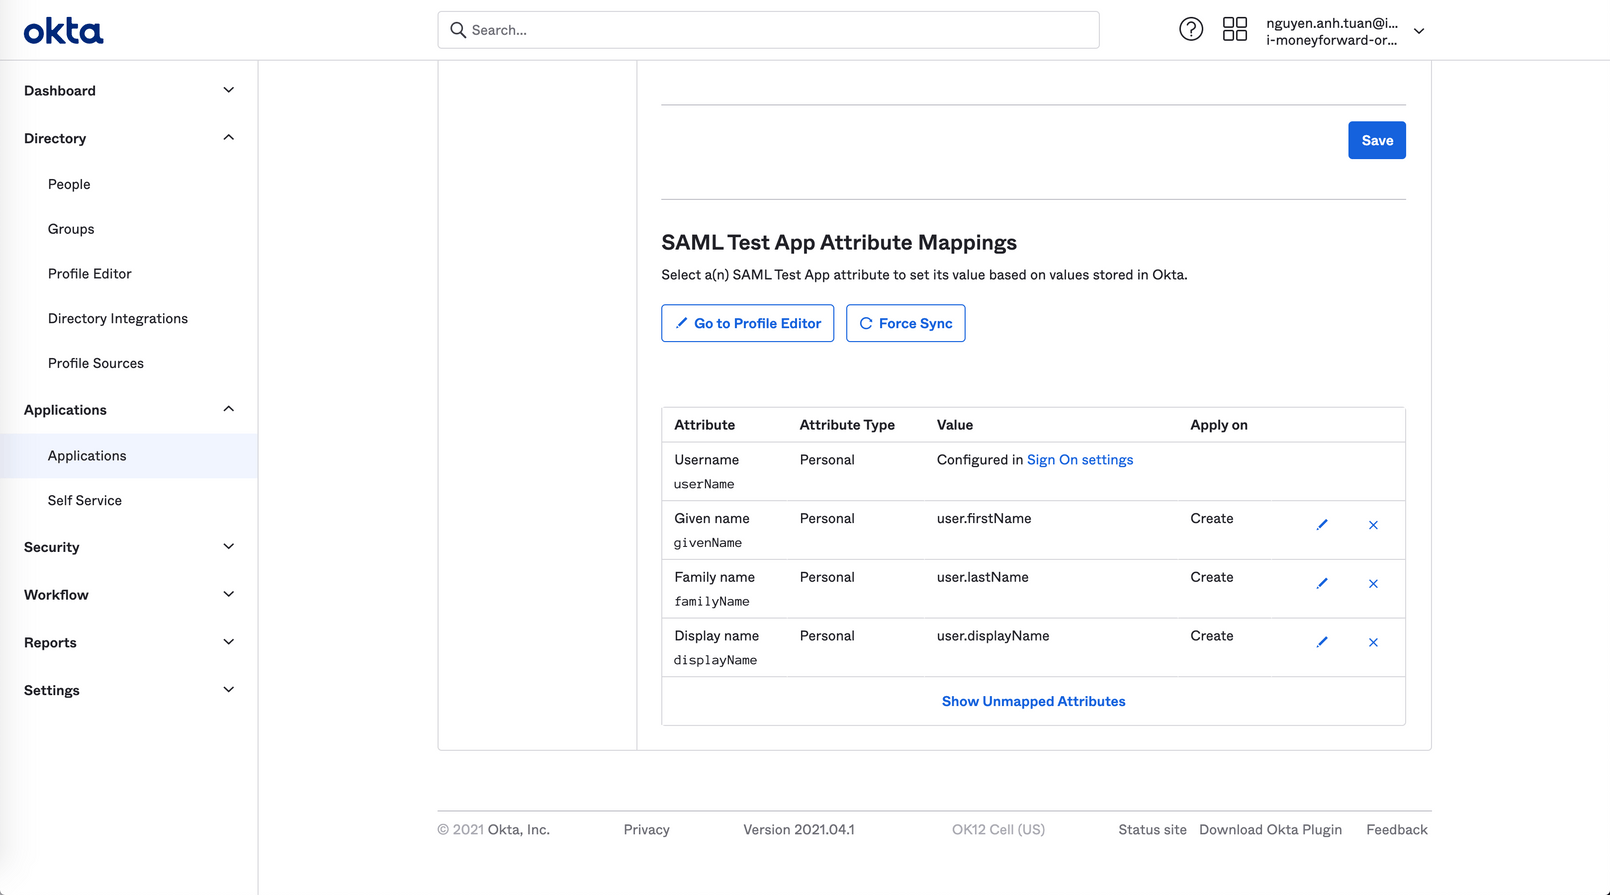
-
This completes the setup.
Users assigned to the application are automatically provisioned to the service.
Known issues and troubleshooting
The service does not yet support provisioning from the application to Okta. Leave the To Okta settings at their default (disabled).
OneLogin
OneLogin guide-
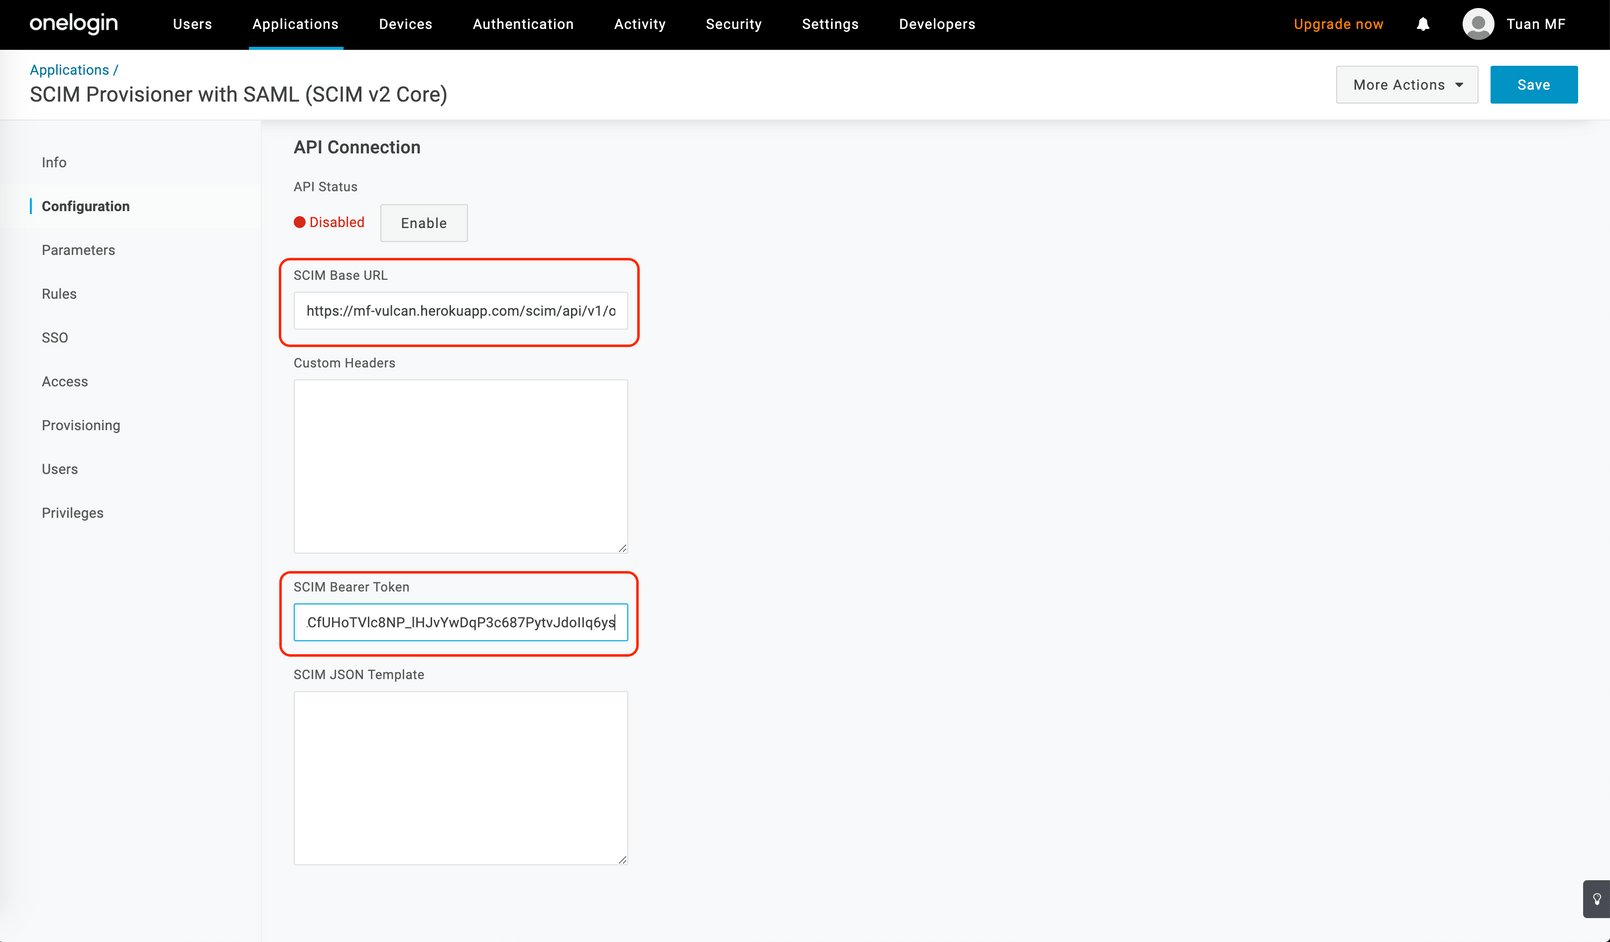
Open the Configuration page and enter the following values.
Field Value SCIM Base URLEnter the Tenant URLobtained from the serviceSCIM Bearer TokenEnter the Secret Tokenobtained from the service -
Click Enable to activate. If no errors appear, click Save.
-
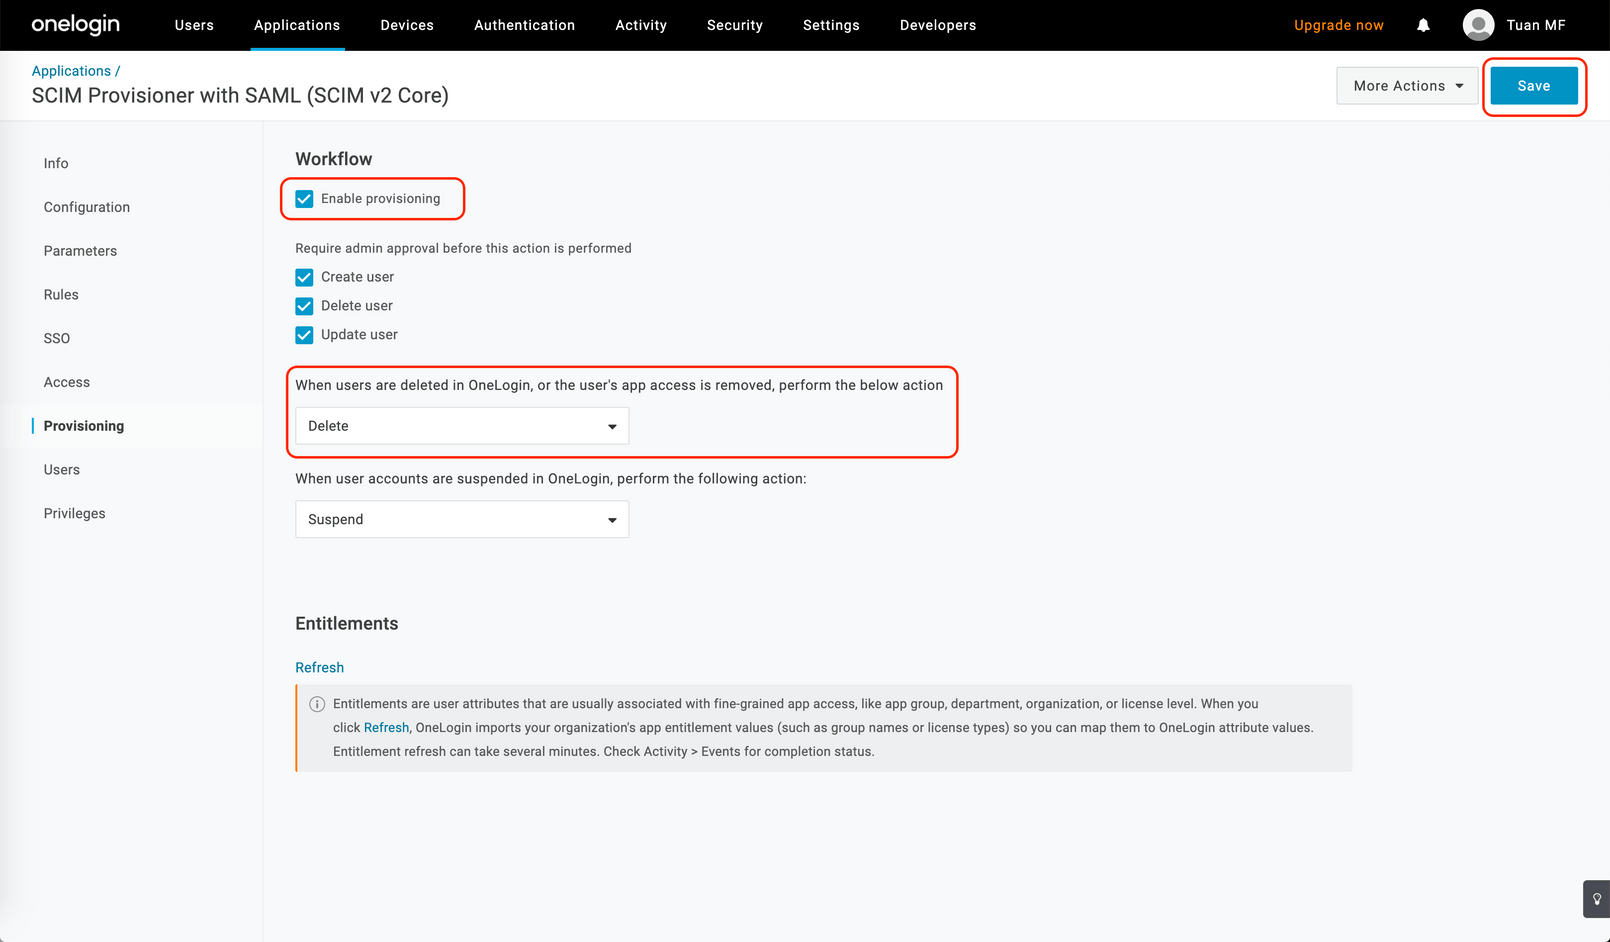
Open the Provisioning page.
Enable Enable provisioning.
Optionally, change what happens when a user is deleted in OneLogin. -
Save the settings.
-
This completes the setup.
Users assigned to the application are automatically provisioned to the service.